Welcome to the final lesson in our first module on foundational skills. So far, we have focused on deconstructing objects into their basic geometric shapes and then meticulously tracing their outlines through contour drawing. These methods train your eye to see the "positive" space—the object itself. Today, we'll explore a powerful complementary technique: drawing the "negative" space.
This lesson is about learning to see and draw the shapes around and between the parts of an object. This may seem counter-intuitive, but it is one of the most effective methods for improving your observational accuracy. Your brain is wired to identify and label things—a "nose," a "chair," a "hand"—and then recall a simplified symbol for that thing. By focusing on the unnamed, abstract shapes of the background, you can bypass this cognitive shortcut and draw what is actually there. This is like debugging your own visual processing system to get raw data instead of a cached, simplified version.
By the end of this lesson, you will be able to identify and sketch the negative space around an object, using it as a tool to define the object's true shape with much greater precision. This skill completes our foundational toolkit for "seeing like an artist" and prepares us for the next stage of creating three-dimensional form.
What is Negative Space?
The concept is best understood visually. Look at the famous optical illusion below.
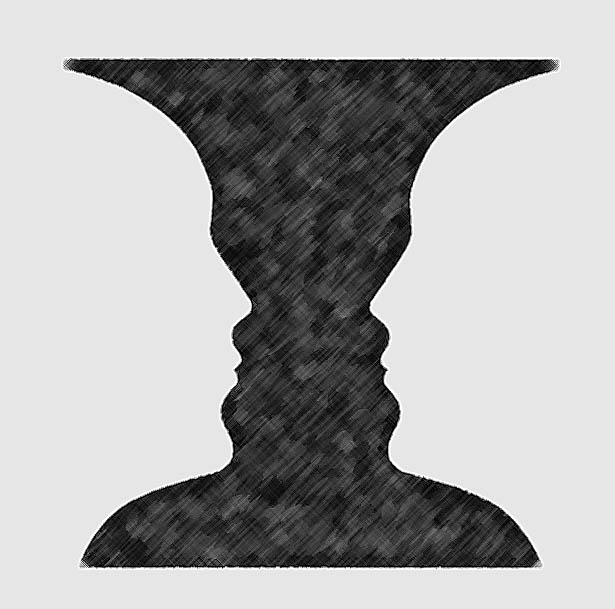
Your perception flips between the two interpretations. When you see the vase, the white area is the background, or negative space. When you see the faces, the black area is the negative space. In drawing, the object you are focused on is called the positive space, and everything else—the background, the air, the gaps between parts—is the negative space.
To get a formal definition and understand why this is so beneficial for an artist, let's turn to a short article on the topic.
Negative Space Drawing - A Practical Beginner's Guide (2024)
This guide from "How to Practice Drawing" clearly defines the concept and its applications.
Please read the first two sections: What Is Negative Space? and the list of benefits under Why Should You Draw Negative Space?. Notice that "Help create 'likeness'" and "Improve accuracy" are listed as key benefits—this directly addresses our goal of drawing realistic portraits.
The core idea is that the edge of the negative space is the edge of the positive space. By drawing one, you automatically define the other. Since your brain has no pre-existing symbol for "the weird shape between the chair leg and the floor," you are forced to observe it purely as an abstract shape, which leads to a more accurate drawing.
The following video provides an excellent visual walkthrough of this mental shift.
Learn to see Negative Space and draw everything better: How to Draw #7
This video from Sketchbook Skool clearly explains the "why" behind using negative space.
Watch the first few minutes, from the introduction using the vase illusion, through the explanation of how this technique helps you bypass your brain's labeling habit. The examples of the plant, buildings, and the man on the dock are great illustrations of how negative space simplifies complex scenes.
Exercise 1: Drawing an Object by its Absence (25 minutes)
Now it's time to put this into practice. The classic subject for this exercise is a chair, because it's a familiar object that is surprisingly difficult to draw accurately due to its many angles, overlapping parts, and perspective.

First, let's watch the instructor from the previous video demonstrate how to tackle a chair drawing using this method.
Learn to see Negative Space and draw everything better: How to Draw #7
This is a practical demonstration of how to apply the negative space concept to a real-world object.
Watch the chair drawing segment. Observe how the instructor ignores the "chair-ness" of the chair and instead focuses on plotting out the abstract shapes he sees between the legs, rungs, and the floor. Notice how drawing these simple, abstract shapes collectively builds an accurate representation of the complex object.
Your Turn: The Chair Exercise
- Find your subject: Locate a simple chair in your home. A basic kitchen or dining chair with open spaces between the legs and back is ideal.
- Set your viewpoint: Sit down in front of the chair. Don't worry about perfect perspective, just find a spot where you can clearly see the shapes of the space around and through it.
- Start with one negative shape: Look at the chair and identify a single, clear negative shape. A good starting point is often the triangular shape between a back leg, a front leg, and the floor.
- Draw that shape: On your paper, draw only that abstract shape. Don't think "I'm drawing the floor and legs"; think "I'm drawing a crooked triangle."
- Build from there: Now find an adjacent negative shape that shares an edge with the one you just drew. Draw this new shape, using the line you've already made as a common boundary.
- Continue the puzzle: Keep adding negative shapes. Draw the space between the rungs of the backrest. Draw the shape of the wall you see to the left or right of the chair's silhouette. You are essentially building a jigsaw puzzle where the pieces are empty space. The chair will emerge as the part of the paper you leave blank.
- Spend about 15-20 minutes on this. Resist the urge to draw the chair's outlines directly. Trust the process. The resulting drawing is a record of your observation, not a finished product.
Exercise 2: Using a Viewfinder for Organic Shapes (20 minutes)
The chair is great for understanding geometric relationships. Now let's apply the same principle to more complex, organic forms, using a helpful tool called a viewfinder. This technique introduces a structured framework—a coordinate system—to help you manage a complex scene.
The following video demonstrates this method using leaves.
More Negative Space Exercises - Drawing on the right side of the Brain - theartproject (2019)
This video from theartproject shows a methodical way to tackle complex subjects using a viewfinder and crosshairs to isolate and organize negative shapes.
Watch the demonstration of the leaf drawing exercise. Pay close attention to how the instructor creates a viewfinder with crosshairs. This divides the scene into four manageable quadrants, making it much easier to accurately place the abstract negative shapes.
Your Turn: The Viewfinder Exercise
- Create a viewfinder: Take a piece of card or stiff paper (an index card works well) and cut a rectangular window in the center (e.g., 2x3 inches). Use your pencil to draw a horizontal and a vertical line across the window, creating crosshairs.
- Set up your subject: Choose a subject with some organic complexity. A small houseplant, a crumpled t-shirt, or your non-drawing hand in a relaxed pose are all excellent choices.
- Frame your composition: Close one eye and look at your subject through the viewfinder. Move the viewfinder closer or further away until you have an interesting arrangement of positive and negative shapes framed in the window.
- Prepare your drawing paper: Lightly draw corresponding crosshairs on your paper, dividing it into four quadrants. Make this rectangle larger than your viewfinder window (e.g., 4x6 inches) to scale up your drawing.
- Draw the negative space, quadrant by quadrant: Look through your viewfinder at the top-left quadrant of your subject. Draw only the negative shapes you see in that quadrant onto the top-left quadrant of your paper. Use the crosshairs as reference points to check alignment and scale. Proceed through the other three quadrants in the same way.
- Spend about 15 minutes on this. You will likely find that the viewfinder and crosshairs make it much easier to place the shapes accurately.
Tying it Back to Portraiture
How does drawing the space around a chair help you draw a face? The principle is identical. The unique likeness of a person is defined by the precise curves of their profile. Trying to draw a "nose" can be difficult, but drawing the abstract shape of the air between the tip of the nose and the lips can often be easier and more accurate.
Let's look at a concrete example of this.
Negative Space Drawing - A Practical Beginner's Guide (2024)
This example directly connects negative space drawing to our course goal.
In the article we viewed earlier, find the section "Application 2: Contour Design" and read the short paragraph about the side profile. This shows precisely how focusing on the background shape can help you capture the specific silhouette of a person's face.
This technique is invaluable for capturing the subtle angles of a jawline, the specific curve of a forehead, or the space between the chin and the neck. It's a fundamental tool for achieving likeness.
Conclusion
In this lesson, you've added a final and crucial tool to your observational arsenal. By learning to see and draw negative space, you've discovered a way to trick your brain into a state of pure observation, dramatically improving your accuracy.
Here are the key takeaways from this lesson and our entire first module:
- Negative space is the area around and between objects, and drawing it is a powerful method for accurately defining the object itself.
- This technique works by forcing your brain to see abstract shapes instead of relying on familiar, simplified symbols.
- The skills you've built—pencil control, seeing in shapes, contour drawing, and now negative space—form the complete foundation for how to see like an artist.
You have now completed the first module, "Foundational Skills: Seeing and Drawing." You've built a solid base for observing the world in terms of line and shape. In our next lesson, we will begin Module 2: Creating Form: Light and Shadow. We'll move beyond line drawing and start exploring how to make objects look three-dimensional. Our very first step will be to learn how to create a full range of tones with your pencil by creating a value scale.