Hello! Welcome back to our module on The Push-Up Bra: Engineering Lift and Volume.
In our last lesson, we defined the core purpose of a push-up bra: to provide lift, enhance volume, and create cleavage. We established that these effects are achieved through a carefully engineered system of strategic padding, angled cups, and supportive underwire.
Today, we'll build directly on that foundation to explore the "how." We'll focus on the engineering principles that allow designers to create a spectrum of enhancement, from a gentle boost to a dramatic transformation. Our goal is to explain how graduated padding placement and cup angle create different levels of lift.
Graduated Padding: The Engine of Lift
The "magic" of a push-up bra lies in its padding, but not just its thickness. The key is that the padding is graduated—it is strategically placed and shaped to be thicker in some areas and thinner in others, creating a wedge that repositions breast tissue.
To see how this is categorized in the industry, please read the following guide. It introduces a "level" system that quantifies the amount of lift based on the padding design.
Push-Up Bra Guide - Shyaway.com
This section from the 'Push-Up Bra Guide' on Shyaway.com clearly breaks down the different levels of push-up padding. This will provide a structured framework for understanding how padding amount corresponds to the degree of lift.
Please read the section titled 'Based on the thickness of the padding'. Focus on the definitions of Level 1, Level 2, and Level 3, paying attention to the description of how much of the cup is padded and the resulting effect on bust size.
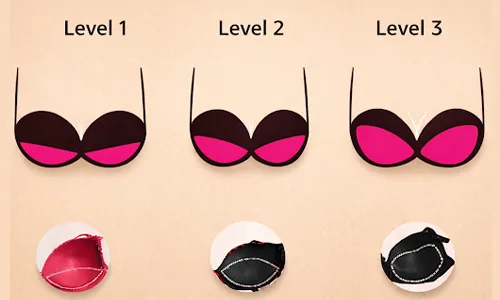
As you've just read, the industry uses a simple system to classify the intensity of the push-up effect:
- Level 1 (Subtle Lift): Uses minimal padding, often concentrated in the bottom third of the cup, to provide a gentle, natural-looking lift.
- Level 2 (Moderate Lift): Features more significant padding that covers the bottom half of the cup, providing a noticeable lift and shaping effect, often with enhanced cleavage.
- Level 3 (Maximum Lift): Contains the most padding, sometimes covering up to three-quarters of the cup, designed for a dramatic increase in volume (up to two cup sizes) and pronounced cleavage.
This image provides a great visual summary of the concept.
Beyond Thickness: The Physics of Placement and Angle
While padding volume is important, its precise placement and the angle of the cup are what truly direct the force to achieve specific aesthetic goals: lift (vertical push) versus cleavage (medial push).
In the previous lesson's video from HerRoom, you saw the difference between a traditional lens-shaped pad at the bottom (creating lift) and a crescent-shaped pad at the bottom and sides (creating lift and cleavage). This distinction is critical.
A fascinating academic study provides a quantitative look at this phenomenon. Researchers compared two bras: one with a thin, uniform 13mm cup ("Bra A") and one with a thicker 23mm cup that had more mass on the lateral side ("Bra B"). Given your background in statistics, you might find their data-driven conclusions particularly insightful.
Comparative Morphological Evaluation of Young Women's Breast ...
This research paper, 'Comparative Morphological Evaluation of Young Women's Breast-Bra Reshaping,' offers a scientific analysis of how different cup thicknesses affect lift and gathering. We won't read the whole paper, but we'll focus on the key findings from the discussion.
Please read the 'Discussion' sections 4.1 ('Comparison of Breast Ptosis') and 4.2 ('Comparison of Breast Separating'), and the first paragraph of the 'Conclusions' (Section 5). Focus on why the thin bra was better at lifting and the thick bra was better at gathering (creating cleavage).
The study's findings reveal a crucial design trade-off:
- For Maximum Lift (Anti-Ptosis): The thinner bra (Bra A) performed better, lifting the breasts by an average of 2.16 cm. The researchers theorize this is because the padding at the bottom provides a primarily vertical, upward force.
- For Maximum Cleavage (Gathering): The thicker bra (Bra B), with more padding on the outer side, was superior. It pushed the breasts inward by 2.15 cm. This is because the lateral padding creates both a vertical and a lateral (inward) force component.
This confirms that as a designer, you can fine-tune the final silhouette by manipulating where you place the bulk of the padding.
- Padding at the base of the cup = Maximizes vertical lift.
- Padding at the sides/outer cup = Maximizes inward push for cleavage.
Translating Theory to Pattern: The Power Bar
These forces are not only created by foam inserts but can also be engineered directly into the pattern of the bra itself. A common technique for this is the use of a "power bar." This is a specially shaped panel, often made of a rigid or non-stretch fabric, that is integrated into the side of the bra cup.
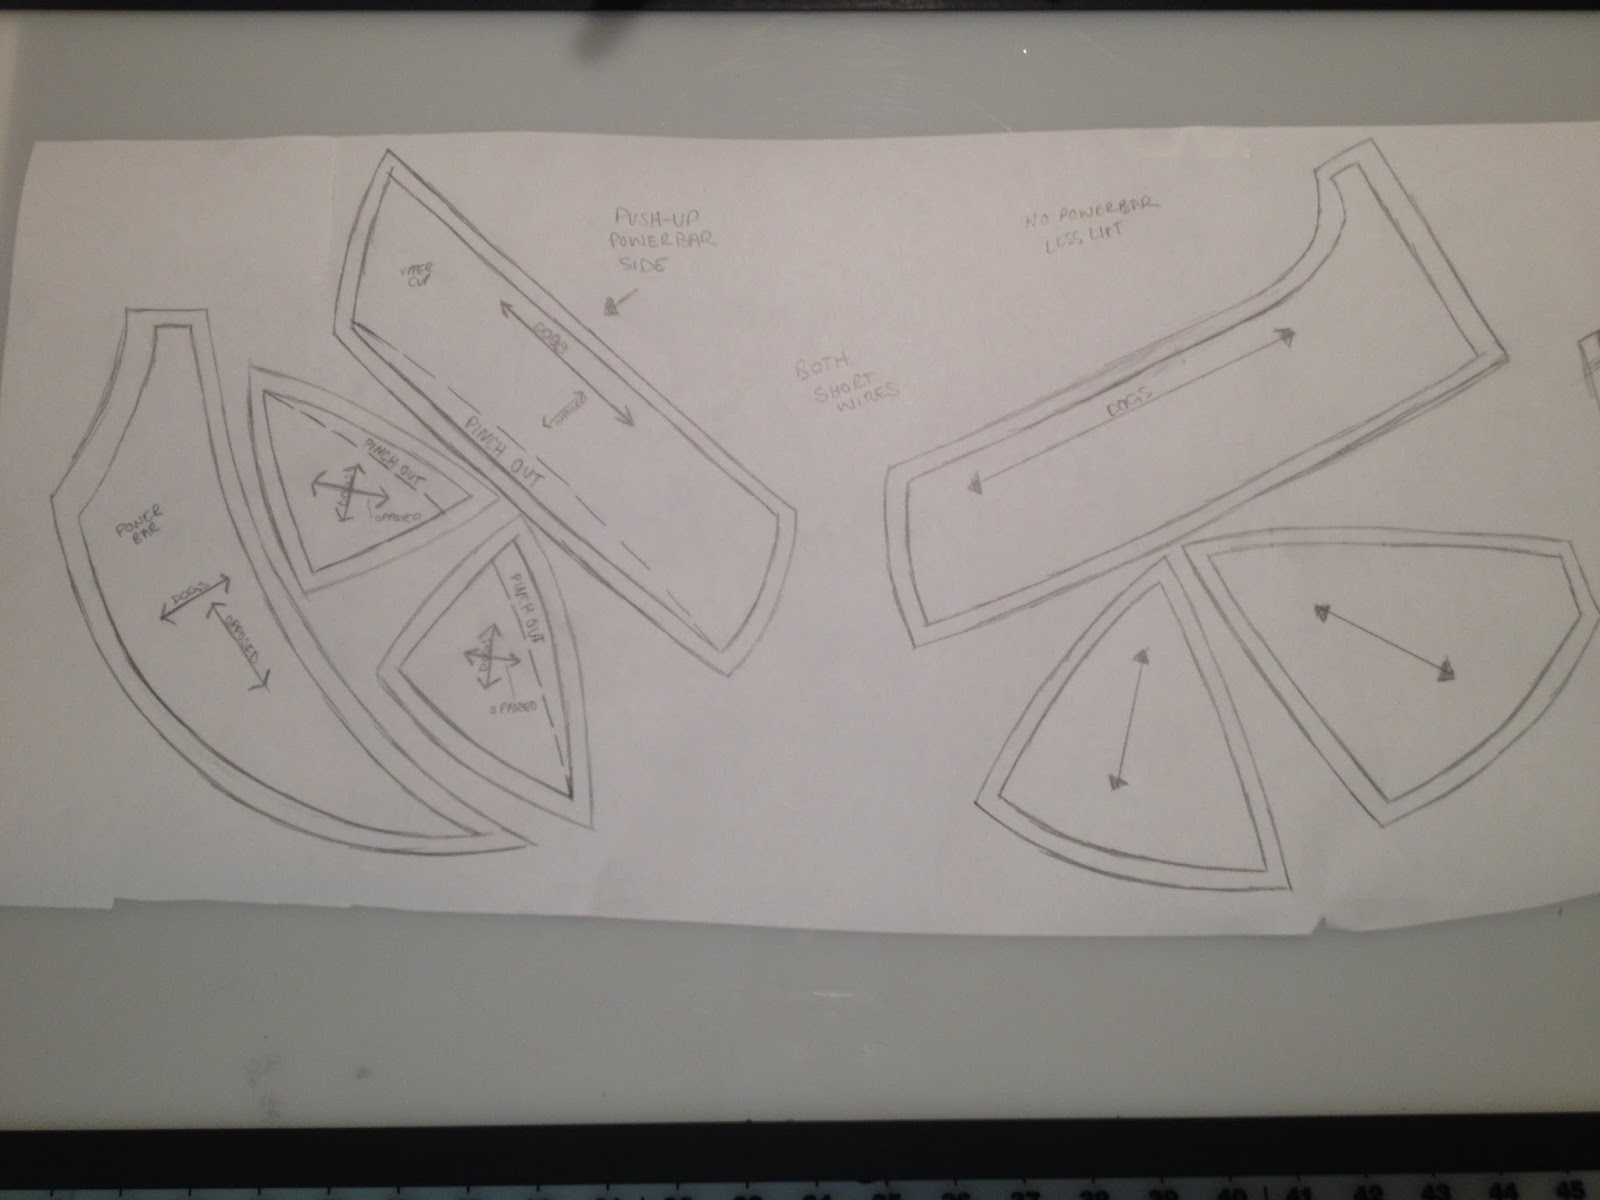
The power bar acts as a structural buttress, providing a firm, angled surface that pushes the breast tissue medially and upwards. It's a perfect example of how seam lines and paneling can be functional engineering elements, not just decorative ones.
Synthesis: A System of Levers and Wedges
To bring it all together, think of a push-up bra not as a static holder, but as a dynamic system of levers and wedges designed to reposition soft tissue.
- Graduated Padding: Acts as the primary wedge. Its volume determines the amount of displacement.
- Padding Placement & Cup Angle: Determine the direction of the push. Bottom placement favors vertical lift, while side placement and angled cups favor an inward, cleavage-enhancing push.
- Structural Panels (e.g., Power Bar): Function as built-in levers, reinforcing the direction of force and adding structural integrity to the push-up effect.
By manipulating these three variables, a designer can create a wide spectrum of silhouettes, from a subtle enhancement to a dramatic reshaping of the bust.
Conclusion
Today, we have moved from the "what" to the "how" of push-up bra design. We've seen that creating different levels of lift is a matter of deliberate engineering, not just adding more foam.
Key Takeaways:
- Push-up bras use graduated padding, which is thicker at the bottom and/or sides, to create a lifting wedge.
- The industry often categorizes the intensity of this effect into Levels 1, 2, and 3, which correspond to the amount and coverage of the padding.
- Padding placement is critical: padding concentrated at the bottom of the cup primarily creates vertical lift, while padding on the sides creates an inward push for cleavage.
- The angle of the cup and structural elements like a power bar are also used to direct breast tissue upwards and inwards.
Next Up:
Now that you understand the mechanics behind different levels of enhancement, our next lesson will explore how these principles manifest in the real world. We will analyze style variations of push-up bras based on enhancement level and cup shape, looking at examples like the plunge push-up, the balconette push-up, and more.