Introduction
Welcome back! In the last lesson, you did an excellent job transforming a simple prediction script into a professional, multi-command Command-Line Interface (CLI) using Typer. You now have a tool that's easy to use locally, with built-in help and validation.
Today, we take the next logical step in "shipping" your product. While a CLI is perfect for individual users on a single machine, the real power often comes from making your model available as a service that other applications can communicate with over a network. Our goal for this lesson is to expose your ML pipeline as a REST API using the web framework FastAPI.
A REST API (Representational State Transfer Application Programming Interface) is a standardized way for computer systems to communicate over the web. By wrapping your model in an API, you turn it into a reusable, language-agnostic service.
This is a cornerstone of modern software and Machine Learning Operations (MLOps). Take a look at this diagram which shows a typical MLOps pipeline.
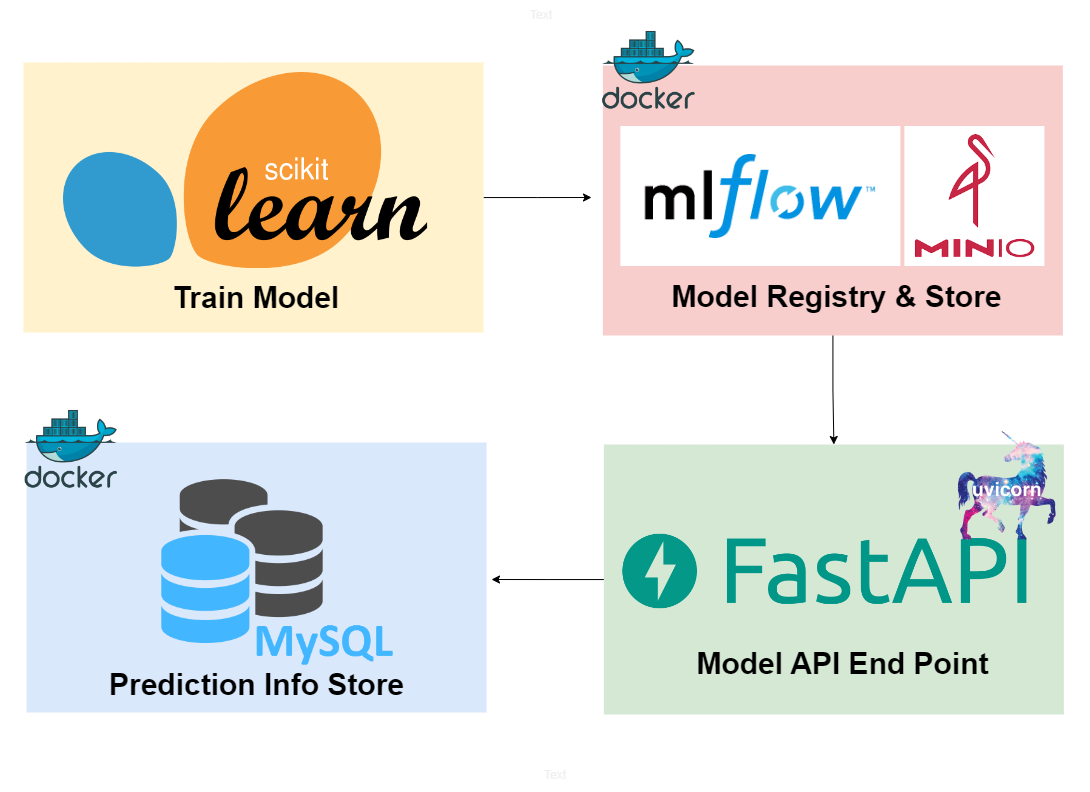
We are essentially swapping the CLI "front-end" with an API "front-end," while keeping our core prediction logic the same.
Part 1: Why FastAPI?
To build an API in Python, we use a web framework. There are many options, but we will use FastAPI. It's a modern, high-performance framework designed specifically for building APIs. Its key advantages are:
- High Performance: It's one of the fastest Python frameworks available.
- Automatic Interactive Documentation: It automatically generates a user interface (Swagger UI) where you can see your API's endpoints and test them directly from your browser. This is invaluable for development and for anyone who wants to use your API.
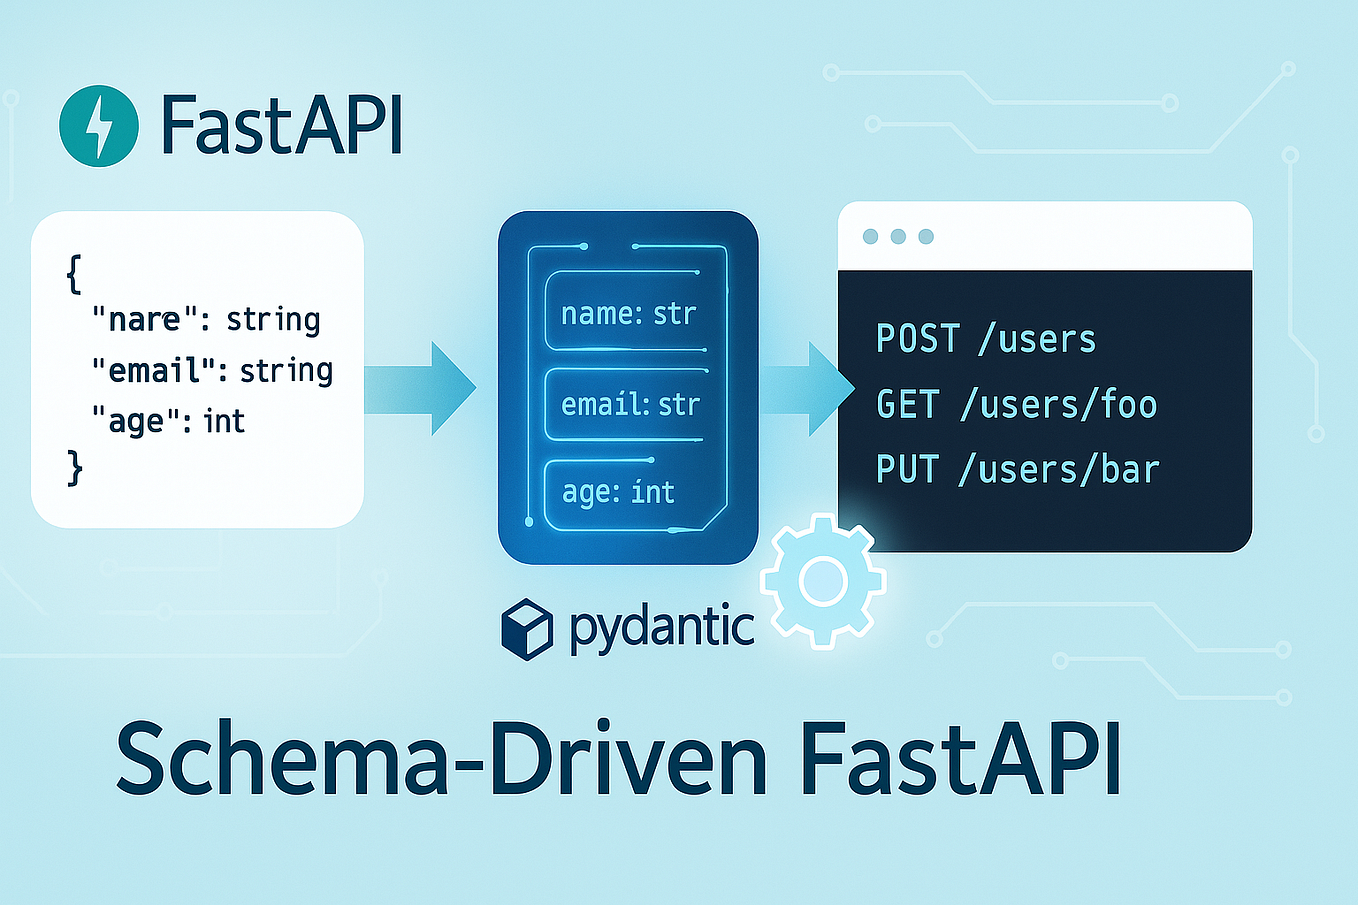
- Data Validation: This is FastAPI's killer feature. It uses a library called Pydantic to enforce data types and validation rules for all incoming requests. This drastically reduces bugs by ensuring your model only receives data in the exact format it expects.
The relationship between your API code, Pydantic, and the requests is visualized well here:
To get a feel for how FastAPI simplifies model deployment, please read the introduction to the following guide.
The Machine Learning Practitioner's Guide to Model Deployment with FastAPI
This guide, 'The Machine Learning Practitioner's Guide to Model Deployment with FastAPI', clearly explains the common challenges of deploying models and how FastAPI provides a clean solution. Focus on the motivation it provides.
Read the introduction, which starts right after the title and ends just before 'Step 1: Training a Simple Model'. Pay attention to why an API is the easiest way to let other systems use your model and the benefits FastAPI provides.
Part 2: Building Your Prediction API
Let's convert your bug-fix predictor into an API. We'll create a new file for the API and reuse the predictor.py module you've already built.
Step 2.1: Project Setup and Dependencies
-
First, add FastAPI and an ASGI server (we'll use Uvicorn) to your project's dependencies. If you have a
requirements.txt, add these lines:fastapi uvicorn[standard]Then, install them in your virtual environment:
pip install -r requirements.txt. -
Create a new file in your
src/bugfix_predictor/directory namedapi.py. Your structure will look like this:your_project/ │ ├── src/ │ └── bugfix_predictor/ │ ├── __init__.py │ ├── api.py # <-- Our new API file │ ├── cli.py # <-- Your existing CLI file │ ├── predictor.py │ └── __main__.py │ └── ...
Step 2.2: The lifespan Manager for Model Loading
In production systems, it's critical to load resources like ML models once when the application starts, not every time a request comes in. FastAPI provides an elegant way to manage this using lifespan events.
The following resource explains this concept well. We will use this pattern to ensure our model is loaded and ready before the API starts accepting requests.
How to Use FastAPI for Machine Learning | The PyCharm Blog
The PyCharm Blog article on FastAPI explains a best practice for managing model lifecycle. We'll focus on the section about 'lifespan events'.
Read Section 6, 'Set up a machine learning model with lifespan events'. Understand how the asynccontextmanager and the code before the yield statement are used to load resources at startup, and code after yield is for cleanup at shutdown.
Now, let's implement this in src/bugfix_predictor/api.py.
# src/bugfix_predictor/api.py

import pandas as pd
import joblib
from fastapi import FastAPI
from pydantic import BaseModel
from contextlib import asynccontextmanager
from . import predictor  # Import our existing predictor module


# This dictionary will hold our model, loaded at startup
ml_models = {}

@asynccontextmanager
async def lifespan(app: FastAPI):


    # Load the ML model during startup
    print("Loading bug-fix prediction pipeline...")
    try:
        pipeline = joblib.load(predictor.PIPELINE_PATH)
        ml_models["bugfix_pipeline"] = pipeline
        print("Pipeline loaded successfully.")
    except FileNotFoundError:
        print(f"Error: Pipeline file not found at {predictor.PIPELINE_PATH}")
        ml_models["bugfix_pipeline"] = None

    yield # The API is now running and accepting requests


    # Clean up resources during shutdown
    print("Clearing ML model resources...")
    ml_models.clear()


# Initialize the FastAPI app with the lifespan manager
app = FastAPI(
    title="Bug-Fix Predictor API",
    description="An API to predict if a commit is a bug-fix based on its message.",
    version="1.0.0",
    lifespan=lifespan
)
Step 2.3: Defining Input and Output with Pydantic
Next, we define the "schema" for our API's input using a Pydantic BaseModel. This is our data contract. Our from_text CLI command took a single commit message, so our API will do the same.
Add this class to api.py:
# src/bugfix_predictor/api.py (continued)

class CommitMessage(BaseModel):
    """Input model for a single commit message."""
    message: str

class PredictionOut(BaseModel):
    """Output model for the prediction result."""
    is_bugfix_prediction: bool
    bugfix_probability: float
Using BaseModel for both input and output helps FastAPI validate data in both directions and automatically document it.
Step 2.4: Creating the Prediction Endpoint
Now for the main event: the API endpoint. We'll create a function that receives a CommitMessage, uses our loaded model to make a prediction, and returns the result.
Add this code to api.py:
# src/bugfix_predictor/api.py (continued)

@app.post("/predict", response_model=PredictionOut)
def predict_bugfix(data: CommitMessage):
    """
    Predicts if a commit message corresponds to a bug-fix.
    """
    if "bugfix_pipeline" not in ml_models or ml_models["bugfix_pipeline"] is None:
        raise HTTPException(status_code=503, detail="Model not loaded or unavailable.")


    # Create a DataFrame from the input, just like in the CLI's from_text command
    input_df = pd.DataFrame([{"commit_message": data.message}])


    # Use the existing predictor logic
    results_df = predictor.predict_from_df(input_df)


    # Extract the single result
    prediction = results_df['is_bugfix_prediction'].iloc[0]
    probability = results_df['bugfix_probability'].iloc[0]

    return {
        "is_bugfix_prediction": bool(prediction), # Ensure boolean type
        "bugfix_probability": float(probability) # Ensure float type
    }
Notice a few key things:
@app.post("/predict"): This decorator exposes our function at the/predictURL and specifies it handles HTTP POST requests. We use POST because the client is sending data to be processed.data: CommitMessage: FastAPI automatically parses the incoming JSON request body and validates it against ourCommitMessagemodel.response_model=PredictionOut: This tells FastAPI to validate our outgoing response against thePredictionOutmodel and include it in the API docs.
Part 3: Running and Testing Your API
Your API is written, but how do you run it? You'll use uvicorn, the server we installed earlier.
Step 3.1: Running with Uvicorn
From your project's root directory, run this command in your terminal:
uvicorn src.bugfix_predictor.api:app --reload
src.bugfix_predictor.api: The path to your API file.:app: The name of theFastAPIinstance inside that file.--reload: This tells Uvicorn to automatically restart the server whenever you save changes to your code, which is very helpful during development.
You should see output indicating the server is running, including the print statements from our lifespan function.
Step 3.2: Interactive Testing with Swagger UI
This is where FastAPI truly shines. Open your web browser and navigate to http://127.0.0.1:8000/docs.
You'll see a full, interactive API documentation page.
- Click on the
/predictendpoint to expand it. - Click the "Try it out" button.
- In the "Request body" text area, edit the JSON to provide a test message:
{ "message": "Fix: resolve critical null pointer exception on user logout" } - Click the "Execute" button.
Scroll down, and you will see the server's response code and the JSON prediction output. Try it again with a non-bug-fix message like "Feat: add new dark mode theme".
This interactive documentation is one of the most powerful features of FastAPI, streamlining the testing and integration process for anyone who needs to use your service.
Part 4: Production-Ready Touches
A production service needs to be observable. A simple but essential feature is a health check endpoint. This is a basic endpoint that monitoring services can call to verify that your API is running.
Add this simple GET endpoint to your api.py:
# src/bugfix_predictor/api.py (continued)

@app.get("/health", summary="Check if the API is running")
def health_check():
    """A simple endpoint to verify the API is alive."""
    return {"status": "ok"}
Refresh your /docs page, and you'll see this new endpoint listed. It's a small addition that makes your API much more robust in a real-world deployment scenario.
Conclusion
Excellent work! You have successfully exposed your machine learning pipeline as a robust, documented, and validated REST API. This is a huge leap from a local script to a shippable, scalable service.
Key Takeaways:
- FastAPI provides a high-performance framework for building APIs, with a focus on developer experience.
- Pydantic models are used to define strict data contracts for your API's inputs and outputs, preventing bad data from ever reaching your model.
- The
lifespanmanager is the correct pattern for loading heavy resources like ML models once at startup. - FastAPI's automatic interactive documentation (
/docs) makes testing and sharing your API incredibly simple. - Small additions like a
/healthendpoint are critical for building production-ready services.
Preview of the Next Lesson:
Your API is running perfectly on your local machine. But how do you give this application to someone else or deploy it to a server without a complicated setup process? In our next lesson, we will solve this by containerizing your application and its dependencies using Docker, making it a self-contained, portable unit that can run anywhere.