Welcome back! In our last lesson, we explored a powerful workflow technique: using adjustment layers to apply effects like color grades and grain consistently across multiple layers. This is a crucial skill for giving your scenes a cohesive, professional look.
Today, we're shifting our focus from styling individual scenes to moving between them. An animation is rarely a single, static shot; it's a story told through a sequence of scenes. The way you guide your viewer from one scene to the next is a critical part of that story. This lesson will teach you how to create a basic transition between scenes using keyframed transform properties.
We'll break down how to build three fundamental transition types—the slide, the zoom, and the rotation—by animating the Position, Scale, and Rotation properties you're already familiar with. Mastering these simple, clean transitions is the first step toward creating dynamic and fluid motion design projects.
The Building Blocks of Transitions
At its core, a transition is a visual bridge that connects the end of one clip with the beginning of another. In After Effects, the simplest and most direct way to build these bridges is by animating the basic transform properties of your layers or scenes.
The video below offers a great, quick overview of this core idea. It directly links the fundamental transform properties to the types of transitions they create.
after effects for beginners // basic transitions, effects, and layout introduction
This video provides a concise introduction to the basic transform properties in After Effects and how they relate to creating transitions.
Watch the brief segment from this part. The presenter clearly explains that position is used for slides, scale for zooms, and rotation for spins. This is the foundational concept for today's lesson.
As you can see, you already have the tools you need. The challenge is learning how to coordinate the animation of two different scenes to create a single, seamless movement. Let's start with the most common type: the slide transition.
Creating a Slide Transition with Position
A slide transition is when one scene appears to push another off the screen. There are several ways to achieve this, but a particularly clean and efficient method involves parenting the incoming scene to the outgoing one. This ensures they move together perfectly.
The following guide from Venter Visuals explains this technique.
Slide Transitions in After Effects | Full Tutorial (2023) – Venter Visuals
This article provides a concise, step-by-step guide to creating a slide transition using the parenting technique.
Read the section titled Basic Slide Transition. Pay close attention to the steps of positioning the second clip, using the "parent pickwhip," and then animating the position of only the first clip.
Let's summarize the key steps for a horizontal slide:
- Arrange Scenes: Place your two compositions (or video clips) back-to-back in your main timeline. Let's call them Scene A (outgoing) and Scene B (incoming).
- Position Scene B: Move Scene B so its left edge touches the right edge of Scene A. It should be perfectly aligned but sitting just off-screen.
- Parenting: Use the pickwhip tool in the timeline to parent Scene B to Scene A. The
Parent & Linkcolumn must be visible for this (Right-click columns > Columns > Parent & Link). - Animate Scene A: Set a
Positionkeyframe for Scene A at the start of the transition. Move forward in time and change the X-position value so Scene A slides completely off-screen to the left. - Motion Blur: Enable motion blur for both layers and for the composition to make the movement look smooth and natural.
Because Scene B is parented to Scene A, it will move in perfect sync, sliding into the frame to replace Scene A seamlessly. This same technique works for vertical slides (animating the Y-position) or diagonal slides (animating both X and Y).
Creating a Zoom Transition with Scale
Another dynamic way to move between scenes is with a zoom transition. This creates the illusion of flying through one scene to land in the next. This effect relies on animating the Scale property of both clips.
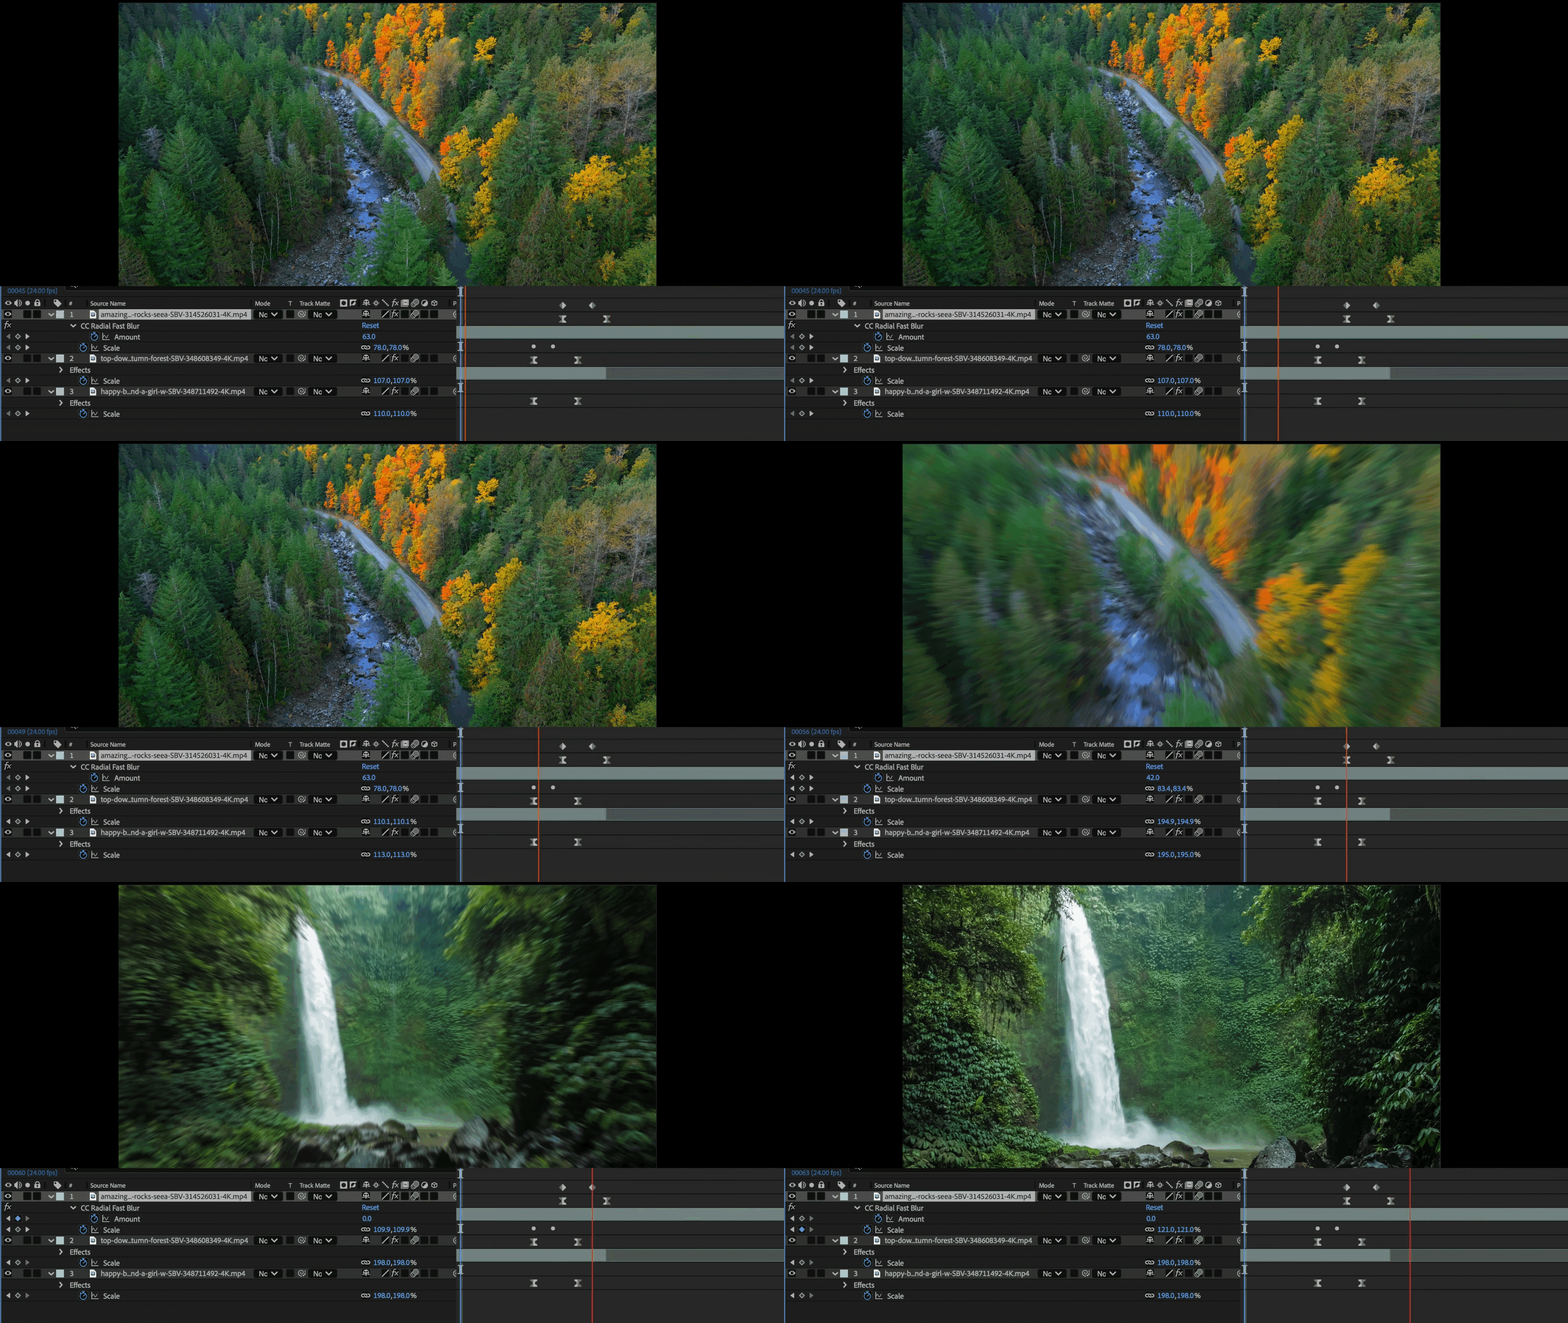
The article below from Storyblocks provides a clear walkthrough for creating this effect.
How to create a zoom effect in After Effects - Storyblocks
This tutorial details how to create a compelling zoom transition by coordinating the scale animations of two clips and enhancing the effect with blurs.
Focus on the section Creating a zoom transition. Follow the steps for keyframing the Scale property on both your outgoing and incoming clips. The use of Radial Fast Blur is particularly important for selling the effect, so pay close attention to that step.
Here's the logic behind the zoom transition:
- Animate Scene A (Outgoing): Towards the end of Scene A, set a
Scalekeyframe at 100%. A few frames later, at the very end of the clip, increase theScalesignificantly (e.g., to 300% or more). This makes it look like you're zooming into the scene. - Animate Scene B (Incoming): At the beginning of Scene B, set its initial
Scaleto a smaller value (e.g., 50% or less). A few frames later, set another keyframe to bring theScaleback to 100%. This creates the effect of "landing" in the new scene. - Overlap and Refine: The timing is crucial. You'll want to overlap the end of Scene A's animation with the start of Scene B's.
- Add Blur: As the article mentions, this effect is unconvincing without motion blur. Enable the standard motion blur on your layers. For an even more exaggerated and stylized effect, apply the
CC Radial Fast Blureffect to both clips during the transition. Keyframe the blur amount to be highest at the point of maximum zoom and zero otherwise.
Creating a Rotation Transition
Finally, let's create a transition based on rotation. Here, we'll have Scene A spin off-screen while Scene B spins into place. For this transition, a smooth motion curve is essential, so it's a great opportunity to revisit the Graph Editor.
The following video provides an excellent, step-by-step demonstration of building this transition.
after effects for beginners // basic transitions, effects, and layout introduction
This video offers a detailed walkthrough of creating a rotation transition. It's especially useful because it shows how to use Easy Ease and the Speed Graph to make the animation look professional.
Watch carefully from this section. The presenter guides you through the entire process for both the outgoing and incoming clips. Pay close attention to these key points: Opposing Values: The first clip rotates to a positive value (e.g., +50°), and the second clip starts from the opposite negative value (e.g., -50°) and rotates to 0. Easy Ease: Applying Easy Ease (F9) to the keyframes is the first step to making the motion less robotic. Speed Graph: The most important part is how the Speed Graph is manipulated. For the outgoing clip, the graph is shaped to accelerate into the transition. For the incoming clip, the graph is shaped to decelerate out of the transition.
By making the rotation fastest at the cut point between the two clips, you create a seamless and energetic transition that cleverly hides the switch from one scene to the next.
Practice Exercise
Now it's your turn to apply these techniques.
- Set Up: Create two simple scenes in After Effects. For example:
- Scene 1: A simple illustration of a tooth (you can use an icon from a previous module or create a new one with the shape tools).
- Scene 2: A text layer with a dental term, like "Canine" or "Gingivitis."
- Create a Transition: Place these two compositions into a new, main composition. Choose one of the three methods we've covered today (Slide, Zoom, or Rotate) and build a transition between them.
- Refine: Remember to enable motion blur. If you have time, apply
Easy Easeto your keyframes and try adjusting the curves in the Graph Editor to control the timing and feel of the motion.
This exercise will solidify your understanding of how simple transform properties can be used to create professional-looking transitions.
Conclusion
Today you've added a fundamental skill to your motion design toolkit: creating transitions. By keyframing the Position, Scale, and Rotation properties, you can now guide your audience's eye from one idea to the next in a smooth and visually engaging way.
Key Takeaways:
- Transitions are visual bridges between scenes, most basically created by animating transform properties.
- A Slide Transition uses the
Positionproperty, often made easier with parenting. - A Zoom Transition uses the
Scaleproperty on both clips, enhanced with motion or radial blur. - A Rotation Transition uses opposing
Rotationvalues and relies on the Speed Graph to create a seamless spin. - Motion Blur is not optional; it's essential for making these movements look realistic and smooth.
In our next lesson, we'll move beyond these basic property-based transitions. You'll learn how to build a custom wipe transition using an animated shape layer as a track matte, unlocking a much more versatile and creative method for revealing new scenes.