In our last session, we created transitions by animating the transform properties of entire scenes, which is perfect for clean, simple slides, zooms, and rotations. Today, we'll expand on that by learning a technique that gives you far more creative freedom. Instead of moving the scenes themselves, we'll create a custom animated "window" that reveals the next scene.
This lesson will teach you how to build a custom wipe transition using an animated shape layer as a track matte. This is a cornerstone technique in motion graphics, used everywhere from stylish social media videos to professional broadcast packages. By the end of this lesson, you'll understand what track mattes are and how to use them to design your own unique scene transitions, a skill you can use to cleanly reveal stages of a dental procedure or transition between different facts in an explainer video.
What is a Track Matte?
Before we build our transition, let's establish the core concept. A track matte is essentially a stencil. It’s a layer whose shape or brightness values are used to control the visibility (or transparency) of the layer directly beneath it. This allows you to create complex reveals without the tedious work of animating masks frame by frame.
The article below from School of Motion provides an excellent introduction to this fundamental tool.
How to Use Track Mattes in After Effects
This guide clearly defines what track mattes are, where to find them in the interface, and why they are often superior to masks.
Start by reading the definition under What are Track Mattes. Then, find the section "Finding the Track Matte Tool in After Effects" and read how to enable the TrkMat column in your timeline. Finally, review the section When to Use Track Mattes, which explains their key advantage over traditional masking.
As the article explains, the real power of track mattes comes from their independence. You can create a complex animation on one layer—like a shape that moves and scales—and then use that entire animation to define the visible area of another layer.
This image demonstrates the basic setup. Notice how there are two layers involved: the "Text-Matte" layer on top, which acts as the stencil, and the "Image" layer below, which is the content being revealed. The TrkMat column on the Image layer is set to use the layer above it.
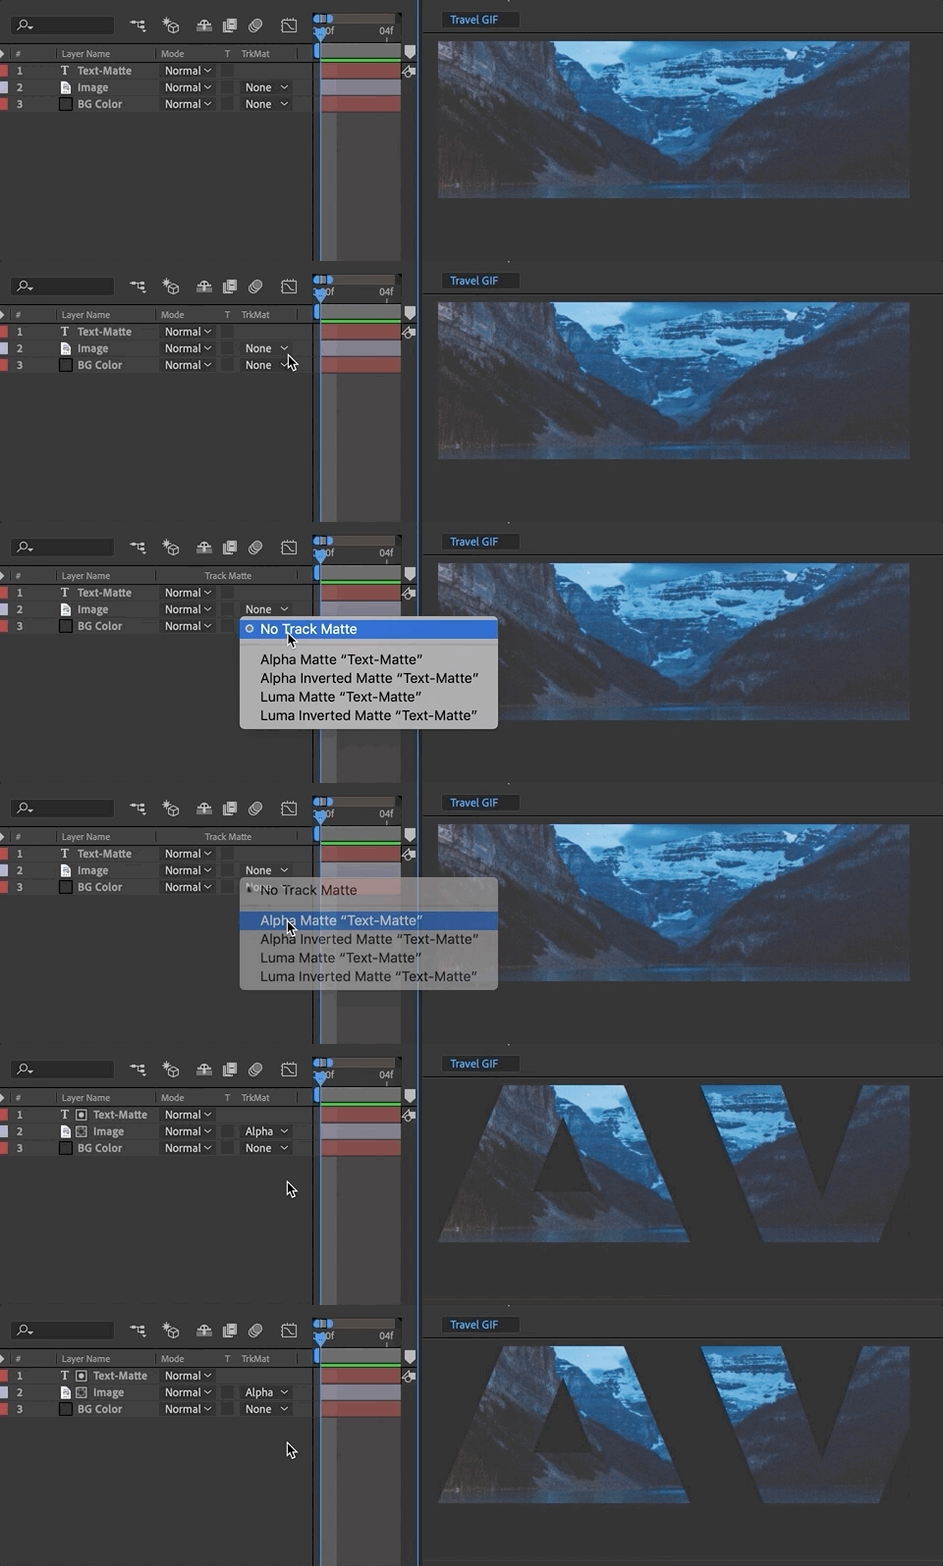
Alpha vs. Luma: The Two Flavors of Mattes
When you use a track matte, you have four options, which fall into two main categories: Alpha and Luma.
- Alpha Mattes use the transparency information of the matte layer. Any pixel in the matte layer that is not 100% transparent will act as a window to reveal the layer below. This is the most common and intuitive type.
- Luma Mattes use the luminance (brightness) information. White areas in the matte layer are fully opaque (fully revealing the layer below), black areas are fully transparent (concealing it), and shades of grey create partial transparency.
The image below provides a great visual summary of the four options: Alpha, Alpha Inverted, Luma, and Luma Inverted.

For most custom wipe transitions, you will be using the Alpha Matte option, as we'll be creating solid shapes to act as our stencils.
Building a Custom Wipe with a Shape Layer
Now, let's put this theory into practice by building a circular wipe transition. We will create a circle shape that starts small and grows to fill the screen, revealing the next scene as it expands.
The following video provides a clear, step-by-step tutorial for this exact process. We will follow its method.
Shape Matte Transitions After Effects Tutorial | Storysium Transitions | Track Matte Transitions
This tutorial from Smertimba Graphics is a perfect hands-on guide to creating a shape matte transition.
Watch the video from the beginning until the end of the first example. Follow along with the presenter as they guide you through these key steps: Setting up the clips with an overlap and splitting the incoming layer. Creating the shape layer that will serve as our animated matte. Animating the shape's Position and Scale to grow and cover the screen. Applying Easy Ease (F9) to the keyframes for smoother motion. Applying the Alpha Matte to the video layer, which is the final step that creates the reveal.
Let's break down the logic:
- Layer Order is Key: You must have the layers stacked correctly:
- Top Layer: The animated shape layer (our matte).
- Middle Layer: The incoming scene that will be revealed.
- Bottom Layer: The outgoing scene.
- Animation Drives the Reveal: The animation of the shape layer is the transition. A shape wiping from left to right creates a linear wipe. A circle expanding from the center creates a radial wipe. The creative possibilities are endless and depend entirely on how you animate your matte layer.
- The
TrkMatSetting Connects Them: Setting theTrkMaton the incoming scene to "Alpha Matte" tells After Effects: "Only show this layer where the shape layer above it exists." After Effects then automatically hides the shape layer itself, as its only job is to define the boundaries for the layer below.
The video goes on to show a more advanced Luma Matte effect and a rectangular wipe. Feel free to explore these later, but mastering the basic Alpha Matte wipe is our primary goal today.
Practice Exercise
It's time to create your own custom transition. This exercise will solidify the workflow.
- Set Up Your Scenes: Create a new 1920x1080 composition.
- Scene 1: Create a text layer that says "Before Whitening" and place a simple tooth icon (you can create one with the shape tool or import one from a previous lesson) next to it. Make the tooth slightly off-white or yellow.
- Scene 2: Create another text layer that says "After Whitening" and place the same tooth icon next to it, but make this one bright white.
- Arrange the Timeline: Place Scene 2 on a layer above Scene 1 in your main composition. Have Scene 2 start about one second before Scene 1 ends, creating an overlap.
- Build the Matte:
- Create a new shape layer and place it directly above your Scene 2 layer.
- Using the Rectangle tool, draw a rectangle that is slightly taller than the composition and about 100 pixels wide.
- Animate its
Positionso it wipes across the screen from left to right during the one-second overlap. Start with it completely off-screen to the left, and end with it completely off-screen to the right. - Apply
Easy Easeto your position keyframes.
- Create the Transition:
- On your Scene 2 layer, find the
TrkMatcolumn. - Select Alpha Matte "[Your Shape Layer Name]".
- On your Scene 2 layer, find the
- Preview: Play back your animation. You should now have a clean wipe transition that reveals the "After" scene, driven by your animated rectangle. Don't forget to enable motion blur on your animated shape layer for a smoother effect!
Conclusion
You have now moved beyond generic, built-in transitions and have learned how to create your own. This is a massive step forward in your ability to craft a unique visual style. By animating a simple shape and using it as a track matte, you can control precisely how one visual idea gives way to the next.
Key Takeaways:
- Track Mattes are layers used as stencils to control the visibility of the layer directly beneath them.
- Alpha Mattes use transparency, making them perfect for reveals with solid, animated shapes.
- Luma Mattes use brightness, opening up more stylistic and textural possibilities.
- The animation of the matte layer is the transition. Your creativity in animating that layer defines the final look.
In our next lesson, we will make another huge leap by adding a new dimension to our work. We will begin exploring After Effects' 3D space, learning how to enable 3D on layers and position them in a virtual environment. This will allow us to create depth, parallax, and camera moves, opening the door to more sophisticated animations for things like 3D tooth models and complex procedural explainers.