Welcome back! In our last lesson, you learned how to organize complex timelines by grouping layers into precompositions. This is a crucial workflow skill for keeping your projects tidy and manageable. Now, we'll build on that foundation by exploring how to add professional polish and style to your graphics.
Today's lesson focuses on how to apply and adjust common visual effects (blur, glow, and drop shadow) to enhance your dental graphics. These effects are the building blocks of visual styling in motion design. They help create depth, draw attention, and give your animations a finished, high-quality feel. By the end of this lesson, you'll be able to take a flat graphic and make it pop off the screen.
Finding and Applying Effects
In After Effects, visual effects are non-destructive modifications that you apply to layers. You can find them in the Effects & Presets panel, which is typically docked on the right side of your workspace. Once you apply an effect to a layer (either by dragging it onto the layer or with the layer selected, double-clicking the effect), its properties will appear in the Effect Controls panel, usually in the top-left. This is where you'll make all your adjustments.
Creating Depth with Drop Shadow
One of the simplest ways to make a 2D object feel like it has substance and exists in a 3D space is to give it a shadow. The Drop Shadow effect is perfect for this, as it helps separate foreground elements, like text or icons, from the background.
The core properties you will adjust are:
- Opacity: How transparent the shadow is.
- Direction: The angle from which the "light" is coming.
- Distance: How far the shadow is offset from the layer.
- Softness: How blurry or diffused the shadow edges are. A higher value creates a softer, more realistic shadow.
This video from Jake In Motion provides a fantastic and concise overview of the Drop Shadow effect and its controls.
Drop Shadow | Effects of After Effects
This tutorial quickly demonstrates the essential parameters of the Drop Shadow effect and then shows a clever trick for creating more realistic shadows by stacking multiple instances of the effect.
First, watch from the beginning to the overview of the basic controls. Pay close attention to how changing the Distance and Softness affects the look of the shadow. Next, watch the section on stacking shadows. Notice how the creator duplicates the effect and uses different settings for each instance—a tight, dark shadow for contact and a softer, larger shadow for diffusion. This is a great technique for adding realism.
As you saw, stacking multiple drop shadows with varying softness and distance can create a much more convincing sense of depth than a single, uniform shadow.
Adding Emphasis with Glow
The Glow effect is incredibly versatile. You can use it to create a soft, ethereal look, a vibrant neon sign effect, or simply to make a specific element in your dental diagram stand out as if it's being highlighted. It works by taking the brightest parts of a layer and creating a bloom of light around them.
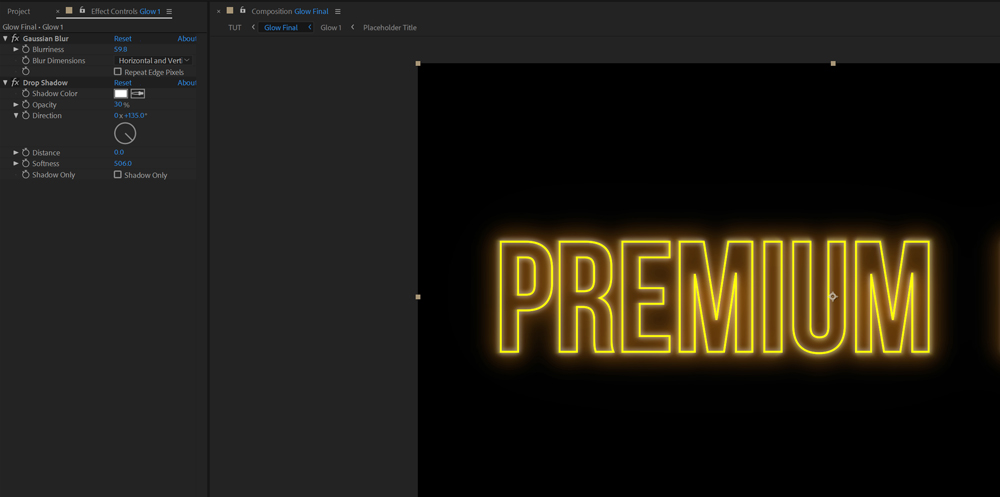
Key properties for the Glow effect include:
- Glow Threshold: Determines how bright a pixel needs to be before it starts to glow. A lower threshold means more of the layer will glow.
- Glow Radius: Controls how far the glow spreads from the bright areas.
- Glow Intensity: The brightness or strength of the glow.
Just like transform properties, effect properties can be animated over time using keyframes. The following video demonstrates how to apply a glow and animate its radius to create a dynamic highlighting effect.
After Effects For Beginners 2025 | Everything You NEED to KNOW!
This clip from a beginner's guide to After Effects shows the practical steps of finding the Glow effect, applying it to a logo, and animating its radius with keyframes.
Watch the segment from this point. Observe the workflow: he searches for "glow" in the Effects & Presets panel, applies it, and then uses the stopwatch icon next to "Glow Radius" in the Effect Controls panel to set keyframes and animate the effect over time.
Using Blur for Style and Realism
Blur is another fundamental effect with two distinct, important applications in motion graphics.
1. Gaussian Blur: Creating Depth of Field
Gaussian Blur is a straightforward effect that uniformly blurs a layer. Its most common use is to mimic depth of field, where objects in the background are out of focus, drawing the viewer's eye to the sharp, focused foreground element. For example, you could apply a Gaussian Blur to a background pattern to make your main dental icon or text stand out more clearly. To use it, simply apply the "Gaussian Blur" effect and increase the "Blurriness" value.
2. Motion Blur: Simulating Movement
Motion blur is different. It's not a stylistic choice so much as a simulation of physics. In the real world, fast-moving objects appear blurred to our eyes and on camera. Adding motion blur to your animations makes them feel smoother, more dynamic, and more natural.
Unlike Gaussian Blur, you don't apply Motion Blur from the Effects panel. Instead, you enable it with two clicks:
- The Layer Switch: A switch on each layer that needs to have motion blur.
- The Composition Switch: A master switch that turns motion blur on or off for the entire composition.
This process is detailed in the following guide, which uses a medical animation as an example—highly relevant to your dental motion design goals.
Medical Animation: Creating Reusable Animations — After Effects
This article provides a clear, step-by-step guide on how to properly enable and adjust motion blur, particularly in the context of nested compositions (pre-comps), which you learned about last lesson.
Read the section titled Adding Motion Blur. Follow the steps carefully. Note that you enable it on a per-layer basis first, then enable it globally for the comp. It also mentions adjusting the Shutter Angle in Composition Settings > Advanced, which controls the intensity of the blur effect.
Power Combo: Effects and Precompositions
Here is where the previous lesson connects directly with this one. What if you have a dental icon made of five separate layers, and you want to apply a single drop shadow to the entire icon? Applying and tweaking the effect on all five layers would be tedious.
This is where pre-comps shine. By pre-composing the five layers into a single "Tooth Icon" pre-comp, you can now apply one Drop Shadow effect to that single pre-comp layer. The effect will treat all the contents of the pre-comp as a single object, giving you a clean, unified shadow. This workflow is essential for staying organized and efficient.
Practice Exercise
Let's put these concepts into practice.
- Open the After Effects project where you created the "Enamel Label Precomp" in the last lesson's exercise. If you don't have it, quickly create it again (a text layer and a pointer line, grouped into a pre-comp).
- Create a Background: Create a new solid layer (
Layer > New > Solid...) and place it at the bottom of your layer stack. Choose any color you like. - Add a Drop Shadow: Select the "Enamel Label Precomp" layer. Go to the Effects & Presets panel, find Drop Shadow, and apply it. In the Effect Controls panel, adjust the Distance and Softness until the label feels lifted off the background.
- Add a Glow: Now, apply the Glow effect to the same "Enamel Label Precomp" layer. Adjust the Glow Radius to a low value (e.g., 10-15) and the Glow Intensity to around 0.5 to give the label a subtle, clean highlight.
- Animate with Motion Blur: Animate the position of your "Enamel Label Precomp" so it slides onto the screen over about 15 frames. Now, enable the motion blur switch for that layer, and then enable the main motion blur button for the composition (both look like an icon of overlapping circles). Preview your animation and notice how the movement now looks much smoother and more realistic.
Conclusion
You've now added three of the most foundational visual effects to your toolkit. Mastering them is a significant step toward creating animations that look professional and visually engaging.
Key Takeaways:
- Drop Shadow creates depth and separates elements from the background. Stacking them adds realism.
- Glow is used to highlight elements, add emphasis, or create stylistic looks like neon.
- Blur comes in two main forms: Gaussian Blur for stylistic softening and depth of field, and Motion Blur for simulating realistic movement.
- Effects are found in the Effects & Presets panel and adjusted in the Effect Controls panel.
- Combining effects with precompositions is a powerful workflow for applying a single effect to a group of layers.
In our next lesson, we'll explore adjustment layers. This is another powerful tool that allows you to apply one or more effects to all the layers beneath it in the timeline, giving you yet another way to work efficiently and creatively.