Welcome to the next stage of your journey into motion design! In previous modules, you've learned to build animations by manipulating individual layers—animating text, revealing diagrams, and sequencing movements. As you start combining these techniques to create more detailed dental explainers, you'll find your project timelines can quickly fill with dozens, or even hundreds, of layers. This lesson introduces a fundamental workflow technique to manage that complexity.
Today, you will learn how to group layers into a precomposition to simplify a complex timeline. Think of this as the digital equivalent of organizing your desk. By grouping related items, you make your workspace cleaner, more efficient, and easier to navigate. This skill is essential for building sophisticated animations without getting lost in the clutter.
What is a Precomposition?
At its core, a precomposition (or "pre-comp") is a way to package a set of layers into its own, self-contained composition. This new composition then appears as a single layer in your main timeline.
The School of Motion article, "A Guide to Precomposing in After Effects," offers a great introduction to this concept.
A Guide to Precomposing in After Effects
This article clearly defines what a pre-comp is and its primary purpose. It's a great starting point to grasp the core idea.
Read the first two sections, What is Precomposing?, and What is Precomposing for?. Focus on the comparison to grouping layers in Photoshop.
The most effective analogy for a pre-comp is a folder. Imagine you have an animation of a tooth that is made of ten different layers: enamel, dentin, pulp, crown, root, etc. Instead of managing all ten layers in your main animation, you can "pre-compose" them. This places all ten layers into a new "folder" (the pre-comp) and leaves you with just one layer in your main timeline, perhaps named "Tooth."
This has two immediate benefits:
- Organization: Your main timeline becomes dramatically cleaner. Instead of scrolling through ten layers for the tooth, five for the background, and three for a text label, you might only have three layers:
Tooth_Precomp,Background_Precomp, andLabel_Precomp. - Control: You can now animate or apply an effect to that single pre-comp layer, and it will affect all the layers inside it as a single unit. For example, you could make the entire "Tooth" pre-comp fade in, scale up, or have a glow effect applied, without having to keyframe each of the ten individual layers.
How to Create a Precomposition
Creating a pre-comp is a straightforward process that you will use constantly. The most efficient way is with a keyboard shortcut, which is worth memorizing.
To create a pre-comp:
- Select the layers you want to group in your timeline. You can select multiple layers by holding
Shift(for a continuous block) orCmd(on Mac) /Ctrl(on Windows) for non-adjacent layers. - Go to the menu
Layer > Pre-compose...or, more commonly, use the keyboard shortcut:- Mac:
Shift + Command + C - Windows:
Shift + Control + C
- Mac:
- The Pre-compose dialog box will appear.
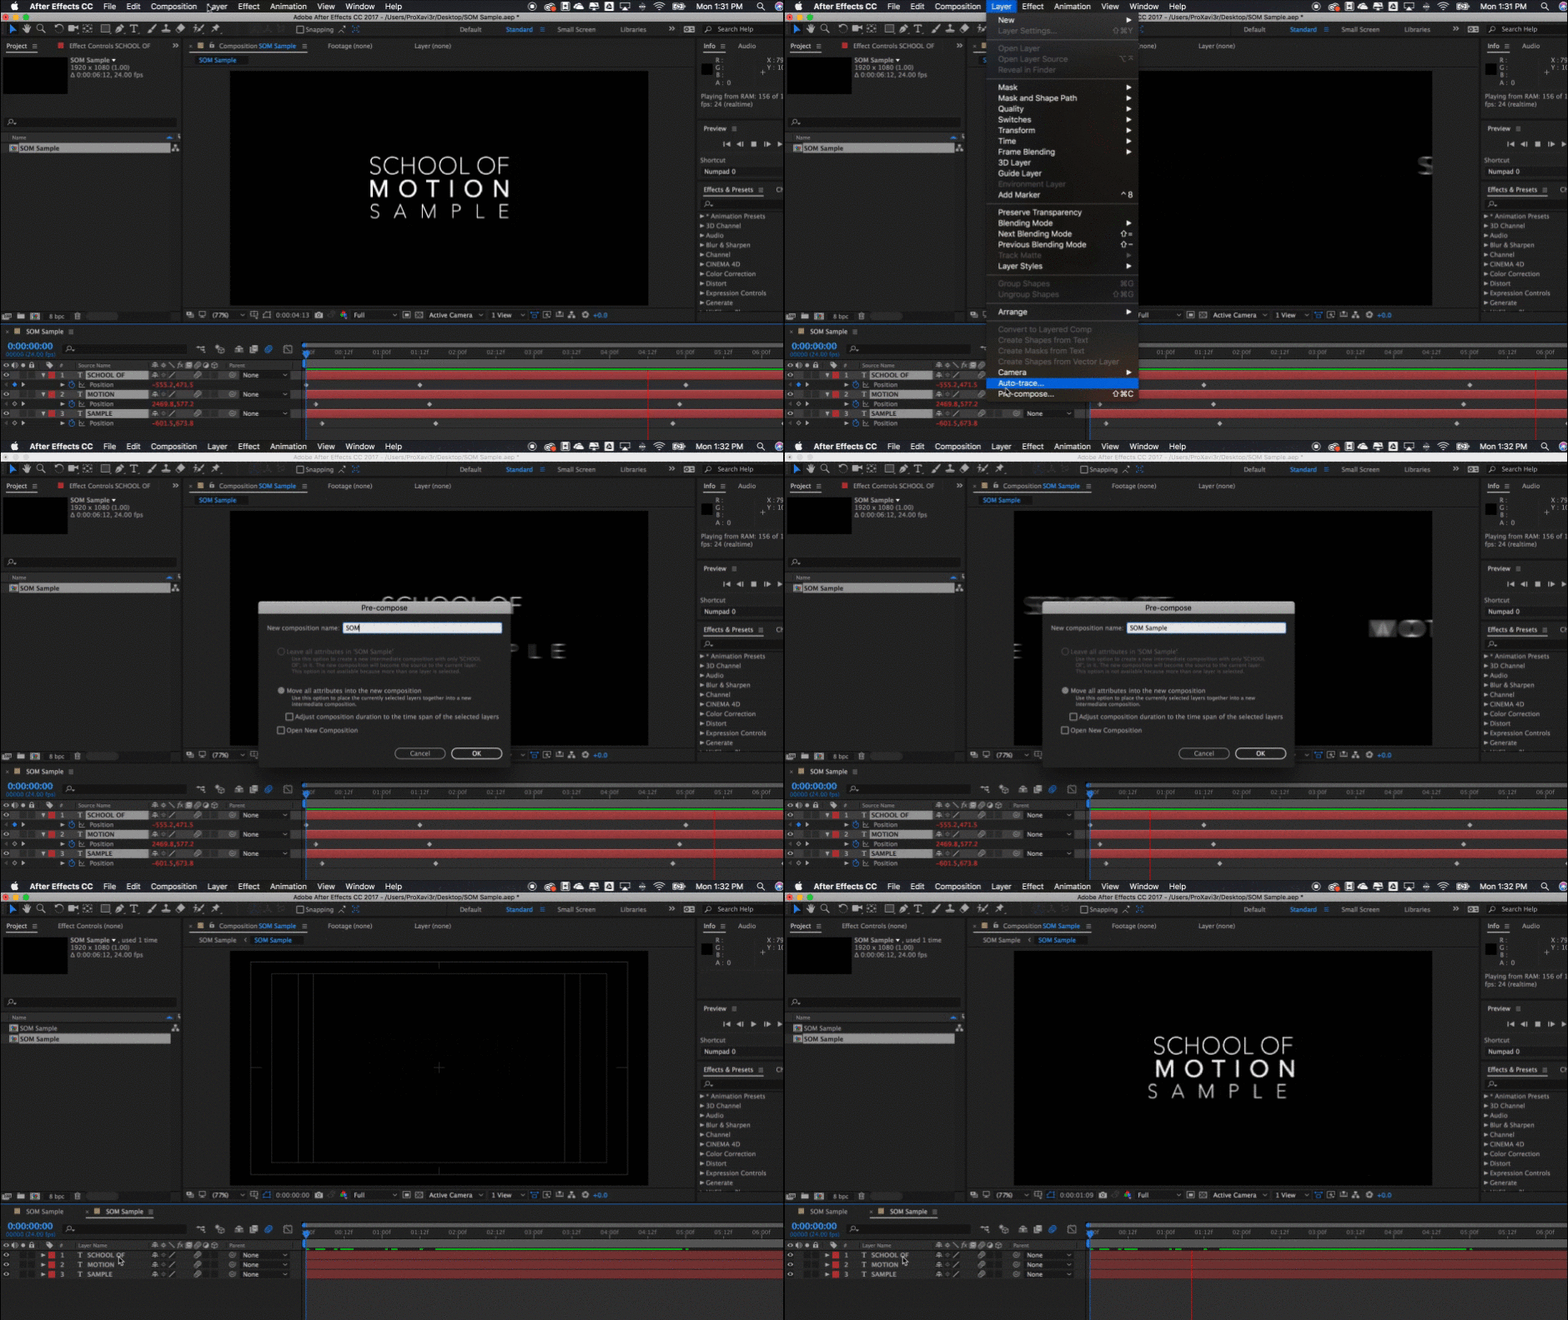
This short video from Mike Murphy provides a crystal-clear, step-by-step demonstration of this process.
After Effects: How to Precompose Layers
This video is a very quick and direct guide on the mechanics of creating a pre-comp, covering the different ways to access the command and the main dialog box settings.
Watch from the beginning until the end of the initial demonstration. Pay close attention to the keyboard shortcut and the options presented in the pop-up window.
The Pre-compose Dialog Box
When you create a pre-comp, After Effects presents you with a crucial choice in the dialog box. Understanding this choice is key to using pre-comps effectively.

You will see two main radio buttons:
Leave all attributes in [Current Comp Name]: This is a more advanced option you'll rarely use as a beginner. It essentially keeps the animation keyframes and effects on the new pre-comp layer in your main timeline, rather than moving them inside with the original layers.Move all attributes into the new composition: This is the option you will use over 95% of the time. It takes all the selected layers—along with all their keyframes, effects, and masks—and bundles them neatly inside the new pre-comp. This gives you a "clean" pre-comp layer in your main timeline with fresh transform properties, ready for you to animate as a group.
For now, and for most of your work, always choose Move all attributes into the new composition.
The article from Juno School provides a good explanation of why this setting is usually the right choice.
When and How to Use Pre-Comps in After Effects: A Workflow Guide | Juno School
This section focuses specifically on the two options in the pre-compose dialog box and gives clear advice on which to use.
Please read the section titled Key Setting. This will reinforce why moving all attributes is the standard workflow.
Editing and Managing Pre-comps
Once you've created a pre-comp, what if you need to adjust one of the original layers inside it? For example, you might want to change the color of the dentin layer within your "Tooth" pre-comp.
It's simple: just double-click the pre-comp layer in your timeline.
This will open the pre-comp in its own, new timeline tab, revealing all the original layers you grouped together. You can make any changes you need—adjust animations, change colors, edit text—and when you click back to your main composition's tab, all your changes will be automatically updated.
The following video from Gareth David Studio provides a comprehensive look at a real-world project and demonstrates this entire workflow, from creating pre-comps to editing them.
Precomposing in After Effects Ep12/48 [Adobe After Effects for Beginners]
This video walks through organizing a messy timeline into clean, manageable pre-comps, showing both the "how" and the "why" in a practical context.
Watch from this section to see how a complex project is organized with pre-comps. Then, watch the detailed step-by-step creation process from this demonstration. Notice how he selects the layers, uses the right-click menu, names the comp, and how the timeline is simplified as a result.
Practice Exercise: Labeling a Dental Diagram
Let's apply this with a small, practical exercise relevant to your goal of creating dental explainer videos.
- Set Up: In a new After Effects composition, create two layers:
- A simple text layer that says "Enamel."
- A thin shape layer (using the Pen tool) that acts as a pointer line, starting near the text and pointing off to the side.
- Animate (Optional): If you like, create a simple reveal animation for these two layers. For example, have the "Enamel" text fade in, and use Trim Paths to make the line draw on.
- Pre-compose: Select both the text layer and the shape layer in your timeline. Press
Shift + Command + C(Mac) orShift + Control + C(Windows). - Name and Confirm: In the dialog box, name your new composition "Enamel Label Precomp." Ensure "Move all attributes into the new composition" is selected and click OK.
- Animate the Group: Your two layers are now replaced by a single "Enamel Label Precomp" layer. Select this new layer and animate its position. For example, create a keyframe for Position, move forward in time, and move the entire label to a different part of the screen.
Notice how both the text and the line move together perfectly, even if they had their own internal animations. You are now animating the "folder," not the individual files inside.
Conclusion
In this lesson, you've learned one of the most important workflow techniques in After Effects. By mastering precompositions, you are empowering yourself to build complex, professional-looking animations without getting overwhelmed.
Key Takeaways:
- A precomposition is a way to group multiple layers into a single, new composition layer, just like putting files into a folder.
- The primary benefits are organizing your timeline and being able to animate or apply effects to multiple layers as a single unit.
- The essential keyboard shortcut is
Shift + Command + C(Mac) orShift + Control + C(Windows). - For most situations, you should always choose to
Move all attributes into the new composition. - You can easily edit the contents of a pre-comp by double-clicking it in the timeline.
In our next lesson, we will explore how to apply common visual effects like blurs, glows, and drop shadows. You will quickly see how powerful pre-composing is, as it will allow us to apply a single effect to an entire animated group with just one click.