Hello!
In our previous lessons, we've focused on authentication—the process of verifying a user's identity. We explored how session-based authentication maintains state on the server and how token-based authentication (using JWTs) allows for stateless communication. In both cases, the goal was for our backend to know who our user is.
But what happens when a third-party application wants to access our user's data on their behalf? For example, when a new diagramming app you've signed up for asks to save files directly to your Google Drive. You certainly don't want to give that app your Google password. This is a problem of delegated authorization: how can a user (the Resource Owner) grant a third-party application (the Client) limited, revocable access to their data held by another service (the Resource Server), without sharing their credentials?
This is the exact problem that OAuth 2.0 was designed to solve. This lesson directly addresses the learning outcome: Describe the OAuth 2.0 Authorization Code grant flow and its role in third-party authorization.
We will go deep into the most common and secure OAuth 2.0 flow, covering:
- The historical problem that made OAuth necessary.
- The four key roles involved in any OAuth flow.
- A detailed, step-by-step breakdown of the Authorization Code grant flow, including the critical distinction between front-channel and back-channel communication.
- The low-level details of the HTTP requests and responses exchanged.
Let's start by understanding why simply asking for a user's password is a fundamentally broken approach.
The Problem: The Password Anti-Pattern
Before a standardized solution like OAuth existed, services that wanted to integrate with each other often resorted to a very insecure method: asking the user directly for their username and password for the other service.
OAuth 2.0 and OpenID Connect (in plain English)
To see a concrete example of this anti-pattern and understand the problem of delegated authorization, let's watch this introductory segment from the "OAuth 2.0 and OpenID Connect (in plain English)" video by OktaDev.
Watch the video from 08:59 to 12:38. Pay attention to the Yelp example and why asking for a user's Gmail password is a terrible security practice.
As the video explains, this approach is flawed for several reasons:
- Massive Over-Privilege: The client application gets full access to the user's account, not just the limited access it actually needs (e.g., access to contacts, but not emails or location history).
- Increased Attack Surface: The user's primary credentials are now stored by a third-party application, which may not have the same level of security as the original service (e.g., Google).
- No Standard Revocation: There's no way for the user to revoke the third-party app's access without changing their main password, which would break access for all other applications.
OAuth 2.0 provides a secure framework to solve this by introducing a formal, token-based flow.
The Cast of Characters: OAuth 2.0 Roles
To understand the flow, we first need to define the actors involved. The OAuth 2.0 specification defines four roles.
OAuth 2.0 Deep Dive — From Textbook Diagrams to Production ...
This article, "OAuth 2.0 Deep Dive," provides clear and concise definitions for the four fundamental roles. Understanding these is essential for making sense of the diagrams and flow.
Please read section 2, 'Core Roles: Who Is Who in an OAuth 2.0 System'. This will define the Resource Owner, Client, Authorization Server, and Resource Server.
To summarize with our example of a diagramming app (diagrams.net) wanting to access your Google Drive:
- Resource Owner: You, the user who owns the data in Google Drive.
- Client: The third-party application,
diagrams.net, that wants to access your data. - Authorization Server: The service that authenticates you and issues the access tokens. This would be
accounts.google.com. It's responsible for the login and consent screens. - Resource Server: The API that hosts your protected data. This is the Google Drive API.
With these roles in mind, let's look at the flow of communication between them.
The Authorization Code Grant Flow: A Step-by-Step Guide
The Authorization Code grant is the most secure and widely used flow, especially for web applications with a backend. It's designed to ensure that the most sensitive credentials—the access tokens—are never exposed to the user's browser.
This sequence diagram provides a complete visual map of the entire process, which we will now break down step-by-step.
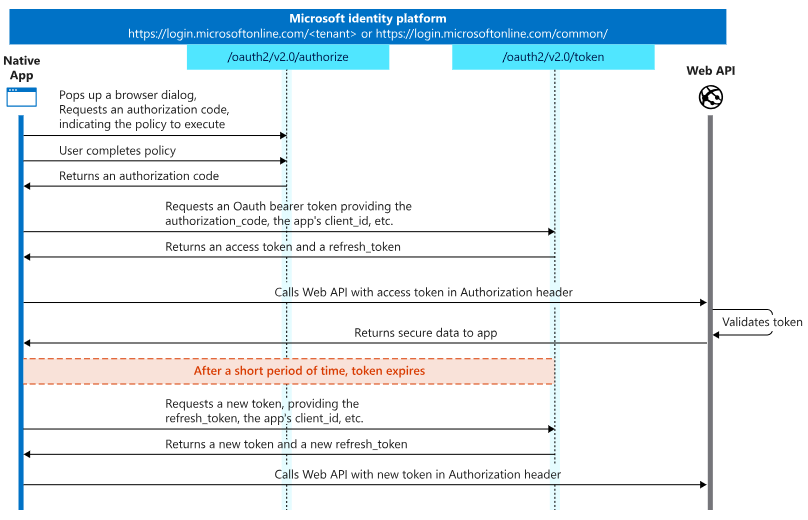
Step 0: Client Registration (A One-Time Setup)
Before anything else, the developer of diagrams.net must register their application with the Google developer console. During this process, they will:
- Receive a unique
client_id(public identifier for their app). - Receive a
client_secret(a confidential password for their app, which must be kept secure on their backend). - Register one or more
redirect_uris. This is a critical security measure; the authorization server will only redirect users back to a pre-approved URL.
Step 1: The User Initiates the Request
You are on diagrams.net and click a button like "Connect to Google Drive." This action triggers the start of the OAuth flow.
Step 2: Redirect to the Authorization Server
The diagrams.net backend constructs a special URL and redirects your browser to the Google Authorization Server. This request is made on the front-channel (your browser), and all the information is visible in the URL's query parameters.
Microsoft identity platform and OAuth 2.0 authorization code flow
For the precise technical details of this first request, we'll turn to the Microsoft identity platform documentation. It provides a raw, low-level look at the protocol, which is exactly the depth we're aiming for.
Read the section 'Request an authorization code'. Focus on the example HTTP GET request and the table explaining the key parameters: response_type=code, client_id, redirect_uri, scope, and state.
Key parameters in this request include:
response_type=code: This tells the authorization server we want to use the Authorization Code flow.client_id: Publicly identifiesdiagrams.net.redirect_uri: Tells the server where to send you back after you're done.scope: This is crucial for limited access. It specifies whatdiagrams.netwants to do (e.g.,https://www.googleapis.com/auth/drive.fileto manage files it creates).state: A random string generated bydiagrams.netto protect against Cross-Site Request Forgery (CSRF) attacks.
Step 3: User Authenticates and Grants Consent
Your browser is now on accounts.google.com. You enter your Google username and password (if you aren't already logged in). Because you are on the real Google domain, it is safe to do so.
After logging in, Google presents a consent screen: "diagrams.net would like to: View and manage Google Drive files and folders that you have opened or created with this app." You have the option to Allow or Deny.
Step 4: Redirect Back to Client with an Authorization Code
If you click Allow, the Google Authorization Server redirects your browser back to the redirect_uri provided by diagrams.net. This redirect URL now contains two important query parameters:
code: A temporary, one-time-use authorization code.state: The same random string thatdiagrams.netsent in Step 2. Thediagrams.netbackend will check that this matches the value it stored to ensure the request is legitimate.
Step 5: Exchange the Code for an Access Token (The Back-Channel)
This is the most critical part of the flow for security.
The diagrams.net backend server receives the authorization_code. This code is useless on its own. The backend now makes a direct, server-to-server POST request to the Google Authorization Server's /token endpoint. This is a back-channel request, meaning it does not happen in the user's browser.
OAuth 2.0 and OpenID Connect (in plain English)
The distinction between front-channel (browser) and back-channel (server-to-server) communication is fundamental to understanding OAuth's security model. This segment from the OktaDev video explains it perfectly.
Watch the video from 26:59 to 33:15. This explains why the authorization code can be safely transmitted through the browser, but the access token exchange requires a secure back-channel.
Now let's look at the technical details of this secure back-channel request.
Microsoft identity platform and OAuth 2.0 authorization code flow
Returning to the Microsoft documentation, we can see the exact structure of the POST request to the /token endpoint.
Read the section 'Redeem a code for an access token', focusing on the 'Request an access token with a client_secret' part. Note the parameters being sent in the POST request body, especially grant_type=authorization_code, code, and the confidential client_secret.
This request includes the authorization_code, the client_id, and, crucially, the client_secret. Since the client_secret is only known to the diagrams.net backend and the Google server, it proves that the request is coming from the real diagrams.net application.
Step 6: Receive the Access and Refresh Tokens
The Google Authorization Server validates the authorization_code, client_id, and client_secret. If everything checks out, it responds with a JSON payload containing:
access_token: A short-lived token (often a JWT) that grants access to the resource server. This is the key thatdiagrams.netwill use to call the Google Drive API.refresh_token: A long-lived token used to obtain a newaccess_tokenwhen the current one expires, without requiring the user to go through the whole login process again.expires_in: The lifetime of the access token in seconds.
Step 7: Use the Access Token to Access the Resource
The diagrams.net backend can now make authenticated requests to the Google Drive API (the Resource Server). It does this by including the access_token in the Authorization header of its API requests.Authorization: Bearer <the-access-token>
The Google Drive API validates this token on every request before processing it.
The Full Flow in Review
Now that we've seen all the pieces, let's watch a video that walks through the entire sequence with all the correct terminology.
OAuth 2.0 and OpenID Connect (in plain English)
This segment from the OktaDev video puts all the pieces together in a single, coherent walkthrough, using the terminology we've just defined.
Watch from 16:15 to 22:25. This will reinforce your understanding of the entire Authorization Code flow from start to finish.
A Final, Crucial Distinction: Authorization vs. Authentication
A common point of confusion is using OAuth for login. While you often see "Login with Google," OAuth 2.0 itself is strictly an authorization framework. It tells an application what it's allowed to do, but it doesn't standardize a way to find out who the user is.
The access_token is for the Client (diagrams.net) to present to the Resource Server (Google Drive API). It represents a grant of permission.
To solve the "who is the user" problem, a separate specification called OpenID Connect (OIDC) was built on top of OAuth 2.0. OIDC adds an id_token to the flow, which is a JWT containing claims about the authenticated user (like their name and email).
- OAuth 2.0
access_token-> For API Authorization - OIDC
id_token-> For Client Authentication
Understanding this distinction is vital for correct implementation.
Conclusion
You have now dissected the OAuth 2.0 Authorization Code grant flow, the backbone of modern delegated authorization on the web. You understand not just the steps, but the security principles that motivate its design.
Key Takeaways:
- Purpose: OAuth 2.0 provides a secure standard for delegated authorization, allowing a user to grant a third-party application limited access to their resources without sharing their password.
- The Roles: The flow involves a Resource Owner (user), Client (app), Authorization Server, and Resource Server.
- The Flow: It's a two-part process involving redirection.
- Front-Channel: The user's browser is redirected to the Authorization Server to log in and give consent, receiving a temporary
authorization_code. - Back-Channel: The client's backend securely exchanges this
codeand itsclient_secretfor a powerfulaccess_token.
- Front-Channel: The user's browser is redirected to the Authorization Server to log in and give consent, receiving a temporary
- Security: The flow is secure because sensitive tokens (
access_token,refresh_token) and theclient_secretare only ever transmitted on the secure back-channel, never through the user's browser. - Authorization vs. Authentication: OAuth 2.0 is for what an app can do (authorization). OpenID Connect (OIDC) is layered on top to handle who the user is (authentication).
Preview of the Next Lesson
We have now covered authentication (verifying a user is who they say they are) and delegated authorization (letting a third party act on a user's behalf). The next logical step is to manage permissions within our own application.
In the next lesson, we will: Implement Role-Based Access Control (RBAC) in a Django application using its built-in permissions framework. We will explore how to define roles (like 'admin', 'editor', 'viewer') and restrict access to certain API endpoints based on the authenticated user's assigned role.