Hello!
In our last lesson, we covered the critical process of securely hashing and verifying passwords using bcrypt. We established that once a user provides the correct password, the server knows, for that single moment, that they are who they claim to be.
But this raises a fundamental problem: HTTP is a stateless protocol. It doesn't remember anything from one request to the next. So, how does a user stay "logged in"? Do they have to send their password with every single click? That would be inefficient and insecure.
This lesson bridges that gap by exploring the most common method for managing a user's logged-in state: session-based authentication.
This lesson directly addresses the learning outcome: Describe the flow of session-based authentication, including cookie management and server-side session storage.
We'll break down the entire mechanism, piece by piece:
- The high-level flow of a user logging in and receiving a "session".
- How HTTP Cookies act as the carrier for a unique session identifier.
- The critical attributes of a cookie (
HttpOnly,Secure,Max-Age) that are essential for security. - The role of the server-side session store (like Redis or a database) where the actual session data is kept.
- Key security considerations, such as session fixation and a proper logout procedure.
Let's begin by visualizing the end-to-end flow.
The Big Picture: A Ticket-Based System
At its core, session-based authentication works like a coat check or a temporary pass system.
- You prove your identity once (by logging in with your password).
- The server gives you a unique, random ticket (the session ID).
- For all future requests, you just show your ticket instead of proving your identity all over again.
- The server keeps a master list that links your ticket back to your identity and permissions.
This video from ByteByteGo provides a fantastic animated overview of this exact process.
Session Vs JWT: The Differences You May Not Know!
Watch this short segment from 'Session Vs JWT' to get a clear, high-level visual of the entire session authentication flow.
Watch from the beginning of the section at 00:19 until 01:12. Pay close attention to the four main components: the client, the server, the session store, and the session ID cookie.
To reinforce this, here are two diagrams that illustrate the same flow. The first shows the high-level components, and the second shows the specific HTTP request-response sequence.

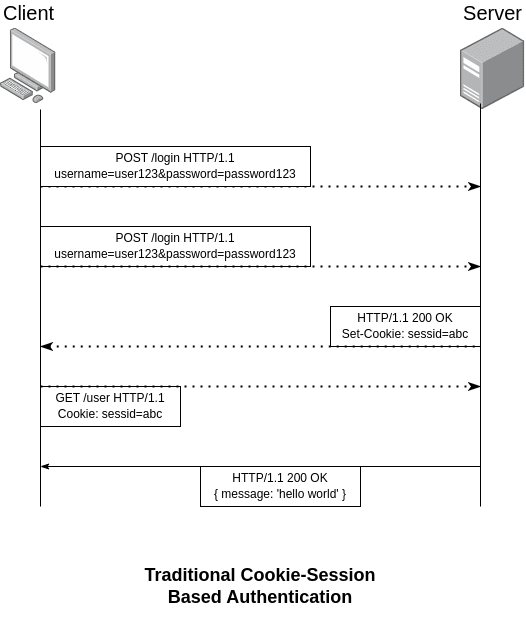
Now that we have the high-level picture, let's zoom in on the most critical piece of the client-side mechanism: the HTTP cookie.
The Carrier: A Deep Dive into HTTP Cookies
The "ticket" or session ID needs a way to travel from the server to the browser and then back to the server with every subsequent request. The mechanism designed for this is the HTTP cookie.
A cookie is just a small piece of data that a server asks a user's browser to store and send back on future requests to the same server. Let's explore how they work.
The 'HTTP Cookies Crash Course' video provides a thorough explanation of cookie mechanics. We'll watch a few key segments.
Please watch the following three clips from the video: Setting a Cookie (04:54 - 06:22): This shows how a server uses the Set-Cookie response header to instruct the browser to store a cookie. Sending a Cookie (14:31 - 15:47): This explains the crucial point that once a cookie is set for a domain, the browser automatically sends it back in the Cookie request header for all future requests to that domain. The HttpOnly Flag (45:20 - 49:18): This covers a critical security attribute that prevents client-side JavaScript from accessing the cookie, which is essential for protecting session IDs.
To summarize the key mechanics:
- Server to Client: The server sends the
Set-Cookieheader in its HTTP response.
Set-Cookie: sessionid=abcde12345; HttpOnly; Secure; Max-Age=3600 - Client to Server: The browser sees this, stores the cookie, and for every subsequent request to that server, it includes the
Cookieheader.
Cookie: sessionid=abcde12345
A crucial technical detail, especially for someone with your goal of deep understanding, is what information is not sent back.
Cookies: HTTP State Management Mechanism
The official IETF draft for cookies (which updates the standard RFC 6265) makes this point very clearly. Let's read the relevant section.
Read Section 4.2.2, 'Semantics', under the 'The Cookie Header Field' heading. It's a short section that highlights that cookie attributes like Expires, Path, HttpOnly, etc., are not returned to the server.
This is a fundamental point: the browser only sends the name=value pair back. The server is responsible for remembering the rules and metadata associated with the session.
Essential Cookie Attributes for Sessions
The Set-Cookie header can include several attributes that control the cookie's behavior. For session management, these are not optional—they are critical for security.
HttpOnly: As the video explained, this flag makes the cookie inaccessible to JavaScript running in the browser. This is your primary defense against an attacker using a Cross-Site Scripting (XSS) vulnerability to steal a user's session cookie and hijack their session.Secure: This flag instructs the browser to only send the cookie over an encrypted (HTTPS) connection. This prevents an attacker on the same network (e.g., public Wi-Fi) from sniffing the unencrypted traffic and stealing the session cookie.ExpiresorMax-Age: These attributes control the cookie's lifetime.- If omitted, the cookie is a session cookie, meaning the browser deletes it when it's closed.
- If present, the cookie is a persistent cookie.
Max-Age=3600tells the browser to keep the cookie for 3600 seconds (1 hour). This is used for "Remember Me" functionality.
The Record Book: Server-Side Session Storage
The sessionid in the cookie is just a meaningless, random string. It's a key. The server needs a place to store the data associated with that key, such as the user_id of the logged-in user. This place is called the session store.
When a request comes in with a sessionid, the server looks it up in the session store to find out who the user is.
An Introduction To Session-based Authentication In Rust
This article, 'An Introduction To Session-based Authentication In Rust,' has an excellent, language-agnostic discussion on the need for a session store and the trade-offs between different choices. While the code is in Rust, the concepts are universal.
Please read sections 3.2 'Session Store' and 3.3 'Choosing A Session Store'. This will explain the purpose of the store and compare using a relational database (like PostgreSQL) versus a key-value store (like Redis).
As the article explains, the main options for a session store are:
- In-memory Store: A simple dictionary or hash map in your application's memory.
- Pros: Extremely fast.
- Cons: Not durable (all sessions are lost on server restart) and doesn't work if you have more than one server instance (a distributed system).
- Database Store (e.g., PostgreSQL): A dedicated
sessionstable in your main database.- Pros: It's durable, and you're already using a database. Django's default session backend works this way (
django.contrib.sessions.backends.db). - Cons: Can add extra load to your primary database. Managing expiration often requires manual cleanup jobs.
- Pros: It's durable, and you're already using a database. Django's default session backend works this way (
- Key-Value Store (e.g., Redis): A dedicated in-memory data store.
- Pros: Extremely fast reads/writes. Redis has built-in support for setting a Time-To-Live (TTL) on keys, which handles session expiration automatically. It's a centralized store that all server instances can connect to, making it ideal for distributed systems.
- Cons: Adds another piece of infrastructure to manage.
For high-performance applications, Redis is the industry standard for session storage due to its speed and native support for expiration.
Tying It All Together & Security Hardening
Let's walk through the full, secure flow one last time, incorporating everything we've learned.
- Login: A user submits their username and password.
- Verification: The server verifies the credentials against the hashed password in the database (as covered in the last lesson).
- Session Generation: Upon success, the server does two things:
- Generates a new, cryptographically secure random string to be the session ID.
- Stores this session ID as a key in the session store (e.g., Redis). The value would be the session data, minimally containing the user's ID (e.g.,
{'user_id': 123}). It also sets an expiration time (TTL) on this record.
- Response: The server sends a response to the browser with a
Set-Cookieheader.
Set-Cookie: sessionid=a7d...; Max-Age=...; Path=/; Secure; HttpOnly; SameSite=Lax - Subsequent Request: The user navigates to
/dashboard. The browser automatically attaches theCookieheader to the request.
Cookie: sessionid=a7d... - Session Validation: The server's session middleware (a component that runs on every request) intercepts the request. It extracts the
sessionid, looks it up in Redis, and retrieves the session data{'user_id': 123}. It then attaches the user object to the request context. - Authorization: The
/dashboardview logic can now see that a user is attached to the request and proceeds. If the session ID were invalid or expired, the middleware would treat the user as anonymous, and the view would redirect them to the login page.
Security: Session Fixation & Logout
Two final, critical points for a robust implementation:
Session Fixation: What if an attacker could trick a user into using a session ID that the attacker already knows before the user logs in? After the user logs in, that session ID becomes authenticated, and the attacker can use it.
- Countermeasure: Always generate a new session ID and invalidate the old one immediately after a user successfully logs in. This is called renewing or rotating the session. Frameworks like Django do this automatically.
Logout: How does a user log out?
- The client sends a request to a
/logoutendpoint. - The server receives the request, gets the
sessionidfrom the cookie, and deletes the session record from the session store (e.g., deletes the key from Redis). - (Optional but good practice) The server can also send back a
Set-Cookieheader that tells the browser to clear the cookie immediately, for example by setting itsMax-Ageto 0.
An Introduction To Session-based Authentication In Rust
The article we read earlier also has an excellent explanation of both session renewal and the cookie deletion process.
Skim the subsection 'Session::renew' within section 3.5.2. It's very short but explains the importance of rotating the session token to prevent session fixation. Read section 2.4.13, 'How To Delete A Cookie In actix-web'. It explains the trick of setting Max-Age to 0 to instruct the browser to delete a cookie, which is the standard way to handle client-side cleanup on logout.
Conclusion
You now have a deep, root-level understanding of how stateful, session-based authentication works. This is the foundation upon which most traditional web applications are built.
Key Takeaways:
- Stateless to Stateful: Session-based authentication is a strategy to add state to the stateless HTTP protocol.
- Cookie as a Pointer: The client stores a cookie containing a random, meaningless session ID, which acts as a pointer or key.
- Server as the Authority: The server maintains a session store (like Redis) that maps session IDs to actual user data. The server is the single source of truth.
- Security is Paramount: Using the
HttpOnlyandSecurecookie flags is non-negotiable to prevent session hijacking via XSS and network sniffing. - Manage the Lifecycle: A secure flow involves generating a fresh session on login (to prevent session fixation) and explicitly destroying the session on the server-side during logout.
Preview of the Next Lesson
Session-based authentication is powerful, but it has one defining characteristic: it is stateful. The server must maintain a record for every active session. This can introduce challenges in very large, distributed systems.
In the next lesson, we will explore an alternative, stateless approach. We will: Explain the structure of a JSON Web Token (JWT) and compare token-based vs. session-based authentication. You'll learn how it's possible for a server to verify a user's identity without having to store any session information at all.