Hello! Welcome to the final lesson of your comprehensive backend engineering course.
In our previous lesson, we mastered the art of graceful shutdown, ensuring your application can exit cleanly without disrupting users or corrupting data. You learned how to intercept OS signals like SIGTERM, a crucial practice for building resilient services.
Today, we address another cornerstone of production-readiness: security. This lesson focuses on how to manage application secrets securely. Secrets are any sensitive pieces of information your application needs to function, such as database passwords, API keys, and encryption keys. Mishandling them is one of the most common and damaging security vulnerabilities. We'll start with basic methods and progress to robust, production-grade solutions, giving you the deep understanding you've been seeking.
1. The Problem: Secret Sprawl and Insecure Practices
The easiest way to provide a secret to an application is to hardcode it directly in the source code. This is also the most dangerous.
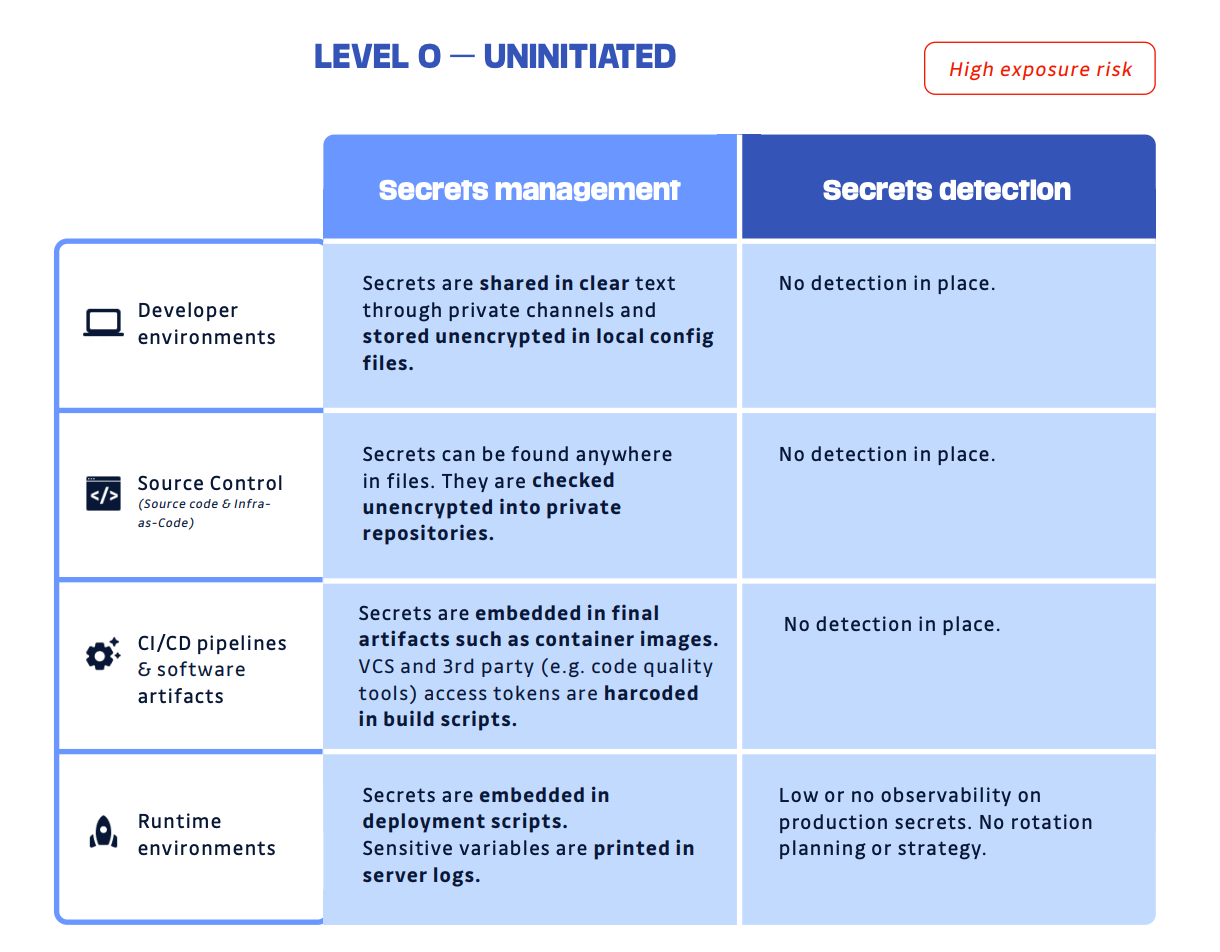
When secrets are hardcoded and committed to a version control system like Git, they become part of the repository's history forever. Even if you delete them in a later commit, they are still accessible. This creates a massive security hole, especially in public repositories. This problem, where secrets are scattered across codebases, configuration files, and developer machines, is often called secret sprawl.
Python Secrets Management: Best Practices for Secure Code
To understand the various ways secrets are managed and the risks involved, start by reading this article from the GitGuardian blog. It provides a great overview of the problem space.
Read the introductory section of the article, which clearly defines secrets and outlines the significant risks associated with leaking them.
2. A First Step: Environment Variables and .env Files
A much better approach than hardcoding is to externalize configuration using environment variables. Your application reads these key-value pairs from its execution environment at runtime.
For local development, managing numerous environment variables can be cumbersome. A common convention is to store them in a file named .env in your project's root directory. A library can then load this file and populate the environment variables for your application.
This approach has two critical components:
- Using a library like
python-dotenvto load the variables. - Crucially, adding the
.envfile to your.gitignorefile to prevent it from ever being committed to version control.
Python Tutorial: Securely Manage Passwords and API Keys with DotEnv
Corey Schafer provides an excellent, concise tutorial on using python-dotenv. This will walk you through the entire process, from installation to the all-important step of ignoring the file in Git.
Watch the video from the beginning up to 06:45. Pay close attention to these parts: 00:00 - 01:31: Understand the benefits of using .env files for project-specific, cross-platform configuration. 01:31 - 04:55: This is the most critical part. Observe how to create a .env file and, more importantly, how and why to add it to your .gitignore file. This prevents accidental secret leakage. 04:55 - 06:45: See the simple Python code using os.getenv() to access the variables loaded by load_dotenv().
While .env files are great for development, they are not a complete solution for production. The secrets still exist in a plaintext file on the server's filesystem, which might be accessible or inadvertently logged.
3. The Hierarchy of Configuration
To manage configuration effectively, it helps to think in terms of a hierarchy of specificity. A more specific source overrides a more general one.
Dev Dissection — Week 9: Environment Variables & Secrets ...
This blog post on 'Dev Dissection' provides a clear and practical configuration hierarchy that is widely adopted in modern applications.
Read the section 'The Configuration Hierarchy: From Chaos to Order'. This establishes a mental model for how different configuration sources should interact, from in-code defaults to command-line overrides.
The hierarchy looks like this:
- Defaults (in code): Least specific. Good for non-sensitive values like a default port.
- Environment files (
.env): Override defaults. Used for local development convenience. - Environment variables: Override
.envfiles. Used for runtime configuration in deployment environments (e.g., settingNODE_ENV=production). - Secret Manager: The most secure source, specifically for sensitive data. It overrides everything else.
This structure allows for flexibility in development while enforcing strong security in production. Public configuration (PORT, LOG_LEVEL) can live in environment variables, but sensitive data demands a dedicated tool.
4. Production-Grade Security: Dedicated Secrets Managers
In a production environment, especially a distributed one, you need a centralized, secure, and auditable system for managing secrets. This is the role of a secrets management tool.
These tools provide:
- Centralized Storage: A single source of truth for all secrets.
- Encryption at Rest and in Transit: Secrets are always encrypted.
- Fine-Grained Access Control: Policies define who (or what application) can access which secrets.
- Auditing: A log of who accessed what, and when.
- Dynamic Secrets: The ability to generate short-lived credentials on demand.
- Automated Rotation: Automatically changing passwords and keys periodically.
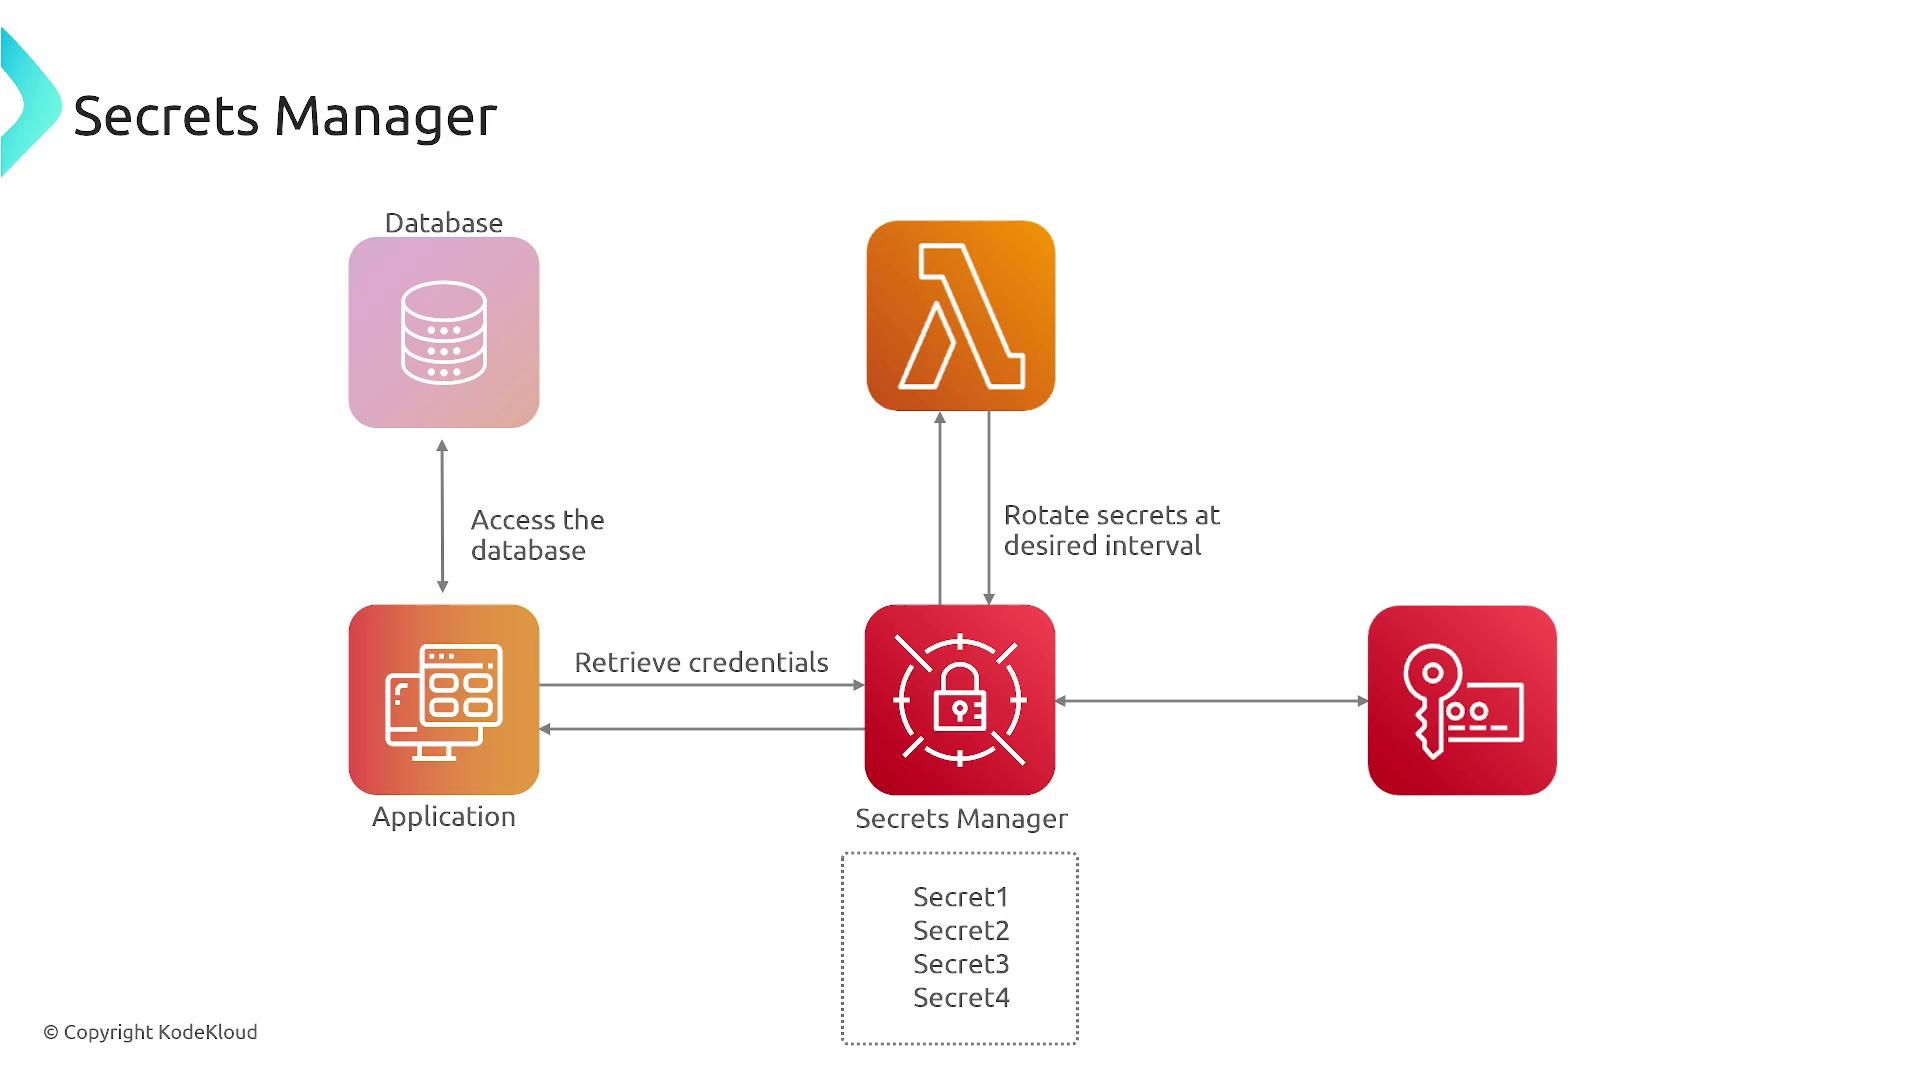
Popular secrets managers include HashiCorp Vault, AWS Secrets Manager, Google Secret Manager, and Azure Key Vault. We'll do a deep dive into Vault, as it's an open-source, platform-agnostic industry standard.
5. Deep Dive: HashiCorp Vault
HashiCorp Vault is a powerful tool for managing secrets. To truly understand it, we need to look at its architecture and core concepts.
HashiCorp Vault Tutorial for Beginners | FULL COURSE in 1 Hour | HashiCorp Vault Fundamentals
This comprehensive tutorial from TeKanAid provides an excellent foundation for understanding and using Vault. We'll go through it section by section.
First, watch from 01:43 to 06:39 to get an introduction to what Vault is, the problems it solves (like secret sprawl), and its primary use cases.
Vault Architecture: Sealing and Unsealing
One of Vault's most unique security features is its seal mechanism. When a Vault server starts, it's in a sealed state. It knows where its data is stored, but it doesn't know how to decrypt it.
To decrypt the data, Vault requires an unseal key. This key is not stored anywhere; instead, it's typically split into multiple shards using an algorithm called Shamir's Secret Sharing. A quorum of keyholders must present their shards to reconstruct the master key and "unseal" the vault.
HashiCorp Vault Tutorial for Beginners | FULL COURSE in 1 Hour | HashiCorp Vault Fundamentals
Let's continue with the Vault tutorial to understand its core architecture and the critical concepts of sealing and unsealing.
Watch from 26:14 to 36:31. This is the 'root level' explanation you're looking for. Focus on: The cryptographic barrier that separates trusted and untrusted components. The concept of the master key and how it's protected by the unseal key. How Shamir's Secret Sharing works to split the unseal key. The purpose of auto-unseal in production environments.
This mechanism ensures that even if the server is compromised or restarted, the data remains encrypted until a deliberate unsealing process is performed by multiple trusted individuals or an automated system.
Authentication, Policies, and Secrets Engines
Once unsealed, clients (users or applications) interact with Vault via its API. This interaction is governed by three key components:
- Auth Methods: How a client proves its identity to Vault (e.g., username/password, tokens, cloud provider IAM roles).
- Policies: Define what an authenticated client is authorized to do (e.g., read a specific secret, but not write it). Vault operates on a principle of least privilege; if a permission isn't explicitly granted, it's denied.
- Secrets Engines: These are the components that actually manage the secrets. This could be a simple key-value store, or a more advanced engine that dynamically generates database credentials or AWS access keys.
HashiCorp Vault Tutorial for Beginners | FULL COURSE in 1 Hour | HashiCorp Vault Fundamentals
Now, let's see how these pieces fit together. This next segment of the video covers authentication, policies, and secrets engines.
Watch from 48:34 to 56:38, and then from 58:17 to 01:01:39. This will explain how a client gets a token via an auth method, how that token is tied to policies, and how policies grant access to different secrets engines.
Integrating Applications with Vault Agent
So how does your Python application, which just wants to read a database URL from an environment variable, get a secret from Vault? You could use a library like hvac to interact with the Vault API directly, but this makes your application "Vault-aware" and adds complexity.
A more common and powerful pattern is to use the Vault Agent. The agent is a client daemon that runs alongside your application (often as a sidecar container in Kubernetes). It handles authenticating to Vault and retrieving secrets. The agent can then use a template to render these secrets into a file on disk (e.g., a .env file).
Your application remains completely unaware of Vault. It simply reads its configuration from a file, just as we did with python-dotenv.
HashiCorp Vault Tutorial for Beginners | FULL COURSE in 1 Hour | HashiCorp Vault Fundamentals
The final piece of the puzzle is the Vault Agent, which bridges the gap between Vault and your application.
Watch from 01:08:10 to 01:10:37. This section explains the role of the Vault Agent in handling authentication, token renewal, and templating secrets into a configuration file that your application can consume without modification.
This pattern of using a sidecar agent is extremely powerful as it decouples secrets management from your application logic, allowing you to adopt best-in-class security practices without rewriting your code.
Conclusion
In this lesson, we've established a robust framework for handling one of the most critical aspects of backend development: secrets management. You've learned to progress from insecure hardcoding to a production-grade, secure, and auditable system.
Key Takeaways:
- Never hardcode secrets or commit them to version control.
- Use
.envfiles and.gitignorefor secure and convenient local development. - Adopt a clear configuration hierarchy to manage settings from different sources.
- For production, use a dedicated secrets management tool like HashiCorp Vault.
- Understand the core security concepts of Vault, such as sealing/unsealing, policies, and auth methods.
- Leverage the Vault Agent sidecar pattern to securely inject secrets into your application without modifying its code.
Course Wrap-Up
Congratulations on completing the entire course! You have embarked on an ambitious journey to understand backend engineering from the root level, and you have reached the end with a deep, comprehensive knowledge of how modern systems are built, deployed, and operated.
Let's retrace our steps to appreciate the ground we've covered:
- Networking Fundamentals: We started at the lowest level, tracing how data travels via TCP/IP and how domain names are resolved by DNS.
- The HTTP Protocol: We deconstructed the language of the web, mastering HTTP requests/responses, methods, status codes, and the security layer of HTTPS.
- Operating System Concepts: We went under the hood of the server, exploring processes, threads, memory management, and the powerful asynchronous I/O models that enable high performance.
- Web Servers and Application Runtimes: We bridged the OS to your application, clarifying the roles of Nginx, Gunicorn, and the WSGI/ASGI specifications.
- Database Internals & Optimization: We dove into the database, understanding how data is stored in B-Trees, what ACID guarantees, and how to analyze queries with
EXPLAIN. - Advanced Database Patterns: We built on that foundation, exploring replication, sharding, and the trade-offs of normalization.
- Tracing the Request Lifecycle: We put all the pieces together, tracing a request from the browser, through load balancers and web servers, to the Django ORM and back.
- Authentication and Authorization: We secured your application with robust patterns like JWTs and OAuth 2.0.
- Application-Level Caching: We learned to scale by reducing database load with Redis.
- Asynchronous Processing: We offloaded long-running work with Celery and message brokers.
- System Design & Scaling: We zoomed out to the architectural level, learning principles of horizontal scaling, load balancing, and the CAP theorem.
- Deployment, Containerization, and Observability: Finally, you learned to package your application with Docker, monitor it with health probes and metrics, and operate it reliably with graceful shutdown and secure secrets management.
Your goal was to go as deep and technical as possible, and this course has equipped you with a solid mental model of how all these layers interact. The journey of a backend engineer is one of continuous learning, but you now possess a powerful and complete foundation to tackle any challenge. Well done.