Hello! Welcome to the final lesson in our module on Web Servers and Application Runtimes.
In our last lesson, we successfully configured a production-like environment with Nginx acting as a reverse proxy for a Gunicorn-managed Django application. A key characteristic of that setup, and of the HTTP protocol itself, is that it's stateless. Every request is treated as an independent transaction, with no memory of previous requests from the same client.
This raises a fundamental question: How do web applications manage to remember you? How do they keep you logged in, maintain your shopping cart, or save your preferences across multiple page loads?
This lesson will answer that question directly. Our learning outcome is to explain how cookies and sessions work at the HTTP protocol level to maintain state. We will go from the ground up, starting with the mechanism that makes statefulness possible—HTTP cookies—and then build upon that to understand the more common and secure pattern of server-side sessions.
The Problem of Statelessness and the Solution: Cookies
HTTP was designed to be stateless to keep things simple and efficient. However, for applications to be useful, they need a memory. Cookies are the standard mechanism created to solve this problem.
Let's start with a foundational definition of what cookies are and their main purposes.
The Mozilla Developer Network (MDN) provides an excellent introduction to cookies. This text will explain their core function and common uses.
Please read the introduction and the section 'What cookies are used for'. Focus on understanding that a cookie is a small piece of data the server asks the browser to store and send back with future requests. Pay attention to the three primary uses: session management, personalization, and tracking.
The Cookie Protocol: Set-Cookie and Cookie Headers
Now, let's look at the mechanics at the protocol level. How does a server give a cookie to a browser, and how does the browser return it? This happens through two HTTP headers:
Set-Cookie(Response Header): When a server wants to create or update a cookie on the client's browser, it includes one or moreSet-Cookieheaders in its HTTP response.Cookie(Request Header): On subsequent requests to the same server, the browser includes aCookieheader, sending back the relevant cookies it has stored.
The following video provides a practical demonstration of creating cookies and observing these headers in a browser's developer tools.
The 'HTTP Cookies Crash Course' video by Hussein Nasser offers a fantastic hands-on look at cookies. We'll watch a segment that demonstrates how cookies are set by both the server and client-side JavaScript.
Watch the segment from 00:04:06 to 00:14:31. Focus on the two methods of creation: Client-side: Using document.cookie in JavaScript. Server-side: The Node.js/Express example setting the Set-Cookie header in the response. Pay close attention at the end of the segment (around 13:40) where he inspects the network request and points out the Set-Cookie response header from the server and the Cookie request header on the next request. This is the core protocol exchange.
This flow is the foundation of how servers maintain a "conversation" with a client across multiple stateless requests.
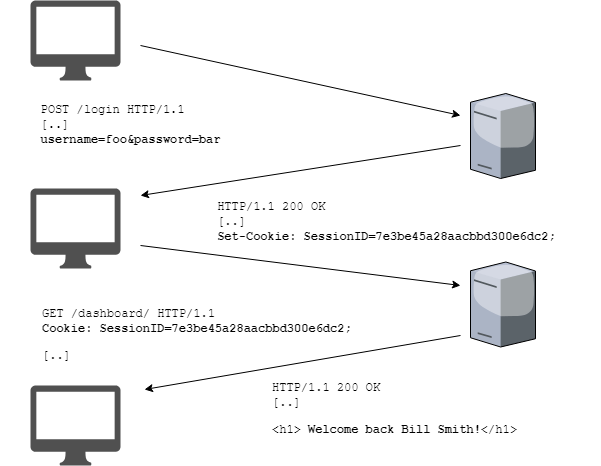
Anatomy of a Cookie: Attributes for Control and Security
A cookie isn't just a simple key-value pair. The Set-Cookie header can include several attributes that give you fine-grained control over a cookie's lifetime, scope, and security. Understanding these is critical for building secure and robust backends.
Let's explore these attributes in detail.
1. Lifetime: Expires and Max-Age
How long should a cookie last? These attributes decide that.
- Session Cookies: If neither
ExpiresnorMax-Ageis set, the cookie is a session cookie. It is deleted when the browser session ends (i.e., when the browser is closed). - Persistent Cookies: To make a cookie last beyond the current session, you can set:
Expires=...: Sets a specific expiration date and time.Max-Age=...: Sets the lifetime in seconds from the moment the cookie is set.Max-Agetakes precedence overExpiresif both are present.
Let's return to the 'HTTP Cookies Crash Course' video to see a demonstration of setting a cookie's lifetime.
Watch the short segment from 00:29:03 to 00:32:06. It explains the difference between session and permanent cookies and shows how to set the Max-Age attribute.
2. Scope: Domain and Path
Where should the cookie be sent? These attributes define the cookie's scope.
Domain: Specifies which hosts the cookie should be sent to. If unspecified, it defaults to the host of the current document URL (but not its subdomains). If you setDomain=example.com, the cookie will be sent toexample.comand all its subdomains (likewww.example.comorapi.example.com).Path: Indicates a URL path that must exist in the requested URL. For example, if you setPath=/admin/, the cookie will only be sent for requests to/admin/,/admin/users, etc., but not to/or/dashboard.
The next segment of the video provides excellent examples of how Domain and Path scoping works.
Watch from 00:15:32 to 00:29:03. Pay attention to how setting a cookie on example.com vs. www.example.com behaves, and how using Domain=.example.com makes the cookie available to all subdomains. The Path example clearly demonstrates how you can limit cookies to certain parts of your application to reduce overhead.
3. Security: Secure, HttpOnly, and SameSite
These are arguably the most important attributes for protecting your users and application.
Secure: If this flag is present, the browser will only send the cookie over an encrypted (HTTPS) connection. It's essential for any cookie containing sensitive information.HttpOnly: This is a critical defense against Cross-Site Scripting (XSS) attacks. When a cookie has theHttpOnlyflag, it is inaccessible to client-side JavaScript (i.e., it can't be read viadocument.cookie). This prevents a malicious script from stealing session cookies.SameSite: This attribute is a powerful defense against Cross-Site Request Forgery (CSRF) attacks. It tells the browser whether to send a cookie with cross-site requests.Strict: The cookie is only sent on requests originating from the same site.Lax(Default in most modern browsers): The cookie is sent on same-site requests and with top-level navigations (e.g., a user clicks a link from another site to go to yours). It's a good balance of security and usability.None: The cookie is sent on all requests, including cross-site requests made by embedded third-party content (e.g., an embedded video player). This requires theSecureattribute to be set.
The following resource provides a comprehensive reference for all these security attributes.
The MDN documentation on 'Using HTTP cookies' has a detailed section on security that serves as a perfect reference for these attributes.
Please read the entire 'Security' section. It provides clear explanations and examples for Secure, HttpOnly, Domain, Path, and SameSite. It also introduces 'Cookie Prefixes' like __Host- and __Secure-, which are an advanced, defense-in-depth security measure.
From Cookies to Sessions: The Server-Side Solution
While you could store all user information directly in cookies, it has significant drawbacks:
- Size Limit: Cookies are limited to about 4KB each.
- Performance: Cookies are sent with every single HTTP request, adding unnecessary overhead.
- Security: Storing sensitive data on the client is risky, even with encryption.
A much better approach is server-side sessions. The concept is simple: store the data on the server and give the client a "key" to unlock it.
Here's the flow:
- A user authenticates.
- The server creates a session object to store user data (e.g., user ID, permissions). This data is stored on the server—in memory, a database like PostgreSQL, or a cache like Redis.
- The server generates a long, random, and unique Session ID.
- The server sends this Session ID back to the client inside a cookie. This cookie is typically set with the
HttpOnly,Secure, andSameSite=Laxattributes for security. - On every subsequent request, the browser sends the Session ID cookie back to the server.
- The server uses the Session ID to look up the corresponding session data from its store, thereby "remembering" the user.

The following video provides a crisp, animated explanation of this flow.
Session Vs JWT: The Differences You May Not Know!
The 'Session Vs JWT' video from ByteByteGo clearly illustrates the session-based authentication flow. We'll focus only on the session part.
Watch from 00:00:19 to 00:01:43. This segment perfectly visualizes the server-side session mechanism. It shows the server creating a session, storing it, and sending back just the Session ID. It also touches on the implications for distributed systems, which is a key concept for scaling.
This session-based approach is the standard for most traditional web applications, including those built with frameworks like Django. It keeps sensitive data secure on the server and minimizes the amount of data transmitted with each request.
Conclusion
In this lesson, we've demystified how state is maintained over the stateless HTTP protocol. You now have a deep, protocol-level understanding of the tools that make modern web applications possible.
Key Takeaways:
- HTTP is stateless by design. Cookies are the primary mechanism for adding state.
- Cookies are exchanged between server and browser via the
Set-Cookie(response) andCookie(request) headers. - Cookie attributes are essential for controlling behavior and security:
- Lifetime:
Expires/Max-Age(session vs. persistent). - Scope:
Domain/Path(where the cookie is sent). - Security:
Secure(HTTPS only),HttpOnly(no JS access),SameSite(CSRF protection).
- Lifetime:
- Server-side sessions are a more secure and scalable pattern. The server stores the actual session data and sends only a unique Session ID to the client in a cookie.
Preview of the Next Lesson:
We just learned that session data is often stored in a database on the server. This provides a perfect transition to our next module, "Database Internals: How Data is Stored and Retrieved." In the first lesson of that module, we will begin our journey into the database by exploring the fundamental question: How does a relational database store data on disk using pages and rows? This will be our first step in peeling back the layers of the database, just as we have done for networking and web servers.