Introduction
Welcome to a new module focused on creating visual digital products! In the last module, you became proficient at designing, building, and packaging sophisticated Notion templates, culminating in a professional, shareable product. You've mastered the art of creating system-based digital goods.
Now, we'll shift our focus to asset-based products, starting with photography. This lesson kicks off our journey into creating custom photo presets, a popular and lucrative digital product. The learning outcome for today is to import and organize photos using a cataloging system in Adobe Lightroom or Darktable.
Mastering organization is the critical first step. A well-organized photo library is like a well-structured database; it's the foundation that enables efficient work, easy access to your assets, and a scalable workflow. You can't build great presets if you can't find your photos. In line with your preference for sustainable and budget-conscious tools, we'll cover both the industry-standard Adobe Lightroom, which you have access to through school, and Darktable, an incredibly powerful and free open-source alternative.
1. The Philosophy of Photo Organization
Before we dive into the software, let's establish a core principle. Professional photo management software like Lightroom and Darktable use a cataloging system.
- What is a catalog? It's a database that stores information about your photos (like their location on your hard drive, your edits, ratings, keywords, etc.) without modifying the original image files. This is called non-destructive editing. The original photo (the "digital negative") remains untouched.
A robust organization system has two parts:
- Physical Organization: How your photo files are structured in folders on your computer's hard drive.
- Virtual Organization: How you group, rate, and tag photos inside the catalog using tools like collections, keywords, and ratings.
For your physical organization, a systematic, date-based folder structure is a reliable standard. It's logical, scalable, and easy to navigate even outside of your photo software.
How to Organize Photos in Lightroom - Photography Life
To understand the fundamentals of setting up a solid file structure, let's consult a guide from Photography Life. We'll focus on the initial decisions about storage and folder hierarchy.
Read section 2, 'Folder Structure and Organization.' The guide recommends a simple hierarchy: a main 'Photos' folder, with sub-folders for each year, and then further sub-folders for each event or location (e.g., Photos/2024/New_York_Trip). This is the rule-based framework we will build upon.
This YEAR/EVENT structure is an excellent starting point. It keeps your file system clean and predictable.
2. The Lightroom Classic Workflow
As you have access to the Adobe suite, Lightroom Classic is the logical place to start. It's the industry standard for professional photographers.
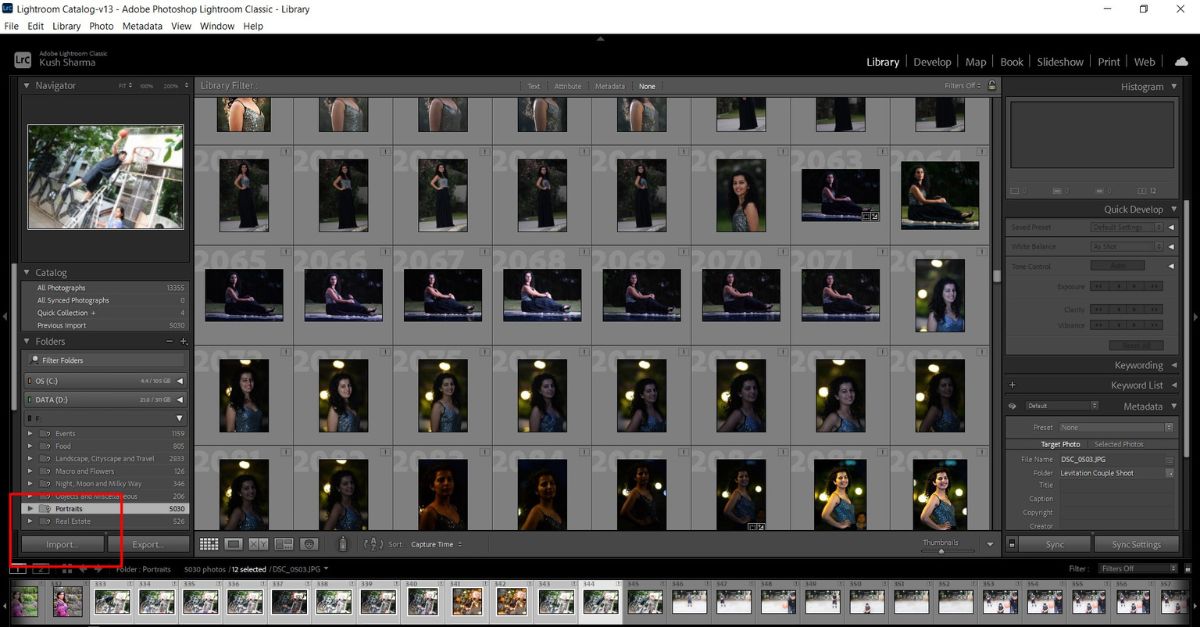
The following video from PHLEARN provides a fantastic walkthrough of the entire import and organization process.
How to Import & Organize Photos in Lightroom Classic
This video, 'How to Import & Organize Photos in Lightroom Classic', will guide you through the essential steps, from the import dialog to building an organized catalog.
Watch the following segments: The Import Dialog (00:49 - 03:00): Focus on the four options at the top: Copy as DNG, Copy, Move, and Add. Copy is what you'll use when importing from a memory card. Applying Metadata (03:00 - 04:51): Learn how to embed your copyright information and add keywords during import. This is crucial for protecting your work and making it searchable. Setting up Folder Structure (07:40 - 12:09): This section shows you how to use Lightroom to automatically create the dated folder structure we just discussed. Creating Subfolders (12:09 - 16:13): See a professional workflow that uses subfolders like 'Capture' (for RAWs), 'PSD' (for Photoshop edits), and 'Output' (for exported JPEGs) to keep projects tidy. Using Collections (16:13 - 20:16): This is a key concept. Pay close attention to the difference between physical folders and virtual collections.
Key Lightroom Concepts
Based on the video, here are the core takeaways:
-
Folders vs. Collections: This is the most important distinction. The Folder panel on the left shows the actual folder structure on your hard drive. If you move a file here, you're moving it on your computer. Collections are virtual groupings, like playlists for your photos. A single photo can be in multiple collections without being duplicated. You might have a folder for
2024-03-15_Downtown_Tripand within it, create collections for "Architecture," "Street Portraits," and "Best Of." -
Import Options:
- Copy: Copies photos from a source (like an SD card) to a new destination on your hard drive and adds them to the catalog.
- Move: Moves photos from an existing location on your hard drive to a new one and adds them to the catalog.
- Add: Adds photos to the catalog from their current location on your hard drive without moving them.
- Copy as DNG: Copies photos and converts them to Adobe's Digital Negative (DNG) format, which can save space and ensure future compatibility. This is often a good choice.
3. The Darktable Workflow (The Free Alternative)
Darktable is a powerful, free, and open-source application that offers a similar cataloging and non-destructive editing workflow. It's an excellent choice for when you no longer have your school's Adobe subscription.
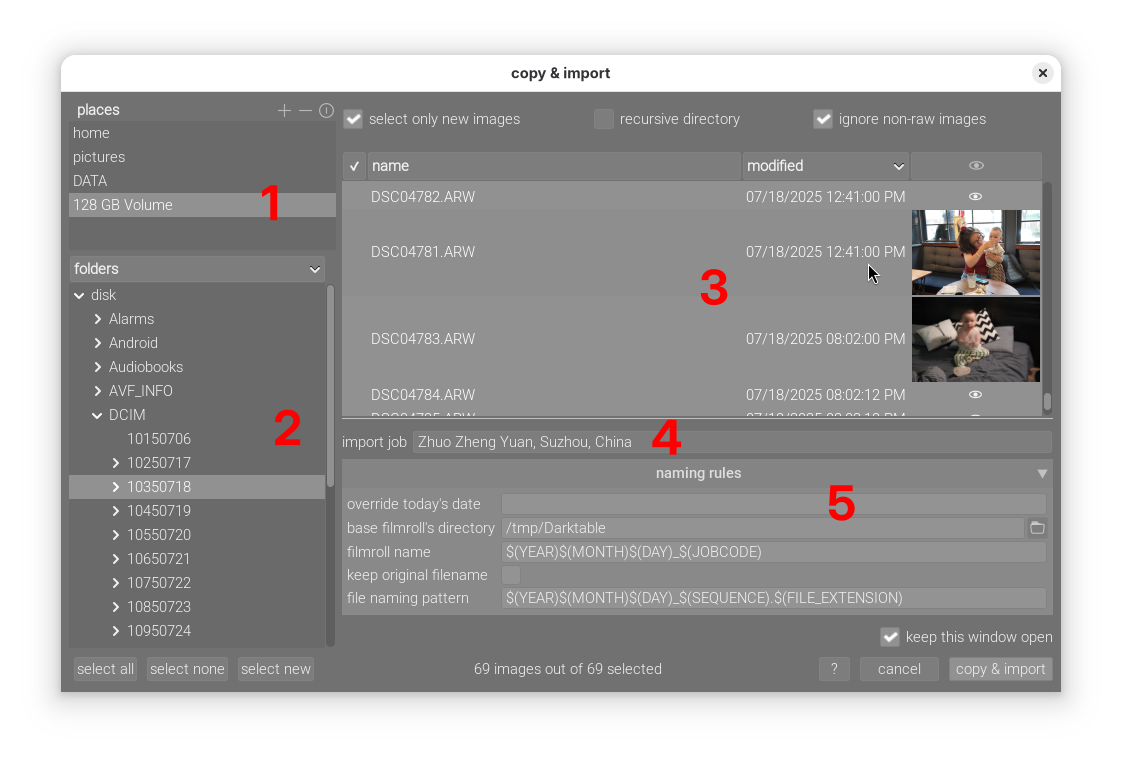
Initial Setup
Before you start, there's one crucial setting to configure for optimal results.
Developing Photos With Darktable - by Scott Gilbertson - Luxagraf
This article, 'Developing Photos With Darktable,' provides a great introduction. We'll start with the initial setup to ensure your results are consistent.
Read the 'Set Up Darktable' section. The most important step is going into the settings (gear icon) and under the 'Processing' tab, setting 'Auto Apply Pixel Workflow defaults' to 'scene-referred (sigmoid)'. This ensures your starting point for editing is consistent and modern.
Now, let's walk through the Darktable workflow, which, while different in name, follows the same organizational principles.
Get Organised! How to Import, Cull, and Organise your photos in Darktable
The video 'Get Organised! How to Import, Cull, and Organise your photos in Darktable' from Darktable Landscapes is a perfect guide to its workflow.
Watch the following segments: Importing Photos (00:31 - 03:40): This covers the difference between add to library and copy & import (equivalent to Lightroom's Add and Copy). Pay attention to how to set up the naming pattern for your destination folders using EXIF data (e.g., $(EXIF_YEAR)/$(EXIF_MONTH)/$(EXIF_DAY)). Culling Photos (05:14 - 09:10): Culling is the process of reviewing and rejecting unusable photos. This section shows a systematic process using ratings and reject flags, which is very efficient. Organizing with Tags (10:52 - 14:58): This is the Darktable equivalent of Lightroom's Collections. You'll learn to create hierarchical tags (e.g., Travel > Denmark > Copenhagen) to create a powerful, searchable virtual organization system.
Key Darktable Concepts
- Lighttable View: This is Darktable's main library interface, equivalent to Lightroom's Library module.
- Tags as Collections: The tagging system is how you create virtual groups. By creating hierarchical tags (tags within tags), you can replicate the exact same organization you'd get with folders and collections in Lightroom.
- Culling with Ratings: The process of quickly going through new photos, marking bad ones for rejection (
Rkey) and marking potential keepers with one star (1key), is a fundamental workflow for managing large shoots.
Your Turn: Build Your First Catalog (20 minutes)
It's time to put this into practice. You can use your iPhone 12 to take a small set of 15-20 photos for this exercise. Try to get a mix of subjects.
Choose your tool: Select either Lightroom Classic or Darktable for this assignment.
- Transfer Photos: Connect your iPhone to your MacBook and transfer the photos to a temporary folder on your desktop.
- Create Your Folder Structure: On your computer (in your main
Picturesfolder or on an external drive), create a folder for the current year (e.g.,2024). - Import Your Photos:
- Open your chosen software (Lightroom or Darktable).
- Start the import process (
Copyin Lightroom,Copy & Importin Darktable). - Point the importer to your temporary desktop folder as the source.
- Set the destination to be inside your
2024folder. Have the software create a new subfolder named with today's date and a descriptive name, like2024-03-15_First_Import_Test. - In the metadata/options section, add your name to the copyright field.
- Add a general keyword/tag for the set, like "Test Shoot."
- Execute the import.
- Organize Virtually:
- Once imported, view your new photos in the Library/Lighttable module.
- Practice culling: go through the images and give your 3-4 favorites a 3-star rating.
- Create a virtual collection/tag:
- Lightroom: Create a new Collection named "Favorites."
- Darktable: Create a new tag named "Favorites."
- Add your 3-star photos to this new collection/tag.
After this exercise, you will have a clean, organized catalog with your photos physically stored in a logical folder and virtually grouped for easy access.
Conclusion
You have successfully taken the first and most critical step in managing a professional photo library. You now understand the difference between physical file location and virtual catalog organization, and you know how to implement a system in both Adobe Lightroom and the free alternative, Darktable.
Key Takeaways:
- Cataloging is non-destructive: Your original files are safe. The catalog simply stores instructions and metadata.
- A
YEAR/EVENTfolder structure is a simple and robust way to organize files on your hard drive. - During import, always apply copyright metadata and relevant keywords to save time later.
- Lightroom Collections and Darktable Tags serve the same purpose: to create flexible, virtual groupings of photos without duplicating files.
This foundation will be essential as we move forward.
Preview of the Next Lesson
With your photos neatly imported and organized, we're ready to start editing. In the next lesson, we will begin our journey into color and tone. The learning outcome will be: "Perform foundational edits by adjusting exposure, contrast, and white balance in the Basic panel." You'll learn how these fundamental sliders form the backbone of every good edit and are the first step in crafting a custom preset.