Introduction
Welcome to the final lesson in our module on creating photo presets! In the last session, you did the creative and technical work of building a cohesive preset collection, starting with a "hero" preset and then developing variations for different lighting conditions. You now have the core components of a professional-grade digital product.
Today's lesson is about the final step: packaging your presets for distribution. A great product is only half the battle; presenting it in a clear, professional, and user-friendly package is what ensures a positive customer experience. We will cover exporting your presets into the correct file formats for both desktop and mobile, writing clear installation instructions, and bundling everything into a single, downloadable file.
By the end of this lesson, you will have a complete, market-ready digital product.
1. Understanding Preset File Formats
Before we export, it's crucial to understand the different file formats your customers will need. The format determines compatibility with different versions of Lightroom and devices.
How to Make and Sell Lightroom Presets in 2026
The article 'How to Make and Sell Lightroom Presets' from Cultured Kiwi provides a concise overview of the different file formats you'll encounter. This will help you understand what you need to provide to your customers.
Read the section titled 'How to Export Presets'. Focus on the descriptions of the three main file formats: .lrtemplate, .xmp, and .dng. This will clarify which formats are for desktop and which are for mobile.
To summarize the key formats for a modern product:
| File Format | Primary Use | How It Works |
|---|---|---|
.XMP |
Lightroom Classic & Lightroom CC (Desktop) | An XML-based file containing the edit settings. It's the current standard for desktop presets. |
.DNG |
Lightroom Mobile (Free & Paid versions) | A raw image file that has the preset's edit settings embedded within it. |
.lrtemplate |
Legacy versions of Lightroom (pre-2018). It's good to know about, but less essential now. | An older format for storing preset data. You likely won't need to create these. |
For a comprehensive product, you should provide both .XMP files for desktop users and .DNG files for mobile users.
2. Creating Your Deliverable Files
Now, let's generate the files for your product package.
A. Exporting for Desktop (.XMP files)
You've already created the .XMP files when you saved your presets in the previous lesson. Now you just need to locate them.
- Open Lightroom Classic.
- Go to the Develop module.
- In the Presets panel on the left, find the preset collection you created.
- Right-click on one of your presets and select "Show in Finder" (or "Show in Explorer" on Windows).
- This will open a folder containing the
.XMPfiles for all your presets in that group. - Create a new folder on your desktop (e.g., "Desktop Presets") and copy all the relevant
.XMPfiles into it.
You now have the files needed for your desktop customers.
B. Exporting for Mobile (.DNG files)
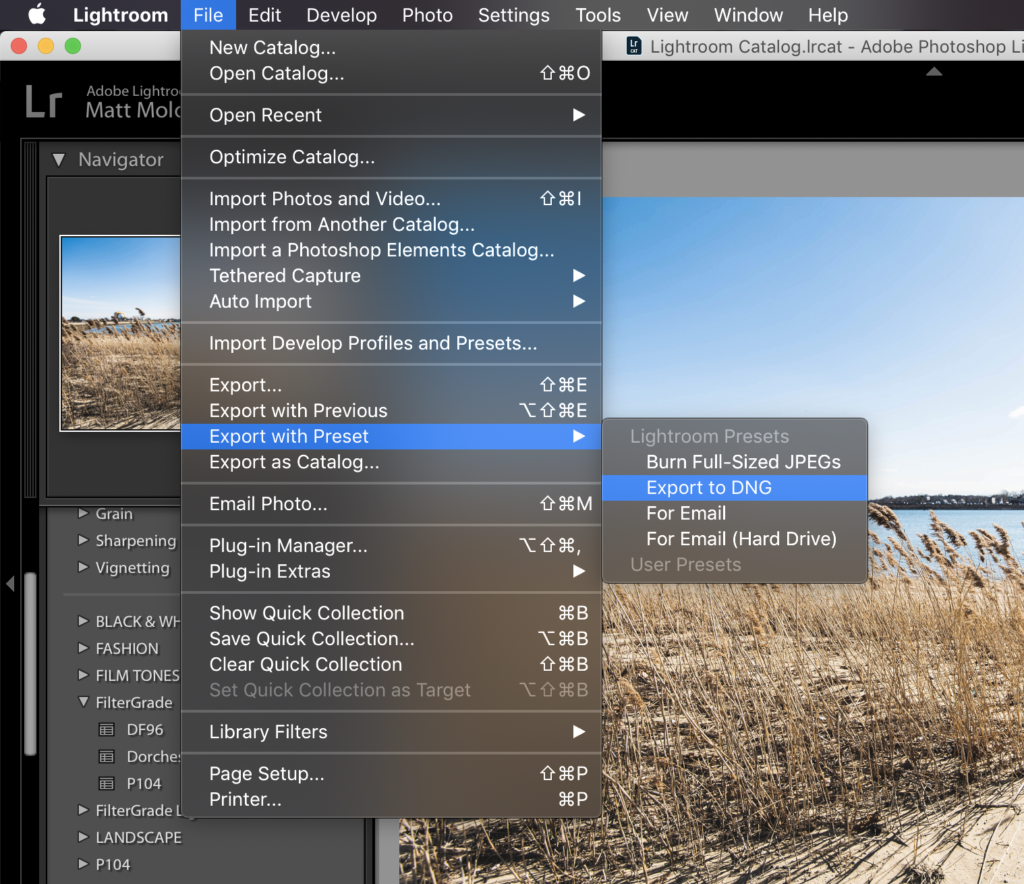
Creating .DNG files requires an extra step: applying each preset to an image and exporting that image as a .DNG. This embeds the settings into the file. The following video demonstrates a clean, systematic way to do this.
How to use Lightroom Desktop presets on Mobile
This video from Dennis Leoca, 'How to use Lightroom Desktop presets on Mobile,' provides a fantastic workflow for creating DNG files. Although the video's goal is to transfer presets for personal use, the process is identical for creating distributable DNG files.
Watch from 00:55 to 03:34. The key steps are: Importing base images: He uses simple thumbnail images with text, which is a great idea for organization. You can use any neutral photo. (00:55 - 02:21) Applying the presets: He applies each desktop preset to one of the base images. (02:21 - 02:53) Exporting as DNG: He then exports each of these images as a DNG file. This is the most critical step. (02:53 - 03:34) Follow this process for each preset in your collection.
After following this process, you should have a second folder (e.g., "Mobile Presets") containing a .DNG file for each preset in your collection.
3. Creating Installation Instructions
Clear instructions are non-negotiable. They prevent customer confusion and reflect the quality of your brand. The best approach is to create a simple PDF document that covers installation for all the file types you provide.
You don't need to write this from scratch. You can use a high-quality online guide as a template for your own instructions.
How To Install Lightroom Presets in 2024 - Desktop and Mobile
The article 'How To Install Lightroom Presets in 2024' by Kevin Krautgartner is an excellent, comprehensive guide. You can model your own installation PDF directly on the clear, step-by-step instructions provided here.
Review the following sections to understand the process for each platform. Then, use these steps to write your own guide in a text editor or design tool (like Canva or Figma) and export it as a PDF. Installing presets in Lightroom Classic (version 7.3 or later): This covers .XMP installation for your desktop users. Installing presets in Lightroom CC on Mac or Windows: This is for users of the cloud-based desktop app. Installing presets in Lightroom Mobile (Method 1): Briefly explain this for users with an Adobe subscription (presets sync automatically from desktop). Installation Guide for Lightroom Mobile on iPhone / iOS devices: This is the crucial guide for your .DNG files. It's the most manual process, so make these instructions very clear.
Your Task: Create a simple PDF document named Installation Guide.pdf. Use the resource above to write clear, numbered steps for installing .XMP and .DNG presets. Adding screenshots can make your guide even more helpful.
4. Packaging Your Product
With all the components ready, the final step is to organize them into a single, compressed .zip file for delivery. A clean folder structure is professional and easy for your customers to navigate.
- Create a main folder and name it after your product (e.g.,
MyBrand - Aura Preset Collection). - Inside this main folder, place the
Installation Guide.pdf. - Also inside the main folder, place the
Desktop Presets (.XMP)folder and theMobile Presets (.DNG)folder you created earlier.
Your final folder structure should look like this:
Aura Preset Collection/
├── Desktop Presets (.XMP)/
│   ├── Aura - Base.xmp
│   ├── Aura - Bright Sun.xmp
│   └── ...
├── Mobile Presets (.DNG)/
│   ├── Aura - Base.dng
│   ├── Aura - Bright Sun.dng
│   └── ...
└── Installation Guide.pdf
- On your Mac, right-click the main folder (
Aura Preset Collection) and select "Compress '[Folder Name]'". This will create the final.zipfile that you will upload to your chosen sales platform.
Bonus: Preparing Promotional Images
While not part of the deliverable file itself, creating promotional images is an essential part of packaging your product for the market. You need to show customers what your presets can do.
How to Make Money Selling Lightroom Presets
The video 'How to Make Money Selling Lightroom Presets' has an excellent segment on creating key marketing assets: a cover image and before-and-after comparisons.
Watch from 04:47 to 09:07. You'll learn two things: Product Mockups (04:47 - 07:34): The creator shows how to use Adobe Express to design a cover image and then place it on a 3D box mockup using Photoshop. This adds a tangible, professional feel to your digital product. Before & After Images (07:34 - 09:07): He demonstrates a very simple method in Adobe Express for creating side-by-side before-and-after images. This is the most effective way to showcase the value of your presets.
Creating a few of these promotional images now, while the product is fresh in your mind, will give you a head start when it's time to build your sales page.
Conclusion
Congratulations! You have successfully created and packaged your first digital product. You've gone from a creative idea to a professional, customer-ready deliverable.
Key Takeaways:
- A complete preset pack should include
.XMPfiles for desktop and.DNGfiles for mobile to serve the widest audience. - Creating
.DNGfiles involves exporting a photo with the preset applied, which embeds the settings for mobile use. - A clear, step-by-step installation guide (PDF) is a critical part of the product that reduces customer support issues.
- Organizing your files into a clean folder structure and compressing them into a
.zipfile is the standard for professional delivery. - Promotional materials like mockups and before-and-after images are essential for marketing your product effectively.
Preview of the Next Module
You've successfully designed and packaged a digital product. This concludes our modules on product design. We are now going to shift gears from making the product to building the business around it.
In the next lesson, we will begin the "Business Operations & Legal Foundations" module. We'll start by exploring the simplest form of business structure: the sole proprietorship, and what that means for your tax obligations and registration requirements.