Hello again! Let's get started on the final functional piece of our capstone project.
In our last lesson, you did an excellent job wiring up the front-end. Customers can now select their product customizations, and that information is correctly saved to the cart as line item properties using the Ajax API. This is a huge milestone!
But what happens after the customer checks out? The merchant needs to see those customizations to fulfill the order correctly. Today's lesson is about closing that loop. Our learning outcome is to build a backend process to retrieve and display order customizations for the merchant. We will create a new page inside our app where the merchant can see a list of recent orders and their associated custom details.
This will bring together your skills in Node.js, Express.js, and React within the Shopify app ecosystem, demonstrating a complete end-to-end feature.
Where Do Customizations Live After Checkout?
First, let's address a fundamental question: when a customer completes their purchase, where do the line item properties go?
The great news is that Shopify automatically carries them over from the cart to the created Order. The simplest way for a merchant to see this information is directly within the Shopify Admin. If they navigate to an order, the line item properties you saved are displayed right under the product title.
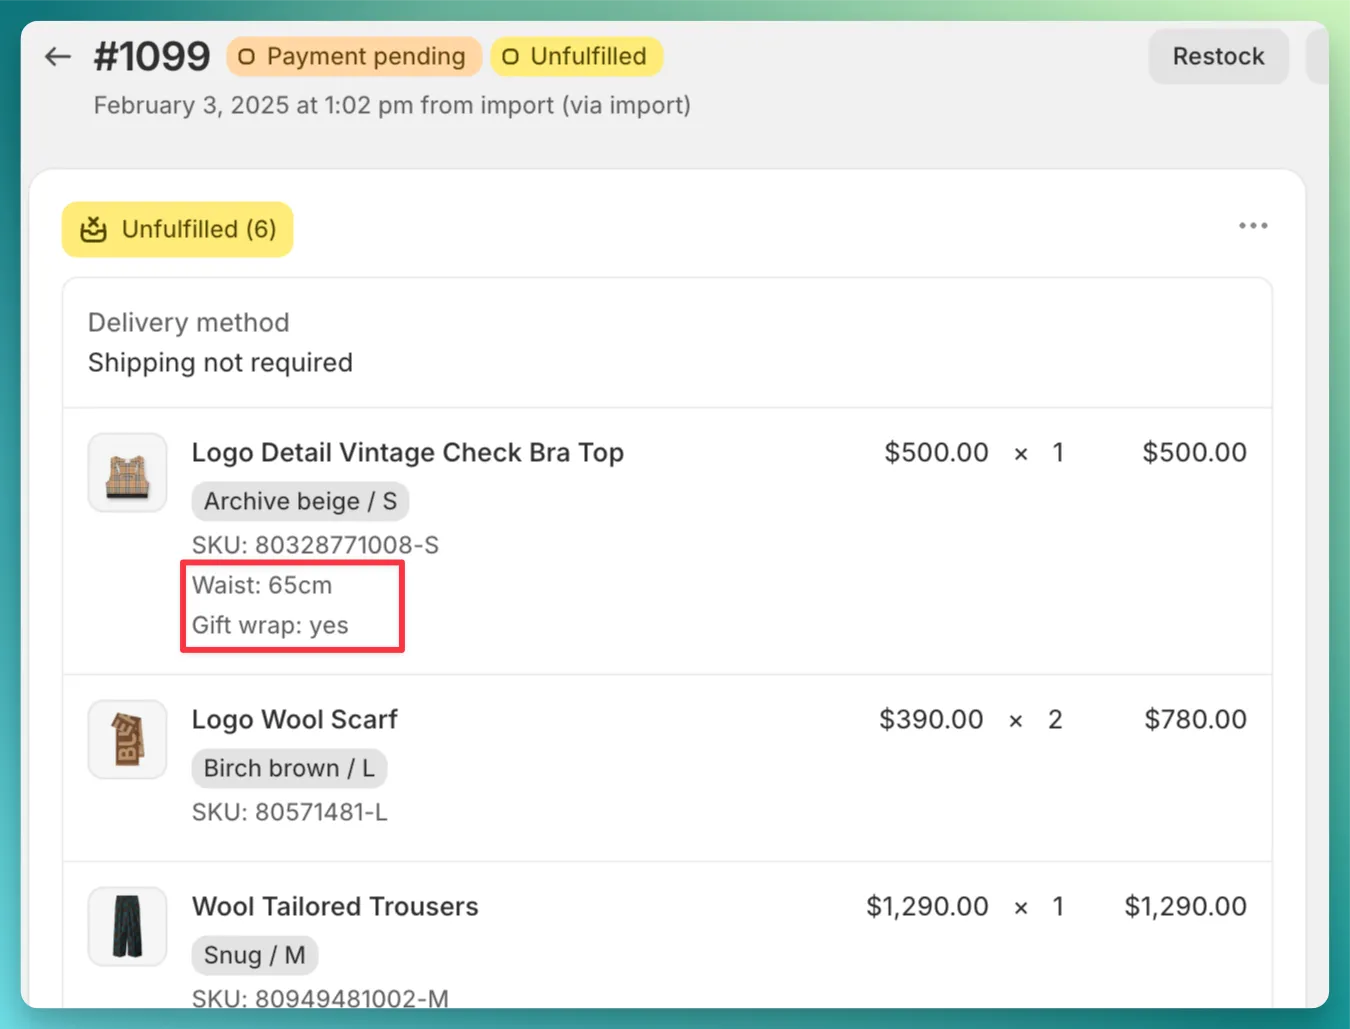
So, if the information is already there, why build a custom backend process?
- Centralized Information: A professional app provides a "home base" for the merchant. Instead of having to hunt through standard Shopify order pages, they can come to your app's dashboard to see all orders that have customizations managed by your app.
- Advanced Filtering & Reporting: What if a merchant wants to see all orders that include an "Engraving"? Or export a list of all engravings for the week? You can only build this kind of value-added functionality by fetching the data and presenting it in your own custom interface.
- Integration: Your app's backend could become a hub for sending customization data to other systems—an external engraving service's API, a special label printer, or a custom workflow tool.
Building our own view transforms your project from a simple front-end add-on into a comprehensive merchant tool.
The Backend Strategy: Fetching Orders with GraphQL
Our goal is to create a new page within our app that lists recent orders and their customizations. Since this requires access to store data, this is a job for our Node.js backend and the Admin API.
Here's our plan:
- Create a backend API endpoint in our Express.js server (e.g.,
GET /api/orders). - When this endpoint is called, our server will use the authenticated Shopify API client to send a GraphQL query to fetch recent orders.
- We will design the query to specifically request the line items and their custom attributes for each order.
- Create a new React page in our front-end that calls our
/api/ordersendpoint. - Use Shopify's Polaris component library to display the fetched order data in a clean, professional table that matches the Shopify Admin's look and feel.
Your full-stack background with the MERN/Next.js stack makes you perfectly equipped for this task. You're connecting a React front-end to a Node.js API, a pattern you're already very familiar with. The main difference here is that our Node.js backend will, in turn, act as a client to the Shopify GraphQL API.
Step 1: Crafting the GraphQL Query
Before writing any server code, let's design the GraphQL query. We need to ask the Shopify API for a list of orders. The primary query for this is orders.
The Shopify Admin API documentation for the orders query is our reference. It explains how to fetch a list of orders and what arguments are available.
Skim the introduction to understand the purpose of the orders query. Then, look at the 'OrderConnection arguments' like first which we'll use for pagination. Finally, review the 'Possible returns' section to see the edges and nodes structure, which is standard for GraphQL connections.
Each order in the list is an Order object. For each order, we need to dig into its lineItems. And for each line item, we need its custom properties. In the GraphQL Admin API, these are called customAttributes.
Here is the complete query we will use. It fetches the 10 most recent orders and, for each one, includes the line items and their custom attributes.
query GetOrdersWithCustomizations {
  orders(first: 10, sortKey: PROCESSED_AT, reverse: true) {
    edges {
      node {
        id
        name
        lineItems(first: 10) {
          edges {
            node {
              id
              name
              customAttributes {
                key
                value
              }
            }
          }
        }
      }
    }
  }
}
Deconstructing the Query:
orders(first: 10, sortKey: PROCESSED_AT, reverse: true): This asks for the first 10 orders, sorted by the most recently processed.edges { node { ... } }: This is the standard GraphQL connection pattern for lists. The actual order data is inside thenode.lineItems(first: 10): For each order, we get its list of line items.customAttributes { key value }: This is the crucial part. For each line item, we retrieve thekeyandvalueof every custom property attached to it. This is where our "Engraving" text and other customizations will be.
Step 2: Building the Backend Route
Now, let's create the Express.js route in your app's backend that will execute this query. The Shopify CLI app template provides an authenticated shopify object that includes a GraphQL client.
In your project's web/ directory, open the main server file (likely web/index.js). We will add a new route handler.
// Add this somewhere in your web/index.js, after the app setup

app.get("/api/orders", async (req, res) => {
  try {
    // Get the current session from the request.
    // The verifyRequest middleware (already in your template) ensures this is valid.
    const session = res.locals.shopify.session;

    // Create a new GraphQL client from the session.
    const client = new shopify.api.clients.Graphql({ session });

    // The GraphQL query we designed earlier.
    const queryString = `
      query GetOrdersWithCustomizations {
        orders(first: 10, sortKey: PROCESSED_AT, reverse: true) {
          edges {
            node {
              id
              name
              lineItems(first: 10) {
                edges {
                  node {
                    id
                    name
                    customAttributes {
                      key
                      value
                    }
                  }
                }
              }
            }
          }
        }
      }
    `;

    // Make the API call.
    const response = await client.query({
      data: queryString,
    });

    // Send the data back to the front-end.
    // The actual orders are in response.body.data.orders.edges
    res.status(200).send(response.body.data.orders.edges);

  } catch (error) {
    console.error("Failed to process api request:", error);
    res.status(500).send("Internal Server Error");
  }
});
This code snippet creates an endpoint at /api/orders. When your app's front-end makes a request to it, the server securely communicates with Shopify to fetch the order data and then passes it back.
Step 3: Displaying the Data on the Front-End
The final step is to create a new page in our React front-end to display this data. The Shopify CLI template uses file-based routing.
- Create a new page file: In your
web/frontend/directory, create a new file:web/frontend/pages/orders.jsx. - Add the page component code: Paste the following React code into your new
orders.jsxfile. This component uses theuseAppQueryhook (provided by the CLI template for authenticated fetches) to call your new backend endpoint and Polaris components to render the UI.
import { Page, Layout, Card, ResourceList, TextStyle, Stack, Spinner } from "@shopify/polaris";
import { useAppQuery } from "../hooks";

export default function OrdersPage() {
  // useAppQuery hook handles fetching, loading, and error states.
  const {
    data: ordersData,
    isLoading,
    isError,
  } = useAppQuery({
    url: "/api/orders",
  });

  // The actual orders are an array of { node: Order } objects.
  const orders = ordersData || [];

  if (isLoading) {
    return (
      <Page>
        <Layout>
          <Layout.Section>
            <div style={{ display: 'flex', justifyContent: 'center', alignItems: 'center', height: '100px' }}>
              <Spinner accessibilityLabel="Loading orders" size="large" />
            </div>
          </Layout.Section>
        </Layout>
      </Page>
    );
  }

  if (isError) {
    return (
        <Page>
            <Layout>
                <Layout.Section>
                    <Card sectioned>
                        <TextStyle variation="negative">Error loading orders.</TextStyle>
                    </Card>
                </Layout.Section>
            </Layout>
        </Page>
    );
  }

  return (
    <Page title="Recent Orders with Customizations">
      <Layout>
        <Layout.Section>
          <Card>
            <ResourceList
              resourceName={{ singular: "order", plural: "orders" }}
              items={orders}
              renderItem={(orderItem) => {
                const { node: order } = orderItem;
                const { id, name, lineItems } = order;

                return (
                  <ResourceList.Item
                    id={id}
                    accessibilityLabel={`View details for order ${name}`}
                  >
                    <h3>
                      <TextStyle variation="strong">{name}</TextStyle>
                    </h3>
                    {lineItems.edges.map(({ node: lineItem }) => (
                      <div key={lineItem.id} style={{ marginLeft: '20px', marginTop: '10px' }}>
                        <div>{lineItem.name}</div>
                        {lineItem.customAttributes.length > 0 && (
                          <Stack vertical spacing="tight">
                            {lineItem.customAttributes.map((attr) => (
                              <div key={attr.key}>
                                <TextStyle variation="subdued">{attr.key}: {attr.value}</TextStyle>
                              </div>
                            ))}
                          </Stack>
                        )}
                      </div>
                    ))}
                  </ResourceList.Item>
                );
              }}
            />
          </Card>
        </Layout.Section>
      </Layout>
    </Page>
  );
}
- Add a link to the page: To navigate to this new page, open
web/frontend/components/App.jsx(or wherever your main navigation is) and add a<Navigation.Item>that points to/orders.
Now, restart your dev server (npm run dev) and navigate to your new "Orders" page in the app. You should see a list of the 10 most recent orders, and under each relevant product, you'll find the customization details neatly listed!
Test your understanding!
A merchant loves the new orders page but has a request: for line items that have no customizations, they want to hide them from the list to reduce clutter. They only want to see the products that were actually customized.
How would you modify the orders.jsx React component to implement this?
Show answer
You would need to filter the lineItems.edges array before mapping over it. Instead of mapping the entire array, you would do something like this:
{lineItems.edges
  .filter(({ node: lineItem }) => lineItem.customAttributes.length > 0) // Add this filter
  .map(({ node: lineItem }) => (
    // ... rest of the rendering logic
  ))
}
This change filters the line items array to include only those items where the customAttributes array is not empty, effectively hiding products without customizations.
Conclusion
Congratulations! You have successfully built a backend process to retrieve and display order customizations for the merchant. This completes the core functionality of your Product Customizer app. You've connected a custom front-end experience for the customer all the way through to a custom backend view for the merchant.
Key Takeaways:
- Line item properties from the cart are automatically saved to the
Orderobject on checkout. - The Admin GraphQL API is the modern, powerful way to query for store data from your app's backend.
- The
ordersquery allows you to fetch a list of orders, while thelineItemsandcustomAttributesfields let you drill down to the specific customization data. - In a Shopify app, you typically create backend API routes that your React front-end calls to securely fetch data.
Next Steps
Your app is now a complete, functional piece of software. It solves a real problem for merchants from end to end. There's just one final, crucial step to making it a real-world tool: deployment.
In our next lesson, we will tackle the final learning outcome: Deploy the full-stack application to a cloud hosting provider (e.g., Fly.io, Heroku). This will take your app from localhost to the public internet, making it ready to be installed on real stores and added to your freelance portfolio.