Hello! Welcome to the final lesson of our module on Shopify's Platform & Data Architecture.
In our previous lessons, we built a solid understanding of Shopify's core data objects: Products, Variants, Collections, Orders, Fulfillments, and Customers. We saw how these objects are structured and interconnected to model a typical e-commerce business. However, we ended with a critical question: what happens when a merchant's needs go beyond these standard fields?
Today, we'll answer that question. The learning outcome for this lesson is to use Metafields to extend Shopify's default data model for custom data requirements. Metafields are the fundamental tool for developers to add custom, structured data to any part of a Shopify store, from products to customers. Given your full-stack background, you can think of this as adding new columns to a database table without actually modifying the core schema—a powerful and flexible concept.
1. The "Why": Moving Beyond the Standard Model
Before we dive into the "how," let's address the "why." Imagine a merchant wants to sell products with unique information that Shopify doesn't provide by default, such as:
Care instructionsfor an apparel product.Estimated delivery datefor a perishable item.Technical specificationsfor an electronics gadget.
One naive approach would be to create a unique product template for every single product that needs special information. This quickly becomes unmanageable. Metafields solve this by allowing you to attach this unique data directly to the resource itself (e.g., a specific product or variant).
The following video provides an excellent, practical example of why metafields are the correct solution compared to misusing templates.
Intro to Templates & Metafields - Shopify Beginners Tutorial
Watch this segment from a tutorial by Ed Codes to see a clear demonstration of the problem metafields solve. It contrasts the cumbersome approach of using multiple templates with the elegant solution of using metafields for product-specific data.
Watch the section from 05:12 to 06:18. Focus on the explanation of why creating a new template for each product is a bad practice and how metafields provide a scalable alternative.
2. The Anatomy of a Metafield
At its core, a metafield is a key-value pair. However, to keep things organized and functional, it has a few distinct components. Understanding these is crucial for working with them effectively.
The official Shopify developer documentation provides the definitive breakdown of a metafield's structure. Please read the following section to understand its components.
Read the section titled 'What are metafields?'. Pay close attention to the definitions of Identifier (namespace and key), Value, and Type. Also, take note of the concept of a Metafield definition, which acts as a schema or blueprint for your custom data.
To summarize, every metafield has:
- Namespace: A grouping mechanism to prevent conflicts. By convention,
customis used for merchant-created metafields. - Key: The name of your specific field, like
care_instructions. The full identifier isnamespace.key(e.g.,custom.care_instructions). - Value: The data itself (e.g., "Hand wash cold").
- Type: A predefined data type (e.g.,
single_line_text_field,integer,file,product_reference) that enforces validation and helps Shopify render it correctly.
Before you can add a metafield value to a product, you must first create a metafield definition. This establishes the namespace, key, and type for all future metafields of this kind.
3. Creating and Using Metafields in the Shopify Admin
Let's make this practical. The most straightforward way to start is by creating a metafield definition directly in your Shopify admin dashboard.
Your Turn: Create a "Care Instructions" Metafield
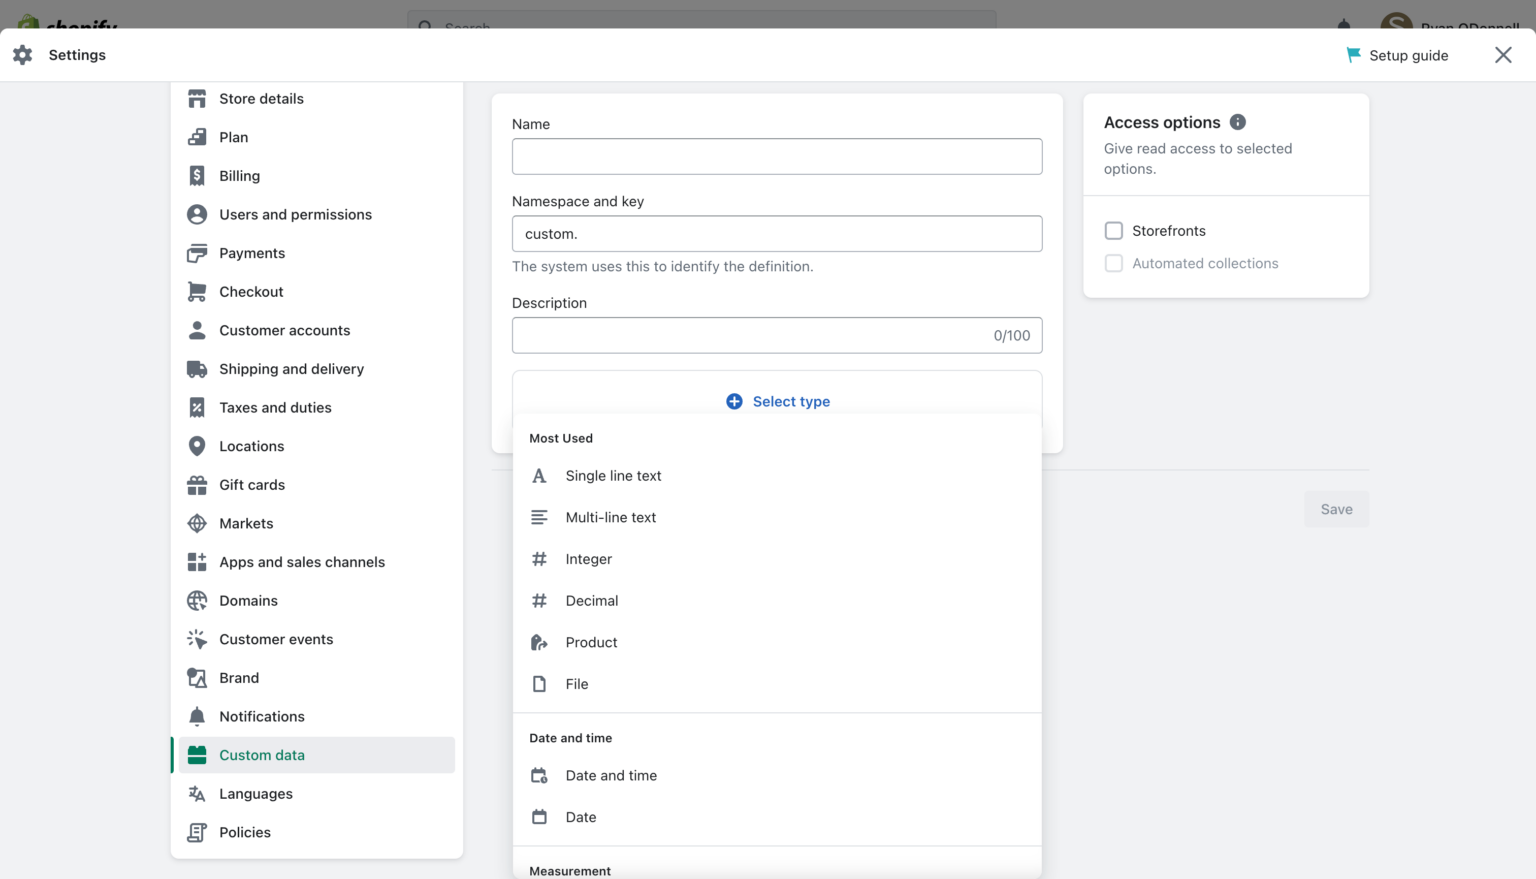
- In your development store, go to Settings > Custom data.
- Select Products under the "Metafields" section.
- Click Add definition.
- Fill in the form with the following details:
- Name:
Care Instructions - Namespace and key:
custom.care_instructions(Shopify will suggest this). - Description: (Optional) "Washing and care instructions for apparel."
- Select type: Choose Single-line text. For now, we'll keep it simple.
- Name:
- Click Save.
Now that the definition exists, you can add a value for it to any product.
- Navigate to any product in your Products admin.
- Scroll down to the bottom of the product page. You should now see a "Metafields" section with a field for "Care Instructions".
- Enter a value, like "Machine wash cold, tumble dry low."
- Click Save.
You have now successfully extended the product data model!
4. Displaying Metafields on the Storefront
Storing the data is only half the battle; now you need to display it in your theme. There are two primary methods for this.
Method 1: Dynamic Sources (The No-Code Way)
Most modern Shopify themes allow you to connect metafield data directly from the theme customizer without writing any code.
Intro to Templates & Metafields - Shopify Beginners Tutorial
This video demonstrates how to create a metafield and then connect it to the storefront using the theme customizer's 'dynamic source' feature.
Watch from 06:18 to 08:54. The first part shows creating the metafield definition (which you just did). The second part shows how to go into the Theme Customizer, add a text block, and connect its content to the metafield you created.
This method is fast and empowers merchants, but as a developer, you'll often need more control.
Method 2: Liquid (The Developer's Way)
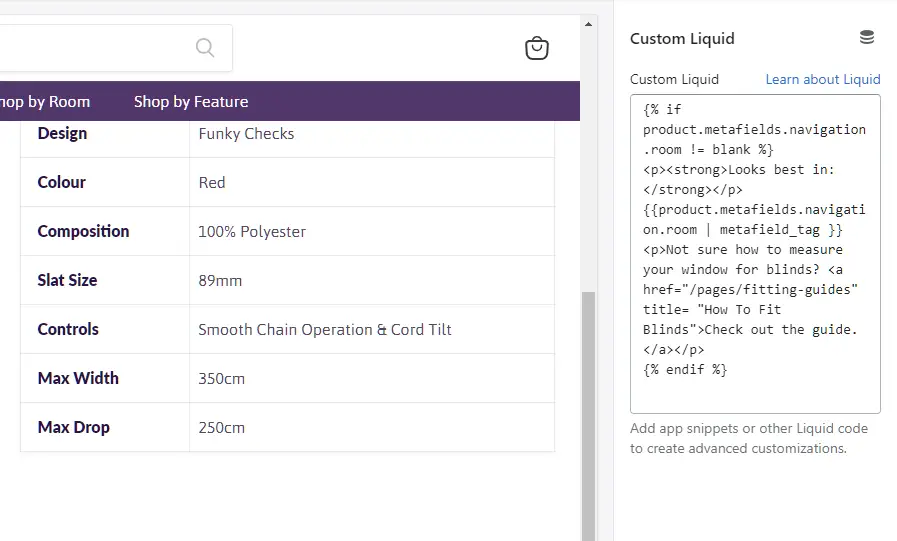
You can directly access metafield values in your theme's Liquid files. This gives you complete control over the markup and logic. The basic syntax is {{ owner.metafields.namespace.key }}. For a product, this would be:
{{ product.metafields.custom.care_instructions }}
5. A Developer's Deep Dive into Metafields and Liquid
The simple syntax above works for basic text fields, but what about other data types like lists, images, or JSON objects? This is where your developer skills come into play. Accessing different metafield types in Liquid has nuances you need to master.
The following video is a comprehensive tutorial that explores exactly how to work with various metafield types in Liquid. It is highly recommended.
Shopify Metafields - How to use them in Shopify Liquid code
Chris the Freelancer provides a detailed, code-focused walkthrough of accessing different metafield types in Liquid. This is essential knowledge for custom theme development.
This video is dense with valuable information. Watch from 13:09 to 32:20, paying close attention to these key concepts: Single-line text (13:09): The difference between accessing the object directly and using .value. List of text (15:08): How to loop through a metafield that contains an array of strings. Single image (17:06): How to use the image_tag filter to render an image from a file metafield. List of images (18:45): How to loop through an array of images. Product reference (21:22): How to get the product object from a metafield and access its properties (like .title). List of products (23:44): How to loop through a list of product references. JSON (26:06): How to access keys within a JSON object stored in a metafield. This should be familiar from your work with JavaScript. Metaobject (27:45): A brief look at accessing a related, structured object. .type vs. .value (29:30): A crucial explanation of the two main properties on a metafield object and why you'll almost always use .value.
Key Patterns to Remember:
- Accessing the value: For almost all metafield types, you need to append
.valueto get the actual content (e.g.,product.metafields.custom.my_field.value). - Handling lists: If your metafield is a list (e.g., list of text, list of products),
metafield.valuewill return an array that you can iterate over with aforloop. - Handling files/images: For file or image metafields,
metafield.valuereturns a file object. You must pass this to a URL filter likeimage_urlor a tag filter likeimage_tagto generate usable HTML. - Handling references: For reference types (like Product or Page),
metafield.valuereturns the corresponding Liquid object (e.g., aproductobject), from which you can access all its properties (e.g.,product.metafields.custom.related_product.value.title).
Test your understanding!
You have created a list of text metafield with the identifier custom.materials on a product. For one specific product, you have added the values "100% Cotton", "Recycled Polyester", and "Spandex".
Write the Liquid code snippet that would render this data in an HTML unordered list (<ul>).
Show answer
{%- if product.metafields.custom.materials.value != blank -%}
  <ul>
    {%- for material in product.metafields.custom.materials.value -%}
      <li>{{ material }}</li>
    {%- endfor -%}
  </ul>
{%- endif -%}
Note the best practice of wrapping the code in an if statement to ensure it only renders if the metafield has a value, preventing empty <ul> tags from appearing on products where it's not set.
6. Metafield Ownership: A Preview of App Development
Finally, it's important to understand the concept of ownership, as this is critical for your goal of building Shopify apps. So far, we've used the custom namespace, which signifies a merchant-owned metafield.
There are also app-owned metafields, which are controlled by a specific app. These are essential for apps that need to store their own configuration or data against Shopify resources without interfering with other apps or merchant data.
Let's return to the Shopify developer documentation to understand the different ownership models.
Read the section titled 'Metafield ownership'. Focus on the table that distinguishes between App-owned and Merchant-owned metafields and their respective purposes and namespaces. We will dive much deeper into this when we begin app development.
This distinction is key:
- Merchant-owned (
custom.*): Managed by the merchant in the admin. Visible and editable by them. Ideal for shared, descriptive content. - App-owned (
app.*or$app.*): Managed by an app via the API. Often used for internal app logic and is typically read-only for the merchant.
Conclusion
Congratulations on completing the "Shopify Platform & Data Architecture" module! You've gone from understanding the core business problem Shopify solves to mapping out its fundamental data objects and, today, learning how to extend that data model to fit any need.
Key Takeaways:
- Metafields are the standard way to add custom data to Shopify resources like products, orders, and customers.
- A metafield definition acts as a schema, defining the metafield's name, namespace, key, and data type.
- Metafields can be connected to your theme without code using dynamic sources or with full control using Liquid.
- Accessing metafields in Liquid requires understanding the nuances of different data types, especially the use of the
.valueproperty andforloops for lists. - Metafield ownership (merchant vs. app) is a critical concept that separates user-facing content from app-specific data, a topic we will revisit in depth.
We now have a complete picture of the data layer. In our next module, "Liquid Templating & Theme Structure," we will shift our full attention to the presentation layer. We'll start by exploring why Shopify uses Liquid and how its syntax allows us to bring all the data we've just learned about to life on the storefront.