Introduction
Welcome back! In our last lesson, we successfully defined vertex data for a triangle (with positions and colors) and uploaded it to the GPU's memory using a Vertex Buffer Object (VBO). We ended with a crucial loose end: we have this chunk of interleaved data on the GPU, but we haven't told OpenGL how to interpret it—how to distinguish position data from color data for each vertex.
This lesson directly answers that question. You will learn to use a Vertex Array Object (VAO) to encapsulate vertex buffer state. The VAO acts as a "recipe card" that holds the instructions (the stride and offset we discussed) for reading data from our VBO. By setting up a VAO once, we can dramatically simplify the process of drawing an object.
The Problem: Managing State in a Render Loop
OpenGL operates as a large state machine. Many functions operate on whatever object is currently "bound" or active. If we didn't have a way to save our VBO configuration, our main render loop would become very cluttered. For every single object we want to draw in every frame, we would have to:
- Bind the correct VBO.
- Re-configure all of its vertex attribute pointers (
glVertexAttribPointer) to describe its specific data layout (positions, colors, etc.). - Enable the necessary attributes.
- Draw the object.
This is inefficient and gets complicated quickly when you have multiple objects with different vertex layouts.
The following video segment does an excellent job of demonstrating what this inefficient process would look like in code.
Watch this segment from The Cherno's 'Vertex Arrays in OpenGL' video. He refactors his code to show all the state that needs to be reset in every frame if you don't use a VAO to store it.
Watch from 01:10 to 05:23. Don't worry about understanding every line of code. The key takeaway is seeing how many glBindBuffer and glVertexAttribPointer calls would need to be repeated inside the main loop.
The Solution: The Vertex Array Object (VAO)
A Vertex Array Object (VAO) is an OpenGL object that stores all of the state needed to supply vertex data to the pipeline. Think of it as a container. When you set up a VAO, you are effectively "recording" your VBO bindings and attribute configurations into it.
A VAO stores the following information:
- Calls to
glEnableVertexAttribArrayandglDisableVertexAttribArray. - Vertex attribute configurations made via
glVertexAttribPointer. - The VBO associated with each vertex attribute at the time
glVertexAttribPointerwas called.
This means that instead of re-setting all that state every frame, you simply bind the appropriate VAO, and all the associated VBOs and their data layouts are restored automatically.
The diagram below provides a great mental model. The VAO doesn't hold the vertex data itself; it holds the "pointers" and configuration that describe how to read the data that's already in the VBO.
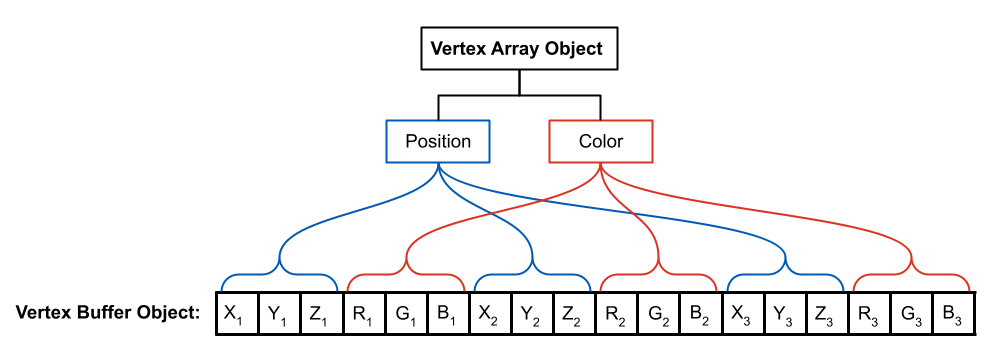
The Core Mechanism: Setting Up a VAO
The setup process links your VBO's data layout to a VAO. This is done once during initialization, not in the render loop. The sequence is critical:
- Generate and bind a VAO. Any attribute configurations you make after this point will be stored in this VAO.
- Bind your VBO.
- Configure the Vertex Attribute Pointers (
glVertexAttribPointer). Since a VAO and a VBO are bound, this call links the VBO's data format to the VAO. - Enable the Vertex Attributes (
glEnableVertexAttribArray). This also gets recorded in the VAO.
Let's dive into a detailed tutorial that walks through this process with C code.
Vertex Buffer Objects - Anton's OpenGL 4 Tutorials
Anton's OpenGL 4 Tutorials provides a clear, step-by-step guide to setting up a VAO with multiple vertex attributes. We will focus on the sections explaining how to create the VAO and link the attributes.
First, read the section titled 'Define VAO'. This explains how to generate a VAO and shows how glVertexAttribPointer configures the currently bound VAO. Note how it binds the points_vbo before setting attribute 0, and then binds colours_vbo before setting attribute 1. You can achieve the same result with a single interleaved VBO, which is what we did in the last lesson. Next, read 'Enable Vertex Arrays 0 and 1 in a VAO'. This covers the crucial glEnableVertexAttribArray step. Pay close attention to the statement: 'the vertex attribute object will remember its enabled attributes, and attribute pointers into buffers.' This is the essence of a VAO.
To reinforce this crucial linking mechanism, watch the following explanation.
The Cherno explains exactly when the link between a VBO and a VAO is formed. This is a common point of confusion for beginners.
Watch from 10:49 to 13:13. The key insight here is that the call to glVertexAttribPointer is what links the currently bound VBO (on the GL_ARRAY_BUFFER target) to the currently bound VAO.
VAOs are Mandatory in Modern OpenGL
It's important to know that you don't really have a choice about using VAOs. In older versions of OpenGL (the "compatibility profile"), a default VAO (with ID 0) was provided. In modern core profile OpenGL, which we are using, there is no default. You must create and bind your own VAO before you can specify any vertex attributes, otherwise OpenGL will generate an error.
This part of The Cherno's video explains why VAOs are mandatory and shows the error that occurs if you try to set vertex attributes without one.
Watch from 06:58 to 10:49. This segment demonstrates the switch to a 'core profile' context, which causes an 'invalid operation' error until a VAO is explicitly created and bound using glGenVertexArrays and glBindVertexArray.
C Code Implementation
Let's bring everything together. Here is a C code snippet showing the full initialization for a triangle with interleaved position and color data, building on what you learned in the last lesson.
// 1. Vertex Data (Position + Color)
float vertices[] = {
    // positions         // colors
    -0.5f, -0.5f, 0.0f,  1.0f, 0.0f, 0.0f,  // bottom-left (red)
     0.5f, -0.5f, 0.0f,  0.0f, 1.0f, 0.0f,  // bottom-right (green)
     0.0f,  0.5f, 0.0f,  0.0f, 0.0f, 1.0f   // top-center (blue)
};

// Declare IDs for our objects
unsigned int VBO, VAO;

// 2. Generate and Bind VAO
glGenVertexArrays(1, &VAO);
glBindVertexArray(VAO); // Start recording state into this VAO

// 3. Generate, Bind, and Populate VBO
glGenBuffers(1, &VBO);
glBindBuffer(GL_ARRAY_BUFFER, VBO);
glBufferData(GL_ARRAY_BUFFER, sizeof(vertices), vertices, GL_STATIC_DRAW);

// 4. Set up Vertex Attribute Pointers (this is recorded in the VAO)
// Position attribute
glVertexAttribPointer(0, 3, GL_FLOAT, GL_FALSE, 6 * sizeof(float), (void*)0);
glEnableVertexAttribArray(0);
// Color attribute
glVertexAttribPointer(1, 3, GL_FLOAT, GL_FALSE, 6 * sizeof(float), (void*)(3 * sizeof(float)));
glEnableVertexAttribArray(1);

// 5. Unbind objects to be safe (optional but good practice)
// Note that the VBO is still associated with the VAO, even though we unbind GL_ARRAY_BUFFER
glBindBuffer(GL_ARRAY_BUFFER, 0);
glBindVertexArray(0); // Unbind the VAO
The Payoff: A Clean Render Loop
After the one-time setup above, your main render loop becomes beautifully simple. To draw your triangle, all you need to do is bind its VAO and make a draw call.
// Inside your main while loop:
// ...

glUseProgram(shaderProgram);
glBindVertexArray(VAO); // Re-bind the VAO with our configured state
glDrawArrays(GL_TRIANGLES, 0, 3);

// ...
Compare this to the cluttered loop we imagined at the start of the lesson. The power of the VAO is that it abstracts away the complex state setup, making your rendering code clean and efficient.
Conclusion
In this lesson, you've mastered a cornerstone concept of modern OpenGL. You connected the VBO from our previous lesson to the rendering pipeline by using a VAO to describe its structure.
Key Takeaways:
- A Vertex Array Object (VAO) stores the configuration of your vertex data, including VBO bindings and attribute pointer setups.
- VAOs solve the problem of re-configuring vertex state every frame, leading to cleaner and more efficient rendering code.
- The setup process involves binding a VAO first, then binding the VBO(s) and calling
glVertexAttribPointerandglEnableVertexAttribArrayto record the state into the VAO. - In the render loop, you only need to bind the VAO to restore all its associated vertex state before drawing.
- Using a VAO is mandatory in core profile OpenGL.
Preview of the Next Lesson:
Currently, to draw a square (which consists of two triangles), we would need to specify 6 vertices. But a square only has 4 unique corner points. This means we're duplicating data. In the next lesson, "Use an Element Buffer Object (EBO) to perform indexed drawing," you'll learn how to define only the unique vertices and then specify the order in which to draw them to form triangles. This technique, called indexed drawing, is essential for rendering any complex mesh efficiently.