Introduction
Hello! In our last lesson, you learned how to use uniforms to send data from your C code to your GPU shaders, allowing you to create dynamic effects like a color that changes over time. This was the final piece of the puzzle for controlling the graphics pipeline.
This lesson serves as the capstone for our module on the graphics pipeline and shaders. Our goal is to bring everything you've learned together to formally achieve this outcome: Render simple 2D shapes (e.g., a triangle) using a shader program and draw calls.
While you've already seen a triangle on screen, today we'll solidify your understanding of the entire process, focusing on the "draw call" – the command that triggers the GPU to do its work. We'll review the complete sequence, from defining vertex data to seeing the final pixels, and then learn a more efficient way to draw shapes using indexed drawing.
The Graphics Pipeline: A Final Review
Everything we've done in this module—creating Vertex Buffer Objects (VBOs), Vertex Array Objects (VAOs), and shader programs—has been in preparation for one moment: telling the GPU to draw. All of these objects configure the state of the GPU. The draw call is the function that says, "Okay, with the current state, render!"
This diagram provides a great overview of the journey our data takes.
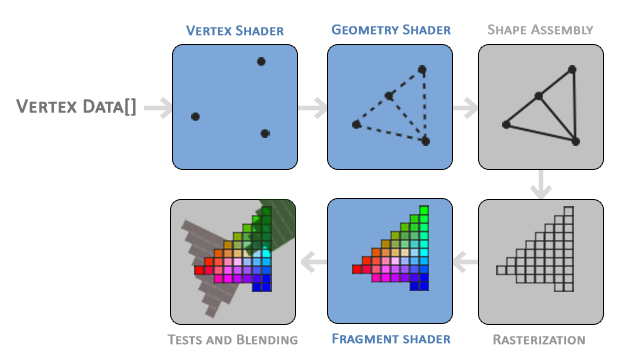
Let's watch a short segment that recaps this process.
This video from Victor Gordan's OpenGL series starts with an excellent, concise overview of the graphics pipeline, explaining what each major stage does.
Watch the first part of the video (0:00 - 02:41). Focus on understanding the role of each stage: Vertex Data -> Vertex Shader -> Shape Assembler -> Rasterization -> Fragment Shader. This will reinforce the 'why' behind all the setup code we've written.
The Draw Call: glDrawArrays
The simplest way to draw is with glDrawArrays. You have already used this function in previous lessons. It tells OpenGL to render a specified number of vertices directly from your bound buffers.
glDrawArrays(GLenum mode, GLint first, GLsizei count);
Let's break down its arguments:
mode: The type of primitive to render.GL_TRIANGLESis what we've been using. Other common options includeGL_POINTSandGL_LINES.first: The starting index of the vertex in the arrays we want to draw. For our single triangle, this is0.count: The number of vertices to process. Since we're drawing one triangle, this is3.
Inside your main render loop, the drawing sequence looks like this:
// In the main while loop...

// 1. Clear the screen
glClear(GL_COLOR_BUFFER_BIT | GL_DEPTH_BUFFER_BIT);

// 2. Activate the shader program
glUseProgram(shaderProgram);

// 3. Bind the VAO that contains our vertex buffer and attribute configuration
glBindVertexArray(VAO);

// 4. Issue the draw call!
glDrawArrays(GL_TRIANGLES, 0, 3);

// 5. Swap the front and back buffers to display the rendered image
glfwSwapBuffers(window);
A Complete Walkthrough
Let's see this entire process in action. The same video we just watched continues to provide a complete, step-by-step guide to rendering a triangle from scratch. Watching this will help you connect all the pieces.
Let's continue with Victor Gordan's video. It will now walk through the entire implementation, covering VBOs, VAOs, shaders, and the final draw call.
Watch the rest of the video (02:55 - 14:22). As you watch, map the steps shown in the video to the C code you've already written in our previous lessons: Defining vertex coordinates. Compiling shaders and linking a program (you have a function for this!). Creating and filling a VBO with vertex data. Creating a VAO to store the VBO and attribute layout (glVertexAttribPointer). Using glDrawArrays in the render loop.
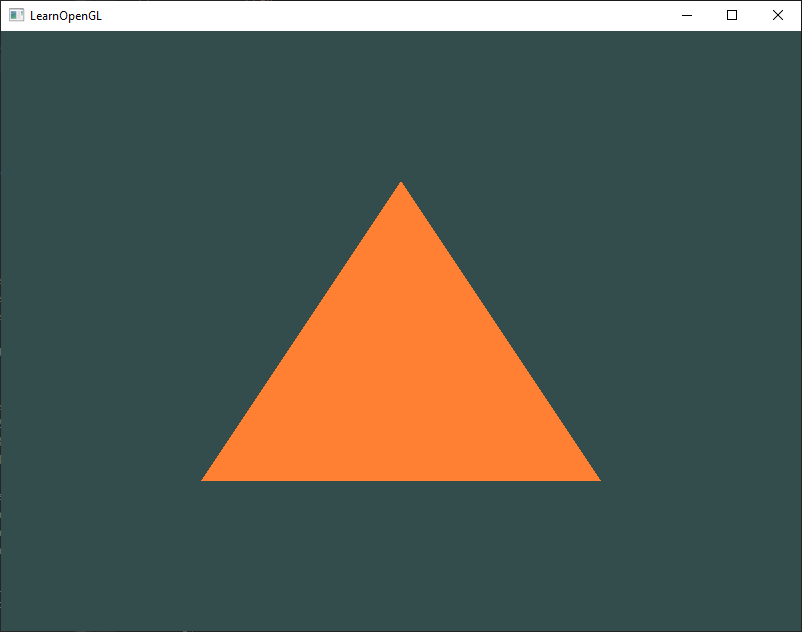
After all those steps, you get your glorious first triangle!
A More Efficient Method: Indexed Drawing
Now, let's say we want to draw a rectangle. A rectangle can be made from two triangles.
Using glDrawArrays, our vertex array would need to look like this:
float vertices[] = {
    // First triangle
     0.5f,  0.5f, 0.0f,  // top right
     0.5f, -0.5f, 0.0f,  // bottom right
    -0.5f,  0.5f, 0.0f,  // top left
    // Second triangle
     0.5f, -0.5f, 0.0f,  // bottom right
    -0.5f, -0.5f, 0.0f,  // bottom left
    -0.5f,  0.5f, 0.0f   // top left
};
Notice the repetition? The "bottom right" and "top left" vertices are defined twice. For a simple rectangle, this is minor. For a complex 3D model with thousands of triangles sharing vertices, this redundancy is extremely wasteful.
The solution is indexed drawing. We define only the unique vertices and then specify the order to draw them using indices.
- Vertex Buffer Object (VBO): Stores the 4 unique vertices of the rectangle.
- Element Buffer Object (EBO): Stores the indices
[0, 1, 3, 1, 2, 3]that define the two triangles.
To render using an EBO, we use a different draw call: glDrawElements.
glDrawElements(GLenum mode, GLsizei count, GLenum type, const void *indices);
mode:GL_TRIANGLES, same as before.count: The number of indices to render. For our rectangle, this is6.type: The data type of the indices. This is usuallyGL_UNSIGNED_INT.indices: An offset into the EBO. We'll use0to start from the beginning.
The following reading from LearnOpenGL provides a fantastic explanation of this concept.
Element Buffer Objects section
The 'Hello Triangle' tutorial on LearnOpenGL has an excellent section on Element Buffer Objects that clearly explains the motivation and implementation of indexed drawing.
Read the section titled 'Element Buffer Objects'. Pay close attention to: How the vertex and index arrays are defined for a rectangle. How to create and bind a buffer with the GL_ELEMENT_ARRAY_BUFFER target. The critical point that an EBO's binding is stored as part of a VAO's state. How glDrawElements is used in place of glDrawArrays.
Applying Indexed Drawing
Let's modify your code to draw a rectangle using an EBO.
-
Update your vertex data: Replace your triangle's vertices with the 4 unique vertices for a rectangle and create a new array for the indices.
float vertices[] = { 0.5f, 0.5f, 0.0f, // top right (index 0) 0.5f, -0.5f, 0.0f, // bottom right (index 1) -0.5f, -0.5f, 0.0f, // bottom left (index 2) -0.5f, 0.5f, 0.0f // top left (index 3) }; unsigned int indices[] = { 0, 1, 3, // first triangle 1, 2, 3 // second triangle }; -
Create and configure the EBO: During your initialization (after creating the VBO and VAO), add the code to create and populate the EBO. Crucially, do this while your VAO is still bound. The VAO stores the EBO binding.
// ... after creating and binding VAO and VBO ...
glBindVertexArray(VAO);
glBindBuffer(GL_ARRAY_BUFFER, VBO);
glBufferData(GL_ARRAY_BUFFER, sizeof(vertices), vertices, GL_STATIC_DRAW);

// Create the EBO
unsigned int EBO;
glGenBuffers(1, &EBO);
glBindBuffer(GL_ELEMENT_ARRAY_BUFFER, EBO);
glBufferData(GL_ELEMENT_ARRAY_BUFFER, sizeof(indices), indices, GL_STATIC_DRAW);

// Configure vertex attributes (same as before)
glVertexAttribPointer(0, 3, GL_FLOAT, GL_FALSE, 3 * sizeof(float), (void*)0);
glEnableVertexAttribArray(0);

// You can unbind the VBO now, but DO NOT unbind the EBO while the VAO is active.
// The VAO's state records the EBO binding.
glBindBuffer(GL_ARRAY_BUFFER, 0);

// Unbind the VAO. This is safe now.
glBindVertexArray(0);
A common mistake is to unbind
GL_ELEMENT_ARRAY_BUFFERbefore unbinding the VAO. Don't do that! The VAO needs to remember which EBO to use. -
Update the render loop: In your
whileloop, simply replace theglDrawArrayscall withglDrawElements.// Inside the render loop... glUseProgram(shaderProgram); glBindVertexArray(VAO); // This also re-binds our EBO glDrawElements(GL_TRIANGLES, 6, GL_UNSIGNED_INT, 0);
Now, when you run your program, you should see a rectangle instead of a triangle.
Conclusion
Congratulations! You have now mastered the fundamental process of rendering in OpenGL. This lesson brought together all the components from this module, culminating in the draw call that produces a visible shape.
Key Takeaways:
- The setup of VBOs, VAOs, and Shaders is all done to configure the GPU's state for rendering.
- A draw call (
glDrawArraysorglDrawElements) is the command that triggers the graphics pipeline to process the bound data and render a primitive. glDrawArraysrenders vertices sequentially from a buffer. It's simple but can be inefficient due to data duplication.glDrawElementsuses an Element Buffer Object (EBO) to perform indexed drawing. This is much more efficient for complex shapes as it eliminates the need to store duplicate vertices.- The EBO binding is part of the VAO's state.
Preview of the Next Lesson:
We have a solid foundation for rendering 2D shapes. But your goal is a 3D game engine. In the next module, "Rendering in 3D Space," we will take our flat shapes and give them the illusion of depth. The very first step is to construct a perspective projection matrix. This will be our first practical application of the 3D math we reviewed earlier, and we'll pass this matrix to our shaders using the uniforms you just learned about. Get ready to see your world in a whole new dimension