Introduction
Hello! In our last lesson, you did an excellent job tackling the complexities of normal vector transformations. We established a robust method for calculating correct world-space normals using the normal matrix (transpose(inverse(model))), ensuring our lighting calculations will be accurate even when objects are rotated or scaled. We now have the fragment's world position (FragPos) and its world-space normal (Normal) ready to be used in the fragment shader.
However, a surface's properties are only half the story of lighting. The other half involves the light source itself and the position of the observer. Today's lesson will bridge that gap. Our goal is to pass light properties (e.g., position, color) and the camera's position to the shader as uniforms. This will allow us to fully implement the Phong lighting model we've been building towards, bringing our 3D objects to life with realistic highlights and shadows.
The Missing Pieces: Uniforms
So far, we've only passed data to the shaders on a per-vertex basis using vertex attributes (like aPos and aNormal). But what about data that's the same for every single vertex and fragment in a draw call, like the color of a light source or the camera's position?
For this, OpenGL provides a mechanism called uniforms. You can think of a uniform as a global variable for your shader program that you can set from your C application. Its value remains constant—or uniform—across all shader invocations for a single object being drawn.
Since you're familiar with Python and C#, you can conceptualize this as passing arguments from your main CPU program to the shader functions running on the GPU.
To use a uniform, you'll follow a two-step process on the C side:
- Get the location: After compiling and linking your shader program, you ask OpenGL for the location (an ID) of a specific uniform by its name.
- Set the value: Before you draw your object, you use this location ID to send data to the uniform.
The following resource provides a great technical introduction to this process.
This guide from a Brown University course introduces the concept of uniforms and the OpenGL functions used to manage them.
Read the section titled 'Uniforms'. Focus on the GLSL uniform keyword, and the CPU-side functions glGetUniformLocation and glUniform*. The example of passing a matrix is particularly relevant.
Passing Light Properties
With the concept of uniforms understood, let's apply it to our Phong lighting model. We'll start with the two most basic properties of a simple point light: its color and its position.
1. Light Color
The color of the light directly influences the ambient and diffuse components of our lighting model. We can define it as a vec3 in our fragment shader.
In the fragment shader (lighting.frag):
// ... other declarations
uniform vec3 objectColor;
uniform vec3 lightColor; // New uniform!

void main()
{
    // Ambient lighting
    float ambientStrength = 0.1;
    vec3 ambient = ambientStrength * lightColor;

    // ... rest of the lighting calculations
}
In your C application:
Before your render loop, or whenever you set up your shader, you'll set this color. For a simple white light:
// This happens after glUseProgram(lightingShader.ID);
// First, get the location of the uniform
GLint lightColorLoc = glGetUniformLocation(lightingShader.ID, "lightColor");

// Then, set the uniform's value.
// We can do this once outside the loop if the light color doesn't change.
glUniform3f(lightColorLoc, 1.0f, 1.0f, 1.0f); // White light
2. Light Position
The light's position is essential for calculating the direction of the light for the diffuse and specular components. In the previous lesson, we established that all our calculations will be in world space. Therefore, we need to pass the light's world-space position to the fragment shader.
In the fragment shader (lighting.frag):
// ...
in vec3 Normal;
in vec3 FragPos; // Fragment position in world space

uniform vec3 lightPos; // New uniform!
// ...

void main()
{
    // ... ambient calculation

    // Diffuse lighting
    vec3 norm = normalize(Normal);
    vec3 lightDir = normalize(lightPos - FragPos); // Vector from fragment to light
    float diff = max(dot(norm, lightDir), 0.0);
    vec3 diffuse = diff * lightColor;

    // ... rest of calculations
}
In your C application:
Assuming you have a vec3 representing the light's position, you'll update its uniform, likely inside the main render loop if the light can move.
// In the render loop, after glUseProgram()
vec3 light_position = {1.2f, 1.0f, 2.0f}; // Example position

GLint lightPosLoc = glGetUniformLocation(lightingShader.ID, "lightPos");
glUniform3fv(lightPosLoc, 1, &light_position[0]);
The LearnOpenGL article on Basic Lighting provides a clear walkthrough of integrating these first two components.
The 'Basic Lighting' article from LearnOpenGL will guide you through adding ambient and diffuse lighting components using the uniforms we've just discussed.
Read the sections 'Ambient lighting' and 'Diffuse lighting'. Pay attention to how the lightColor and lightPos uniforms are declared in the shaders and used in the lighting equations.
Passing Camera Position for Specular Highlights
We now have ambient light (base illumination) and diffuse light (directional shading). The final piece of the Phong model is specular lighting, which creates the bright highlights you see on shiny surfaces.
A specular highlight is the reflection of the light source on the object's surface, and its visibility depends entirely on where you are looking from. Therefore, to calculate it, we need to know the camera's position.
In the fragment shader (lighting.frag):
// ...
uniform vec3 lightPos;
uniform vec3 viewPos; // New uniform for camera/viewer position!
// ...

void main()
{
    // ... ambient and diffuse calculations

    // Specular lighting
    float specularStrength = 0.5;
    vec3 viewDir = normalize(viewPos - FragPos); // Vector from fragment to camera
    vec3 reflectDir = reflect(-lightDir, norm); // Reflected light direction

    float spec = pow(max(dot(viewDir, reflectDir), 0.0), 32);
    vec3 specular = specularStrength * spec * lightColor;

    // Combine all components
    vec3 result = (ambient + diffuse + specular) * objectColor;
    FragColor = vec4(result, 1.0);
}
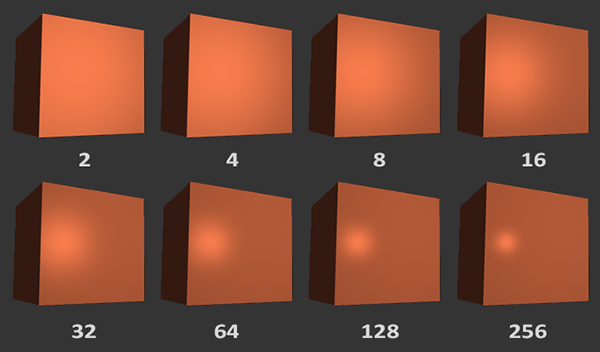
The pow(..., 32) part is what creates the focused highlight. The exponent, 32 in this case, is the object's shininess value. A higher value creates a smaller, more intense highlight. This is another perfect candidate for a uniform!
In your C application:
You would pass your camera's world-space position vector to the viewPos uniform each frame, as the camera is likely to be moving.
// In the render loop, after glUseProgram()
// Assuming you have a camera struct with a 'position' member
GLint viewPosLoc = glGetUniformLocation(lightingShader.ID, "viewPos");
glUniform3fv(viewPosLoc, 1, &camera.Position[0]);
The next section of the LearnOpenGL article completes the picture by adding this specular component.
This final section from the LearnOpenGL article explains specular lighting and the role of the viewer's position.
Read the section 'Specular Lighting'. Focus on how the viewPos uniform is used to calculate the viewDir and how the final specular component is calculated and added.
Summary and Visual Recap
You've now seen how to pass all the necessary data from the CPU to the GPU to implement a complete Phong lighting model.
lightColor(avec3uniform) to set the color of the light source.lightPos(avec3uniform) to define the light's position for diffuse and specular calculations.viewPos(avec3uniform) to define the camera's position for specular calculations.- (Optional but recommended) A
shininessfloatuniform to control the size of the specular highlight.
The following video provides a quick, practical summary of this entire process, showing the code in both the C++ application and the GLSL shaders.
This tutorial by Victor Gordan provides a great visual summary of implementing the full Phong lighting model, including passing the required light and camera properties as uniforms.
Watch the video from 01:17 to 07:37. It's a fast-paced walkthrough of everything we've just discussed: 01:17: Passing the light color. 02:11: Adding normals and passing the light position. 04:39: Calculating diffuse and ambient light. 06:06: Adding specular light by passing the camera position.
Conclusion
Excellent work! You have now assembled all the pieces for a foundational, dynamic lighting system. By using uniforms, you've created a powerful channel of communication between your C application and your GPU shaders, allowing you to control lighting parameters in real-time.
Key Takeaways:
- Uniforms are used to pass data from the CPU to shaders that remains constant for all vertices/fragments in a draw call.
- The workflow involves getting a uniform's location with
glGetUniformLocationand setting its value with aglUniform*function. - The Phong lighting model is an equation that takes several parameters, which we supply as uniforms:
lightColorandobjectColordetermine the final calculated color.lightPosandFragPosare used to find the light direction for diffuse shading.viewPosandFragPosare used to find the view direction for specular highlights.
Preview of the Next Lesson:
We have a beautifully lit, but static, 3D object. To turn this into a game or interactive simulation, we need things to move smoothly and consistently. In our next lesson, we will begin building the core of our game engine's architecture by implementing a time-step mechanism using delta time. This is a fundamental concept that ensures your game logic and physics run independently of the rendering frame rate, a crucial step towards professional game development.