Welcome back! In our previous lesson, we mastered the CSS position property, learning how to move elements out of their normal flow to create sophisticated layouts. We saw that giving an element a position value other than static not only unlocks properties like top and left, but also a powerful property for managing layers: z-index.
This lesson focuses on that third dimension. We will explore how to control which elements appear in front of others using z-index. You'll discover that it's not always as simple as picking the biggest number, and we'll unravel the crucial concept of "stacking contexts" to truly master element layering. Then, we'll switch gears to address a common layout challenge: what to do when content is too big for its container. We'll learn how to manage this with the overflow property, a tool essential for creating scrollable areas and robust UI components like modals.
By the end of this lesson, you'll be able to confidently control both the vertical stacking and content containment of your elements, two fundamental skills for building the polished, professional UIs you're aiming for.
The Third Dimension: z-index
When elements are positioned, they can overlap. The z-index property lets you explicitly control the stacking order of these positioned elements. Think of the x and y axes of your screen; z-index controls the z axis, which comes out toward you and goes back into the screen. An element with a higher z-index value will appear in front of an element with a lower one.
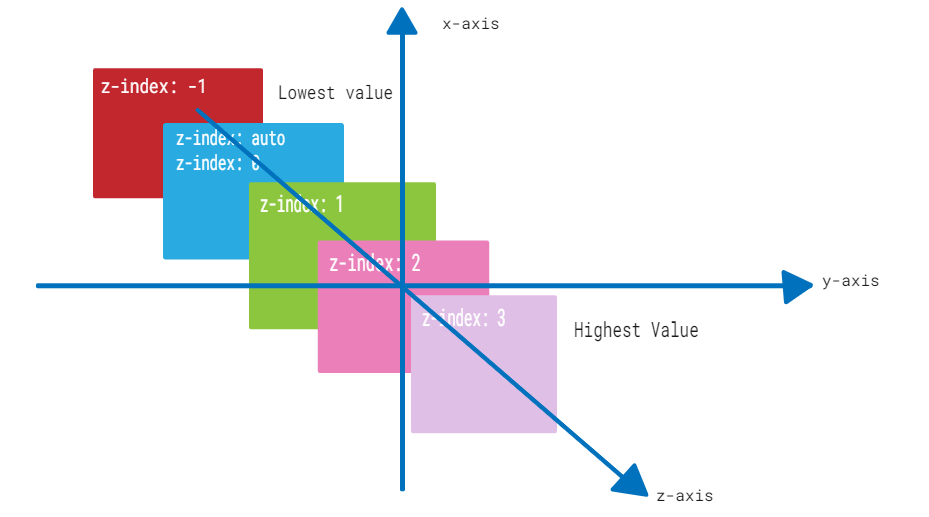
A critical rule to remember is that z-index only works on positioned elements—that is, elements with a position value of relative, absolute, fixed, or sticky. It also applies to items in a Flexbox or Grid container, which we'll cover in future modules.
Let's watch a quick demonstration of this fundamental behavior.
Solve your z-index issues | z-index and stacking context explained
Kevin Powell provides a clear, initial look at how z-index works and reinforces the requirement of a position property.
Watch the segment from this point. Note how changing the z-index values reorders the colored boxes and how the property stops working when position is removed.
When z-index Fails: Understanding Stacking Contexts
Now for the interesting part. You will inevitably encounter a situation where you give an element a massive z-index (like 9999), yet it stubbornly remains hidden behind another element with a z-index of 1. This isn't a bug; it's a feature of a core CSS mechanism called the stacking context.
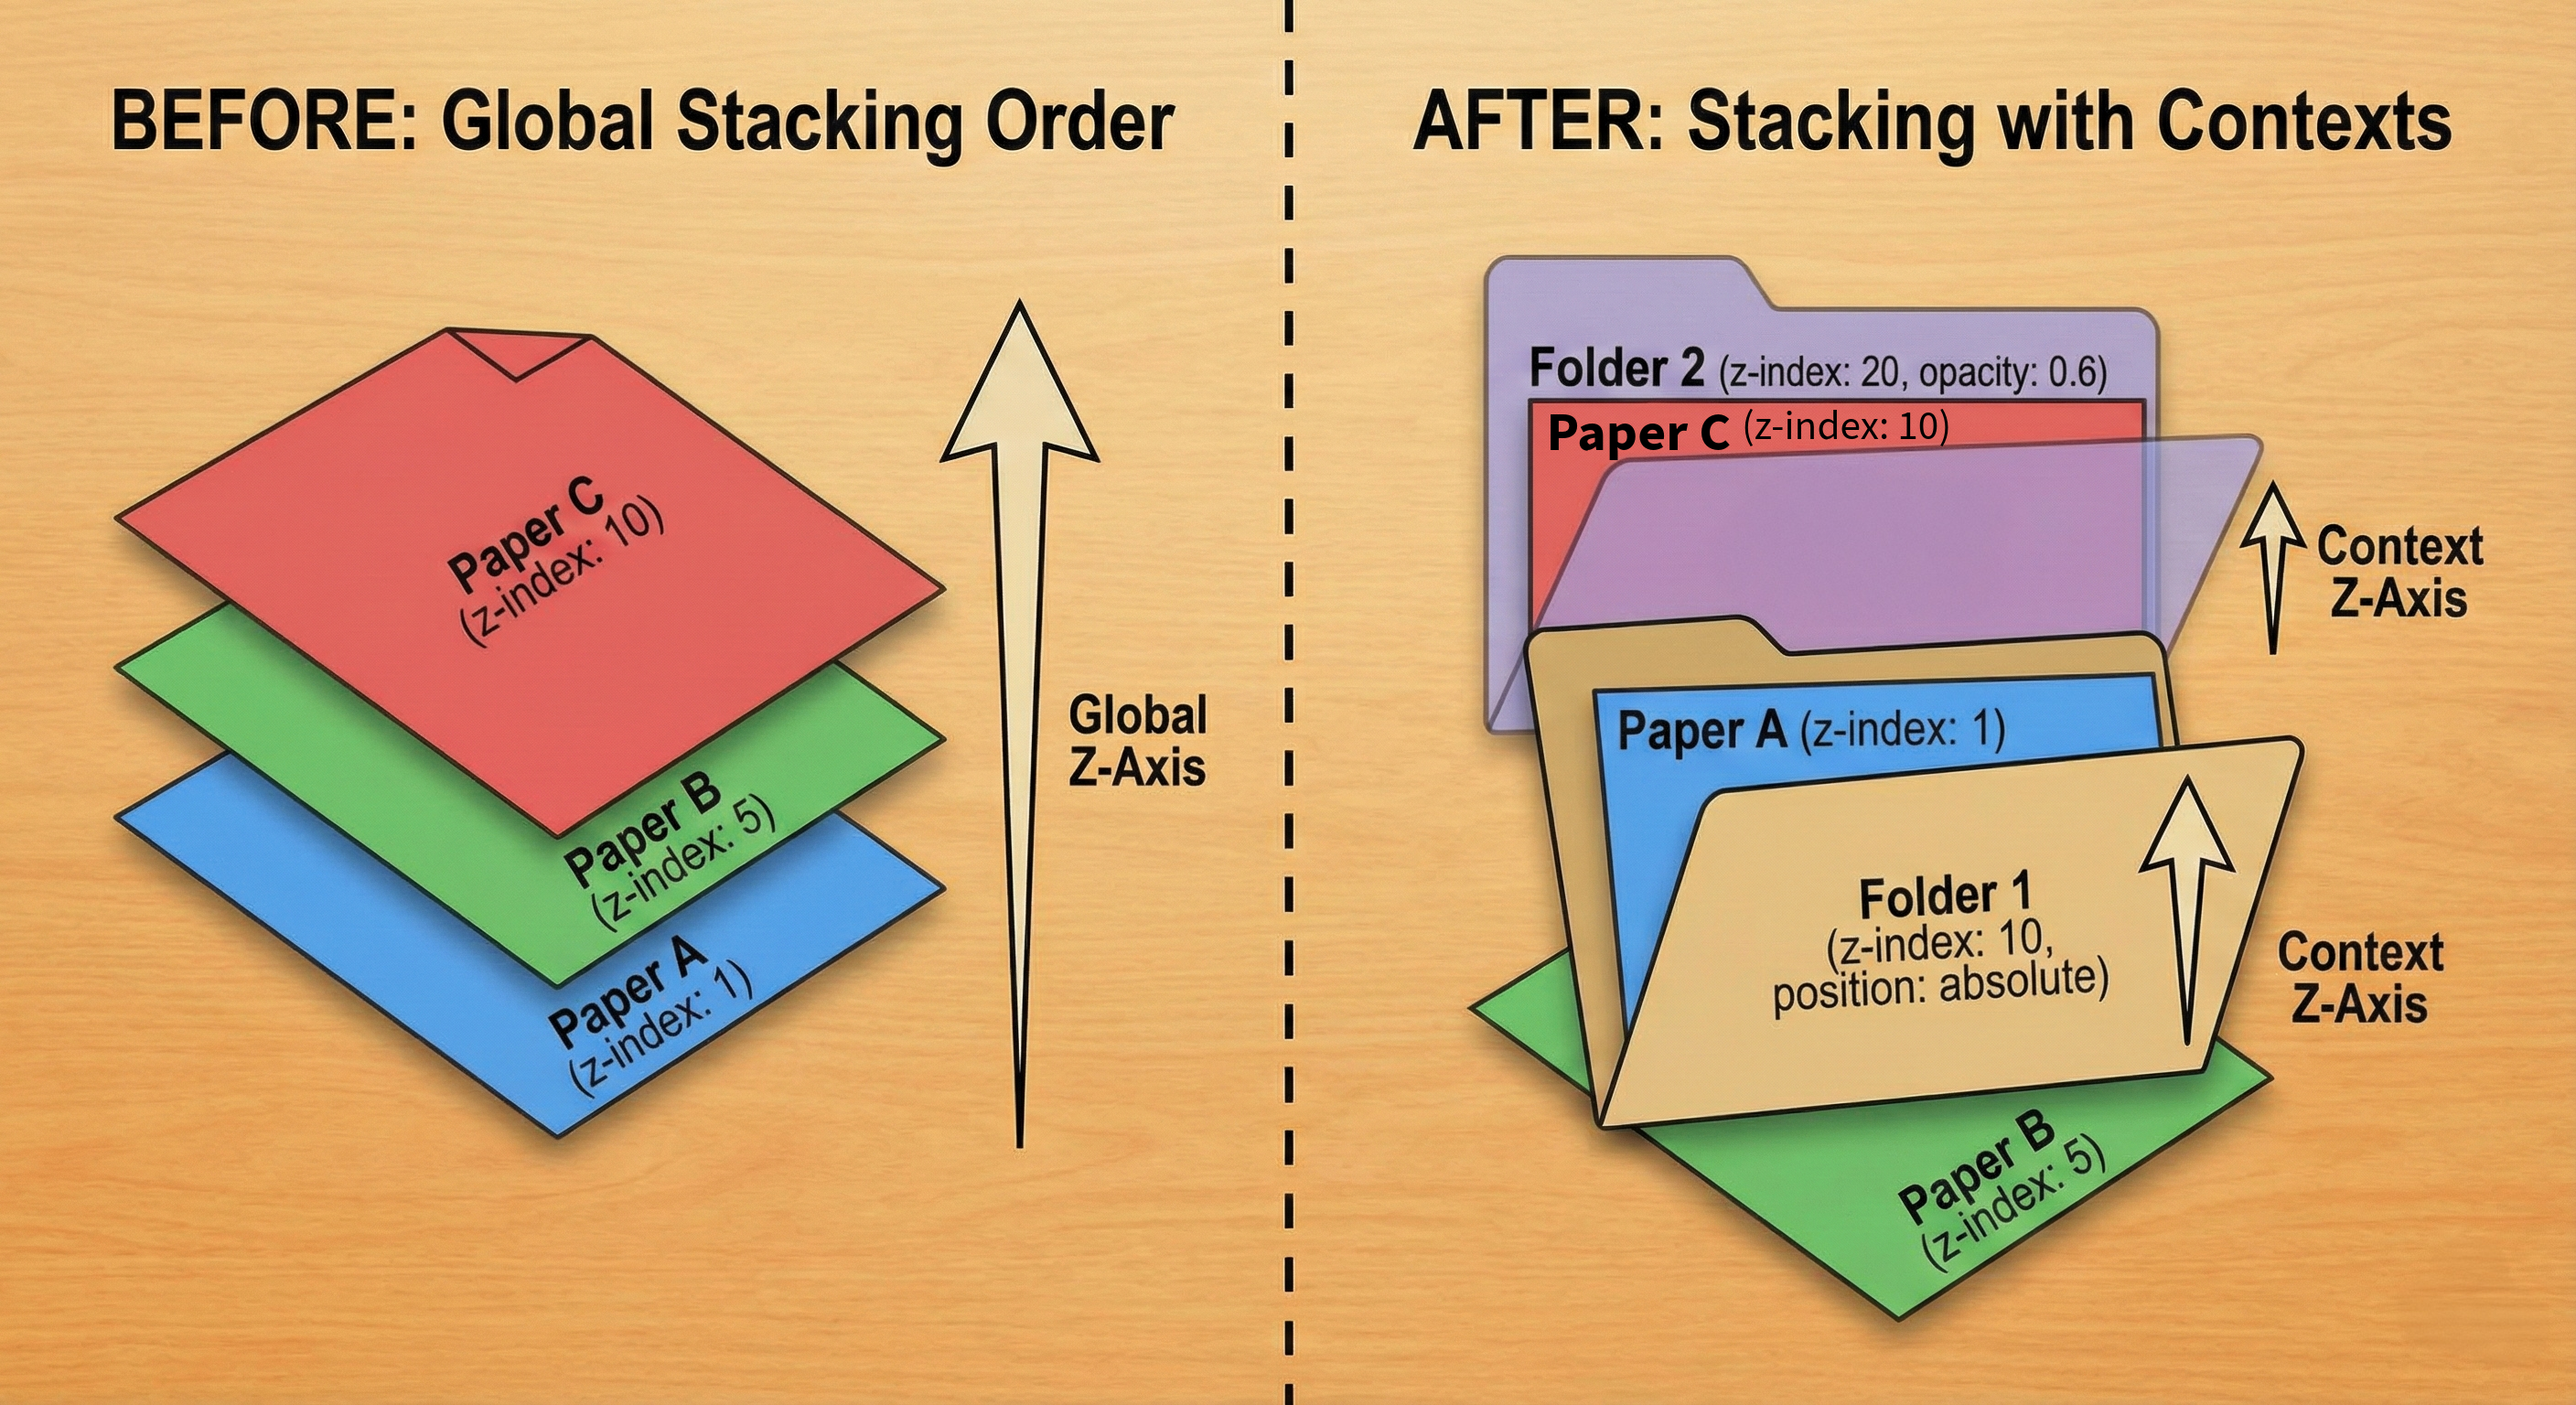
A stacking context is like a group or a folder for layers. Within a stacking context, z-index values are compared among sibling elements as you'd expect. However, once an element creates a stacking context, all of its children are "trapped" within that context. No child, no matter how high its z-index, can appear on top of an element that is outside and above its parent's stacking context.
The phenomenal article "What The Heck, z-index??" by Josh W. Comeau explains this with a fantastic analogy.
What The Heck, z-index?? Exploring stacking contexts, one ...
This article will demystify stacking contexts using interactive examples and clear analogies.
Start by reading the introduction to see a classic example of z-index not working as expected. Next, read the section Layers and groups. The analogy to layers and groups in image-editing software is key to building the right mental model for how stacking contexts work.
The image below visualizes this "paper and folder" concept perfectly. On the left, all papers are in one global context. On the right, "Paper C" has a z-index of 10, but because it's inside "Folder 2" (which has an opacity creating a stacking context), it cannot appear on top of "Paper A" which is in "Folder 1", because Folder 1 is stacked on top of Folder 2 in the parent context.
Creating and Debugging Stacking Contexts
So, what creates a stacking context?
The most common way is by giving a positioned element (relative, absolute, etc.) a z-index value other than auto.
However, several other properties also implicitly create a new stacking context, which is often the source of confusion. These are the "gotchas" that, as a QA Engineer, you'll want to be keenly aware of when debugging UIs.
Solve your z-index issues | z-index and stacking context explained
Kevin Powell demonstrates how a parent-child relationship affects z-index and then reveals some of the less obvious properties that also create stacking contexts.
First, watch the segment explaining the core idea of a stacking context. Next, watch the crucial section on other properties, like transform and opacity, that can unexpectedly create new stacking contexts.
Here's a summary of the most common stacking context creators:
- An element with
position: relativeorabsoluteand az-indexother thanauto. - An element with
position: fixedorposition: sticky. - An element with an
opacityvalue less than1. - An element with a
transform,filter, orclip-pathvalue other thannone.
This list is not exhaustive, but covers the properties you'll encounter most frequently.
Given that many properties can implicitly create a stacking context, there's a modern CSS property designed to do it explicitly and cleanly: isolation: isolate. This is incredibly useful for creating self-contained, reusable components, ensuring their internal layering doesn't accidentally interfere with the rest of the page.
What The Heck, z-index?? Exploring stacking contexts, one ...
Let's return to Josh Comeau's article to learn about this modern best practice and how to debug these issues.
Read the section Airtight abstractions with “isolation”. This explains why isolation: isolate is the preferred method for creating stacking contexts in component-based design. Finally, review the Debugging section, which lists some browser tools that can help you visualize and understand the stacking contexts on your page. Knowing these tools can save you a lot of time.
Managing Overflowing Content
Now let's switch from the z-axis to handling content that doesn't fit within an element's defined width and height. By default, browsers will render the content anyway, letting it flow outside the element's box. This is overflow: visible. While this ensures content is never lost, it often breaks our layouts.
The overflow property gives us control over this behavior.
CSS Overflow Property (hidden, auto, scroll)
This video provides a straightforward tour of the overflow property and its primary values.
Watch the intro to see the overflow problem. See how overflow: hidden clips the content. Understand overflow: scroll, which always adds scrollbars. Learn about overflow: auto, which smartly adds scrollbars only when needed. This is often the most practical choice. Finally, see how overflow-x and overflow-y give you independent control over each axis.
Practical Application: Styling a Modal
Let's tie these concepts together with a common UI element: a modal dialog. Modals are a perfect case study for both z-index and overflow. You need a high z-index to ensure the modal and its backdrop overlay appear on top of all other page content. And if the modal's content is too long, you need a way for the user to scroll it without scrolling the entire page.
Considerations for Styling a Modal - CSS-Tricks
This article from CSS-Tricks walks through the practical CSS needed to build a robust modal, covering both layering and overflow.
First, scroll to the section "Dealing with the overlay". Notice the use of z-index to ensure the modal (z-index: 1010) appears on top of the overlay (z-index: 1000), which in turn covers the rest of the page. The author's note about having a documented system for z-index is excellent professional advice. Next, read the section "Dealing with Overflow". Pay close attention to the solution: instead of putting overflow on the modal itself, an inner div (.modal-guts) is used to contain the scrollable content. This allows the modal's header and footer (like a close button) to remain visible while the inner content scrolls. Finally, read the valuable comment exchange starting with "One important UX consideration...". This discusses a common requirement: preventing the main page from scrolling while the modal is open. The solution, applying overflow-y: hidden to the <body> element via JavaScript, is a crucial technique for building polished user experiences.
Conclusion
In this lesson, you've gained control over two more fundamental aspects of CSS layout. You've moved beyond a simple understanding of z-index and can now diagnose and solve complex layering issues by understanding the rules of stacking contexts. You've also learned how to gracefully handle content that doesn't fit its container using the overflow property.
Here are the key takeaways:
z-index: Controls the stacking order of positioned elements along the z-axis. Higher values appear on top.- Stacking Contexts: An element that creates a stacking context "traps" its children. A child's
z-indexis only meaningful within its parent's stacking context. - Stacking Context Triggers: Created by
position+z-index, but also properties likeopacity,transform, andfilter. isolation: isolate: The modern, explicit way to create a stacking context for a component without side effects.overflow: Manages content that exceeds an element's bounds.overflow: autois usually the best choice, as it only adds scrollbars when necessary.- Practical Patterns: Combining these concepts allows you to build complex UI components like modals, where layering and internal scrolling are managed independently.
In our next lesson, we will apply everything we've learned so far—the box model, positioning, and z-index—to build our first complete component: a simple page header with a logo and navigation links.