Hello! Welcome to your sixth lesson on backend engineering with Django.
In our last lesson, you successfully configured URL routing, mapping URL paths to your view functions. However, those views could only return simple text using HttpResponse. Real web applications, of course, need to display rich, structured pages built with HTML.
Today, we'll address that. This lesson's outcome is to render HTML templates using Django's template engine. We will replace our simple text responses with full HTML pages, introducing the "T" (Template) in Django's MTV (Model-Template-View) architecture. This step is crucial for separating your application's logic from its presentation, a fundamental principle of clean web development.
1. From HttpResponse to Templates: The "T" in MTV
So far, our views have looked something like this:
from django.http import HttpResponse

def say_hello(request):
    return HttpResponse("<h1>Hello World</h1>")
While you can embed HTML directly, this becomes messy and unmaintainable for anything more than a single line. Imagine trying to manage a complex webpage with hundreds of lines of HTML inside a Python string!
This is where Django's template system comes in. It allows you to create separate .html files that contain your page structure and presentation. Your view's job then shifts from generating HTML itself to preparing data and telling Django which template to render with that data.
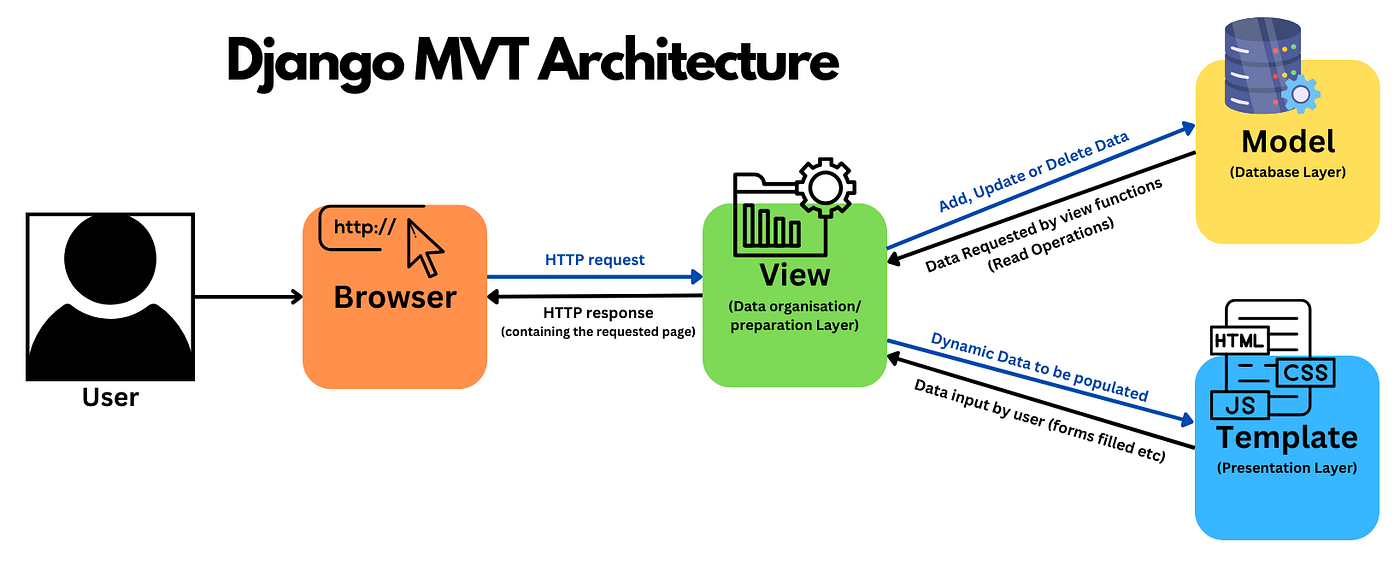
This separation of concerns is at the heart of the MTV pattern:
- Model: Manages the data (we'll cover this soon).
- View: Contains the business logic, preparing the data.
- Template: Defines the presentation, or how the page looks.
The diagram below shows where Templates fit into the full request-response cycle. The View receives a request, interacts with the Model, and then passes data to the Template to generate the final HTML response.
2. Setting Up the Template System
Before we can render a template, Django needs to know where to find it. You need to perform two key steps:
- Create a directory to store your HTML files.
- Tell Django where this directory is located.
While there are a couple of ways to organize templates, the most robust and scalable method is to create a templates directory inside each application. To prevent naming conflicts (e.g., two different apps having an index.html), we add another subdirectory named after the app itself.
This creates a namespace for your templates. For our playground app, the structure will be:
playground/
├── templates/
│   └── playground/
│       └── hello.html
└── views.py
Let's watch a short video that walks through creating this structure and configuring Django to use it.
Python Django Tutorial: Full-Featured Web App Part 3 - Templates
This segment from Corey Schafer's Django tutorial series clearly demonstrates the best-practice way to set up app-specific templates and configure Django to find them.
Watch the video from 00:00:59 to 00:05:40. Focus on these key actions: Creating the playground/templates/playground/ directory structure. Adding your playground app to the INSTALLED_APPS list in storefront/settings.py. This step is crucial for Django's app_directories template loader to find your templates. Creating a simple hello.html file inside the new directory.
3. Rendering a Template with render()
With our template file in place, we can now update our view to render it. Django provides a convenient shortcut function called render() for this exact purpose.
The render() function takes the request object, the name of the template, and an optional dictionary of data (called context) to pass to the template. It handles loading the template, filling it with the data, and returning a properly formatted HttpResponse object.
This is explained well in the official Django documentation.
Writing your first Django app, part 3
The Django documentation explains the render() shortcut and why it's the standard way to return a rendered template from a view.
Read the section titled 'A shortcut: render()'. It's a short section that succinctly explains the function's purpose and its arguments. This will solidify your understanding of what render() does behind the scenes.
Now, let's put this into practice. We'll continue with the video tutorial, which shows how to modify your view to use render().
Python Django Tutorial: Full-Featured Web App Part 3 - Templates
Let's continue with the same video to see how to replace HttpResponse with the render() function in your view.
Watch from 00:05:40 to 00:07:35. Follow along to modify your playground/views.py file: Import render from django.shortcuts (if it's not already there). In your say_hello view, replace the return HttpResponse(...) line with return render(request, 'playground/hello.html').
After these changes, your say_hello view in playground/views.py should now look like this:
from django.shortcuts import render

def say_hello(request):
    # This view now renders an HTML file instead of returning inline text.
    return render(request, 'playground/hello.html')
If you run your server and visit http://127.0.0.1:8000/playground/hello/, you should see the content of your hello.html file rendered in the browser!
4. Reusing Layouts with Template Inheritance
You'll quickly notice that many pages on a site share common elements like a header, navigation bar, and footer. Copying and pasting this HTML into every single template is inefficient and violates the DRY (Don't Repeat Yourself) principle.
Django's template engine solves this with inheritance. You can create a parent base.html template that defines the overall page structure and includes special "blocks" that child templates can override.
{% extends "app_name/base.html" %}: This tag, placed at the top of a child template, declares which parent template it inherits from.{% block block_name %}and{% endblock %}: These tags are used in the parent template to define sections that can be filled in by child templates. The child template then uses the same block tags to provide its unique content.
This is one of the most powerful features of the template system. Let's see how it works.
Python Django Tutorial: Full-Featured Web App Part 3 - Templates
This final clip from the Corey Schafer video provides an excellent, practical demonstration of creating a base.html template and having other templates extend it.
Watch from 20:31 to 26:38. The goal is to understand and implement template inheritance: Create a base.html in your playground/templates/playground/ directory. Define the main HTML structure (<!DOCTYPE html>, <html>, <head>, <body>) inside base.html. In the <body> of base.html, create a content block: {% block content %}{% endblock %}. Modify your hello.html to extend the base template and place its unique content inside the content block.
After following the video, your files should look something like this:
playground/templates/playground/base.html
<!DOCTYPE html>
<html>
<head>
    <title>My Django Site</title>
</head>
<body>
    <main>
        {% block content %}
        <!-- Child template content will go here -->
        {% endblock %}
    </main>
</body>
</html>
playground/templates/playground/hello.html
{% extends 'playground/base.html' %}

{% block content %}
    <h1>Hello World</h1>
    <p>This is my first Django template!</p>
{% endblock %}
Now, any page that extends base.html will automatically share the same document structure. If you need to add a stylesheet or a site-wide navigation bar, you only need to change it in one place: base.html.
Test your understanding!
Let's apply what you've learned. Create a new "About" page for your playground app that also uses the base.html layout.
- Create a template: In
playground/templates/playground/, create a new file namedabout.html. - Extend the base: Make
about.htmlextend yourbase.htmltemplate. - Add content: Inside the
contentblock, add an<h1>tag that says "About Us". - Create a view: In
playground/views.py, create a new view functionabout_page(request)that renders theabout.htmltemplate. - Create a URL: In
playground/urls.py, add a new pathabout/that maps to yourabout_pageview.
After completing these steps, you should be able to visit http://127.0.0.1:8000/playground/about/ and see your new page with the same base layout as the "Hello World" page.
Show answer
-
playground/templates/playground/about.html:{% extends 'playground/base.html' %} {% block content %} <h1>About Us</h1> <p>This is the about page for our application.</p> {% endblock %} -
playground/views.py:# Add this new view function def about_page(request): return render(request, 'playground/about.html') -
playground/urls.py:# ... your existing imports and app_name urlpatterns = [ path('hello/', views.say_hello, name='hello_world'), # ... other existing paths # Add the new path for the about page path('about/', views.about_page, name='about_page'), ]
Conclusion
Congratulations! You've successfully moved from returning simple text to rendering full HTML pages, a major step in building a web application. You now understand how to separate presentation from logic, a core tenet of backend development.
Key Takeaways:
- Templates separate the presentation layer (HTML) from the logic layer (Python views), aligning with the MTV pattern.
- Django finds templates based on the
INSTALLED_APPSsetting and thetemplates/app_name/directory convention, which provides namespacing. - The
render()function is the standard shortcut to load a template and return anHttpResponse. - Template inheritance using
{% extends %}and{% block %}is a powerful technique for creating reusable page layouts and keeping your code DRY.
Preview of the Next Lesson:
Our templates are still static. The real power of a backend framework is in generating dynamic content—pages that change based on data from a database, user input, or other sources. In the next lesson, "Pass context data from a view to a template and display it," we will explore how to pass data from your views into your templates and use the Django Template Language (DTL) with tags like {{ variable }} and {% for %} to display it.