Hello! Welcome to your seventh lesson on backend engineering with Django.
In our last lesson, you successfully started using templates to render full HTML pages, separating your application's logic (views) from its presentation (HTML). However, the templates we created were static. The true power of a backend framework lies in generating dynamic content.
Today, we will make our pages dynamic. The learning outcome for this lesson is to pass context data from a view to a template and display it. You'll learn how to send information from your Python code to your HTML files, allowing you to build pages that display variable content like user data, lists of items, and more. This is the crucial step that breathes life into your web applications.
1. The Bridge Between View and Template: The context Dictionary
So, how do we get data from a Python view function into an HTML template? The answer is a simple, yet powerful mechanism: the context dictionary.
A context in Django is a standard Python dictionary that you create in your view.
- The keys of this dictionary are strings that become the names of variables accessible within the template.
- The values can be any Python object you want to use in your template: strings, integers, lists, or even more complex objects.
You pass this dictionary as the third argument to the render() function you learned about in the last lesson.
# The general pattern
def my_view(request):
    # 1. Prepare your data
    my_data = {
        'variable_name_in_template': 'some_value',
        'another_variable': 123
    }

    # 2. Pass the dictionary to render()
    return render(request, 'my_app/my_template.html', my_data)
The Mozilla Developer Network (MDN) guide provides a clear explanation of this process.
Django Tutorial Part 5: Creating our home page
This resource from MDN Web Docs explains how the view function prepares data in a context dictionary and passes it to the render() function. It's a great conceptual overview.
Read the sections titled 'View (function-based)' and pay close attention to the explanation of the render() function's parameters, especially the context variable. The snippet under 'The important thing to note...' at the end of the page reinforces how the dictionary keys map to template variables.
2. Displaying Data with Django Template Language (DTL)
Once data is passed to a template, you need a way to access and display it. This is done using the Django Template Language (DTL). DTL is not Python, but it has a simple, Python-like syntax designed for presentation logic.
The most basic DTL tag is the variable tag: {{ variable_name }}.
When the template is rendered, Django replaces {{ variable_name }} with the value associated with the variable_name key in the context dictionary.
Let's modify the say_hello view from our previous lessons to pass a name and display it.
In playground/views.py:
from django.shortcuts import render

def say_hello(request):
    # Create a context dictionary
    context = {
        'name': 'Arpan',
        'course': 'Backend Engineering'
    }
    # Pass the context to the render function
    return render(request, 'playground/hello.html', context)
In playground/templates/playground/hello.html:
{% extends 'playground/base.html' %}

{% block content %}
    <h1>Hello, {{ name }}!</h1>
    <p>Welcome to the {{ course }} course.</p>
{% endblock %}
Now, when you run your server and visit http://127.0.0.1:8000/playground/hello/, you'll see a personalized greeting. The template has been dynamically rendered with the data from your view.

3. Handling Dynamic Content: Loops and Complex Data
Most real-world applications deal with collections of data, not just single variables. For example, you might have a list of blog posts, products, or search results. DTL provides template tags for handling this, the most common of which is the {% for %} loop.
Let's watch how to implement this. The following video demonstrates creating a list of dummy data (blog posts), passing it to the template, and then iterating over it to display each post.
Python Django Tutorial: Full-Featured Web App Part 3 - Templates
This video from Corey Schafer's Django series provides a clear, step-by-step guide to passing a list of dictionaries to a template and rendering it with a for loop.
Watch the video from 09:49 to 16:44. Focus on these two key stages: In the View (09:49 - 13:00): See how a Python list of dictionaries is created to represent blog posts. This list is then placed into a context dictionary. In the Template (13:00 - 16:44): Observe the DTL syntax for looping through the list: {% for post in posts %}. Pay close attention to the dot notation ({{ post.title }}) used to access the values of each dictionary inside the loop.
As you saw, the syntax is straightforward:
{% for post in posts %}
    <h2>{{ post.title }}</h2>
    <p>By {{ post.author }} on {{ post.date_posted }}</p>
    <p>{{ post.content }}</p>
{% endfor %}
An important detail is the dot notation (.). In DTL, {{ post.title }} is used to access values from the post dictionary. This works for dictionary keys, object attributes, and even list indices (e.g., {{ my_list.0 }}). This is a deliberate design choice to simplify syntax in the template layer.
The following resource provides more textual examples of accessing nested data structures.
This article from Python Assets gives concise examples of passing various data types, including nested dictionaries and lists, and accessing them in the template.
Review the final code block in this short article. It demonstrates how to access elements from a dictionary (current_course.name) and a list (previous_courses.0) using the same dot notation.
4. Adding Logic with Conditionals
Sometimes you need to display content conditionally. For example:
- Show a "Welcome back!" message if a user is logged in.
- Display "No items found" if a list is empty.
- Render different page titles for different pages.
DTL provides {% if %}, {% else %}, and {% endif %} tags for this purpose.
Let's see a practical example of how to use these conditional tags to set a dynamic page title.
Python Django Tutorial: Full-Featured Web App Part 3 - Templates
We'll continue with the same Corey Schafer video, which now demonstrates how to use an if-else block within a template.
Watch from 17:53 to 20:31. The video shows how to pass a title variable for one page but not for another. Notice how the if statement in the base.html template checks for the existence of the title variable and displays content accordingly.
The pattern is as follows:
<title>
    {% if title %}
        My Site - {{ title }}
    {% else %}
        My Site
    {% endif %}
</title>
This is an elegant way to make your templates more flexible and reusable.
Test your understanding!
Let's apply what you've learned to the about page you created in the last lesson.
-
Modify the View: In
playground/views.py, update yourabout_pageview. Create a list of dictionaries representing a project team. Each dictionary should havenameandrolekeys. Pass this list and a pagetitleto the template via the context.# Example data for your view team_members = [ {'name': 'Alice', 'role': 'Lead Developer'}, {'name': 'Bob', 'role': 'UX Designer'}, {'name': 'Charlie', 'role': 'Data Scientist'} ] -
Update the Template: In
playground/templates/playground/about.html, do the following:- Make sure your template extends
base.htmland uses thetitlevariable you passed from the view. - Inside the
contentblock, add a section for "Our Team". - Use a
{% for %}loop to iterate over the list of team members and display each person's name and role.
- Make sure your template extends
After completing these steps, visiting http://127.0.0.1:8000/playground/about/ should display a page with a custom title and a list of your team members.
Show answer
-
playground/views.py:from django.shortcuts import render # ... your say_hello view ... def about_page(request): team_members = [ {'name': 'Alice', 'role': 'Lead Developer'}, {'name': 'Bob', 'role': 'UX Designer'}, {'name': 'Charlie', 'role': 'Data Scientist'} ] context = { 'title': 'About Us', 'team': team_members } return render(request, 'playground/about.html', context) -
playground/templates/playground/about.html:{% extends 'playground/base.html' %} {% block title %} {% if title %}{{ title }}{% else %}About{% endif %} {% endblock %} {% block content %} <h1>About Our Project</h1> <p>This is the about page for our application.</p> <h2>Our Team</h2> <ul> {% for member in team %} <li><strong>{{ member.name }}</strong> - {{ member.role }}</li> {% endfor %} </ul> {% endblock %}(Note: You could also place the title block logic in your
base.htmlfor wider reuse, as shown in the video.)
Conclusion
Excellent work! You have now mastered a fundamental skill in backend development: making your front-end dynamic by passing data from your application logic. This separation of logic and presentation is key to writing clean, scalable, and maintainable web applications.
Key Takeaways:
- The
contextdictionary is the bridge that carries data from your Python view to your HTML template. - The
render()function's third argument is used to pass thiscontext. - Django Template Language (DTL) uses
{{ variable }}to display data. - DTL provides logic tags like
{% for item in list %}to iterate over collections and{% if condition %}to render content conditionally. - You can access nested data in templates using dot notation (e.g.,
{{ dictionary.key }},{{ object.attribute }},{{ list.0 }}).
Preview of the Next Lesson:
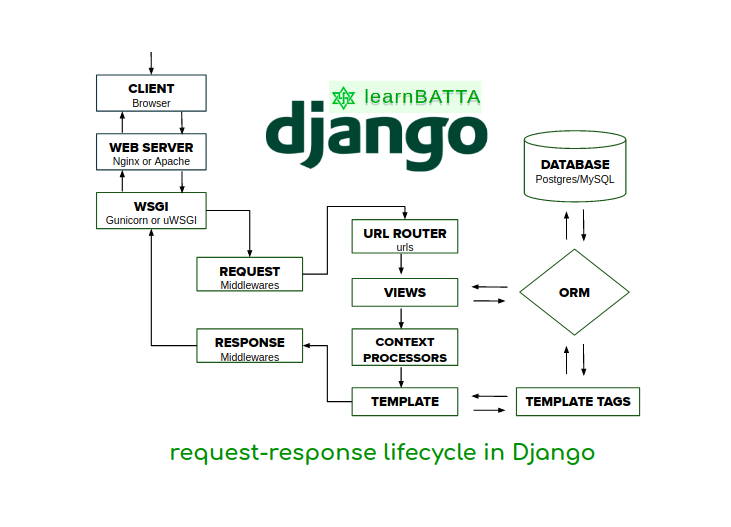
So far, we've built up the pieces of a Django request: a URL is requested, a view is called, it prepares data, and a template is rendered. In the next lesson, "Describe the request-response cycle within a Django application," we will step back and look at the entire journey of an HTTP request, from the moment it leaves the browser to the moment the response arrives. This will formalize your understanding of how all the components you've learned about work together.