Hello! Welcome to the next module in our Backend Engineering course: Containerization and Application Deployment.
In the previous modules, you've built a robust Django API, complete with database models, authentication, and even asynchronous tasks. Most recently, we explored how TLS secures your application's data as it travels across the network. Now, we face a new challenge: how do we package this entire application—the Django code, the Python environment, the database, and the message broker—so that it can be run reliably and consistently anywhere?
This lesson addresses that question head-on. Our learning outcome is to containerize a Django application and its services (e.g., PostgreSQL, Redis) using Docker and Docker Compose. We will tackle the infamous "it works on my machine" problem by bundling our application and its dependencies into isolated, portable environments called containers.
This is a foundational skill for modern backend development and your first major step toward deploying applications to the cloud.
The Multi-Service Architecture
Our Django application isn't a monolith; it relies on other services to function. We have the web application itself, a PostgreSQL database for data storage, and a Redis instance that acts as a message broker for Celery.
The diagram below illustrates this kind of multi-service architecture.
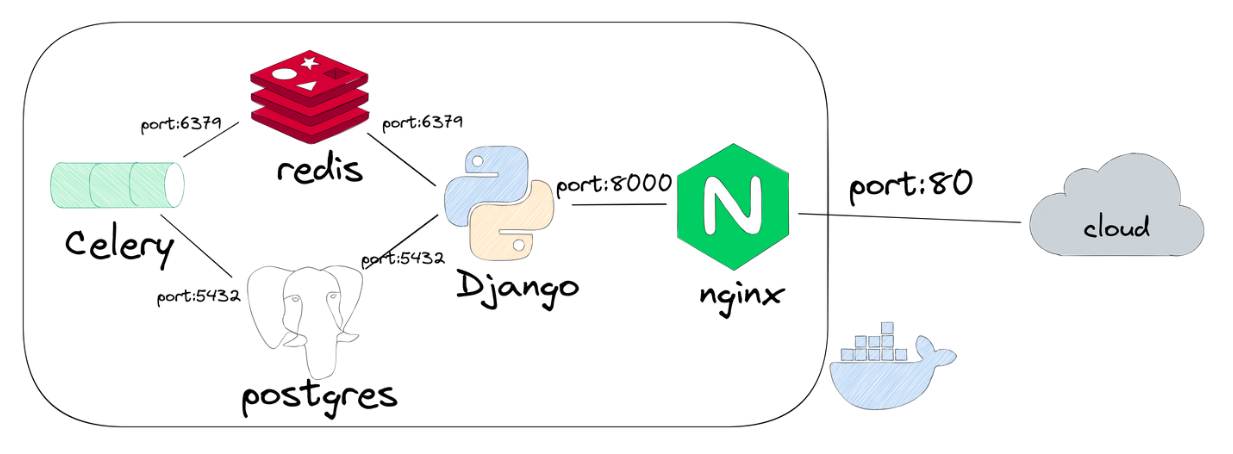
Our goal today is to take this entire collection of services and package it so it can be started, stopped, and managed as a single unit. We'll use two key tools for this: Docker to package each individual service, and Docker Compose to define and run the multi-service application.
Why Containerize? The Core Concepts
Before we write any code, it's crucial to understand the fundamental ideas behind containerization. Docker provides a way to run applications in isolated environments, ensuring consistency from development to production.
To get a solid grasp of these concepts, please review the introductory slides from this workshop on containerization.
Containerizing Python Web Apps
This presentation provides a clear, high-level overview of Docker's core components and the motivation for using them.
Please review the first section, 'Docker', which runs from the 'Docker overview' slide to the 'Image layers' slide. Focus on the distinction between an image (a blueprint) and a container (a running instance of that blueprint).
As you saw, Docker solves several key problems:
- Consistency: It bundles the application, its dependencies, and its configuration into a single package (an image), eliminating environment-specific bugs.
- Isolation: A container runs in an isolated environment on the host OS, preventing conflicts between different applications or dependencies.
- Portability: A Docker image built on your laptop will run identically on a colleague's machine, a testing server, or in the cloud.
Your experience with complex AI pipelines, which often involve multiple stages and dependencies, provides a useful parallel. Imagine packaging your data preprocessing scripts, a model training environment with specific library versions, and a separate inference server into their own containers. This ensures each part of the pipeline runs exactly as intended, regardless of the underlying machine.
Part 1: Defining a Single Container with Dockerfile
The first step is to create a blueprint for our Django application container. This is done using a special file named Dockerfile. This file contains a series of instructions that Docker follows to build our image.
The following video provides a step-by-step guide to creating a Dockerfile for a Django project and then expands to using Docker Compose to orchestrate it with a PostgreSQL database. It's a comprehensive and modern walkthrough.
Docker - Django and PostgreSQL setup (with uv) from scratch!
This video will be our primary guide for this lesson. We'll start by focusing on how to create a Dockerfile to containerize the Django application itself.
Watch the section from 01:44 to 10:35. This part covers the creation of the Dockerfile from scratch. Pay close attention to the purpose of each instruction (FROM, ENV, WORKDIR, COPY, RUN, CMD).
Let's break down the key instructions you saw in the video:
FROM python:3.13-slim-bookworm: EveryDockerfilestarts with aFROMinstruction. It specifies the base image to build upon. Here, we're using an official, lightweight Python image.ENV PYTHONUNBUFFERED=1: Sets an environment variable inside the container. This specific one ensures that logs from our Python application are sent straight to the container's log stream without being buffered, which is essential for debugging.WORKDIR /app: Sets the working directory for subsequent instructions. It's like runningcd /appinside the container.COPY requirements.txt .: Copies therequirements.txtfile from our local machine into the container's working directory (/app).RUN uv pip install -r requirements.txt --system: Executes a command inside the container. Here, we install our Python dependencies. The video usesuv, a very fast, modern package installer.COPY ./source /app: Copies the rest of our Django source code into the container.CMD ["python", "manage.py", "runserver", "0.0.0.0:8000"]: Specifies the default command to run when a container is started from this image. Binding to0.0.0.0is crucial, as it tells Django to listen for connections on all network interfaces inside the container, not justlocalhost.
Test your understanding!
In the video and the summary above, the requirements.txt file is copied and its packages are installed before the rest of the application source code is copied. Why is this done? What advantage does this specific ordering provide?
Show answer
This is a best practice for leveraging Docker's layer caching. Docker builds images in a series of layers, and it caches the result of each instruction. If a file hasn't changed, Docker will reuse the cached layer from a previous build instead of re-running the instruction.
Your project's dependencies (requirements.txt) change much less frequently than your source code. By installing them in a separate, earlier step, the layer containing the installed packages can be cached. When you then change your Python code and rebuild the image, Docker reuses the cached dependency layer and only re-runs the final COPY instruction for your source code. This makes subsequent builds much faster.
Part 2: Orchestrating Services with docker-compose.yml
Now that we have a Dockerfile for our Django app, we need a way to define and run it alongside our other services: PostgreSQL and Redis. This is where Docker Compose comes in. It uses a YAML file, typically docker-compose.yml, to configure the application's services.
Let's continue with the same video, which now builds the docker-compose.yml file.
Docker - Django and PostgreSQL setup (with uv) from scratch!
We will now see how to define our multi-service application. The video will first set up the web (Django) and db (PostgreSQL) services.
Watch the segment from 10:35 to 22:40. This covers the creation of the docker-compose.yml file, defining the web and db services, and configuring them to work together. Focus on build vs. image, volumes, ports, env_file, and depends_on.
This section was packed with important concepts. Here’s a summary of a docker-compose.yml for Django and PostgreSQL:
version: '3.8'

services:
  web:
    build: .
    container_name: django_app
    command: python manage.py runserver 0.0.0.0:8000
    volumes:
      - ./source:/app # Mount local code for development
    ports:
      - "8000:8000" # Map host port 8000 to container port 8000
    env_file:
      - ./.env # Pass environment variables from a file
    depends_on:
      db:
        condition: service_healthy # Wait for the DB to be ready

  db:
    image: postgres:16-alpine # Use a pre-built image from Docker Hub
    container_name: postgres_db
    volumes:
      - postgres_data:/var/lib/postgresql/data/ # Persist DB data
    environment:
      - POSTGRES_DB=${POSTGRES_DB}
      - POSTGRES_USER=${POSTGRES_USER}
      - POSTGRES_PASSWORD=${POSTGRES_PASSWORD}
    healthcheck:
      test: ["CMD-SHELL", "pg_isready -U ${POSTGRES_USER} -d ${POSTGRES_DB}"]
      interval: 5s
      timeout: 5s
      retries: 5

volumes:
  postgres_data: # Define the named volume
Key concepts from this file:
services: Each top-level key (web,db) defines a service. Each service will run in its own container.buildvs.image: For ourwebservice, we usebuild: .to tell Compose to build an image from theDockerfilein the current directory. Fordb, we useimage: postgres:16-alpineto pull a pre-built image directly from the Docker Hub registry.volumes: This is crucial for development and data persistence../source:/app: This is a bind mount. It maps the localsourcedirectory into the container's/appdirectory. Any changes you make to your code locally are immediately reflected inside the container, enabling a live-development workflow.postgres_data:/var/lib/postgresql/data/: This is a named volume. Docker manages this volume, and it's used to persist the database data even if thedbcontainer is stopped and removed. This prevents you from losing your data every time you restart.
env_file/environment: This is how we pass configuration, especially secrets like database passwords, to our containers. Reading them from an.envfile keeps them out of our version-controlled code.depends_on&healthcheck: This controls startup order. We tell thewebservice to wait until thedbservice is not just running, buthealthy(i.e., ready to accept connections).
Adding Redis to the Mix
Adding another service like Redis is straightforward. We simply add another service definition to our docker-compose.yml. The following video shows how to add both Redis and a Celery worker. For this lesson, we will focus only on adding the Redis service itself.
Docker - Django, Celery & Redis Docker Compose setup
Now let's see how easy it is to add Redis to our composition. This video demonstrates a setup including Celery, but we'll focus on the Redis service definition.
Watch the portion from 09:55 to 11:27. This specifically covers the db (PostgreSQL) and redis service definitions. Observe how the Redis service is defined using just an image from Docker Hub.
Adding Redis is as simple as:
# In your docker-compose.yml services section
  redis:
    image: redis:7-alpine
    container_name: redis_cache
Part 3: The Complete Workflow
You now have all the pieces. Let's outline the full workflow for running your containerized Django application.
- Create your
Dockerfileto define the Django web container. - Create your
docker-compose.ymlto define theweb,db, andredisservices and how they connect. - Create an
.envfile in your project root to store your database credentials and other secrets.# .env POSTGRES_DB=app_db POSTGRES_USER=app_user POSTGRES_PASSWORD=supersecretpassword - Configure
settings.pyto read database and Redis settings from environment variables, usingos.environ.get(). - Build and run everything with a single command:
docker compose up --build. The--buildflag tells Compose to rebuild any images for which theDockerfileor its context has changed. - Run database migrations in a separate terminal while the services are running:
docker compose exec web python manage.py migrate. Theexeccommand allows you to run a command inside a specific, running service container.
The first video we watched demonstrates this final interaction, including running migrations and connecting to the database shell.
Docker - Django and PostgreSQL setup (with uv) from scratch!
Finally, let's see how to interact with our running containers to perform tasks like migrating the database.
Watch from 23:47 to 27:56. This section shows how to use docker exec (or docker compose exec) to run Django management commands (makemigrations, migrate, shell) inside the web container and how to connect to the psql shell inside the db container.
As a final practical tip, many developers use a shell script named entrypoint.sh to automate startup tasks like running migrations. This script is then executed by the CMD or ENTRYPOINT instruction in the Dockerfile. This ensures that whenever the web container starts, it automatically applies any pending database migrations before starting the web server.
Conclusion
Congratulations! You have taken a complete, multi-service Django application and packaged it into a portable, reproducible environment with Docker and Docker Compose. This is a massive leap forward in making your applications ready for testing, collaboration, and eventually, production deployment.
Key Takeaways:
- A
Dockerfileis a text file that contains instructions to build a single container image. - Docker Compose is a tool that uses a
docker-compose.ymlfile to define, run, and connect multiple containers as a single application. - Services like PostgreSQL and Redis are typically run from pre-built images from Docker Hub.
- Volumes are essential for persisting data (named volumes) and enabling a live-development workflow (bind mounts).
- Configuration and secrets should be passed into containers using environment variables, often managed with an
.envfile. - The
docker compose execcommand is your tool for running one-off commands (likemanage.py migrate) inside a running container.
Preview of the Next Lesson:
Our current docker-compose.yml is perfect for local development. However, running an application in production requires a few more considerations for security, performance, and asset management. In our next lesson, we will configure a Django application for a production environment, covering settings like DEBUG, ALLOWED_HOSTS, and how to handle static files.