Hello! Welcome to your next lesson in the Containerization and Application Deployment module.
In our previous session, you successfully containerized a multi-service Django application using Docker and Docker Compose. You now have a portable, consistent development environment. However, a configuration optimized for development (with live-reloading and debug tools) is insecure and inefficient for a live, public-facing application.
Today, we will bridge that gap. Our learning outcome is to configure a Django application for a production environment, focusing on DEBUG settings, allowed hosts, and static files. We'll transform your development setup into a more secure, performant, and robust configuration ready for deployment.
This process involves a mindset shift: from prioritizing developer convenience to prioritizing security and performance.
1. The Two Environments: Development vs. Production
It's crucial to understand that development and production environments serve different purposes and have conflicting requirements.
-
Development (
DEBUG = True):- Goal: Maximize developer productivity.
- Features: Detailed error pages, automatic code reloading, serving static files directly for convenience.
- Environment: Your local machine, a containerized setup like we built in the last lesson.
-
Production (
DEBUG = False):- Goal: Maximize security, performance, and stability.
- Features: Generic error pages, robust static file handling, locked-down access controls.
- Environment: A cloud server or platform where users access your application.
Our goal is to make our application's configuration flexible enough to run in either environment without hardcoding sensitive values.
2. Managing Configuration with Environment Variables
The best practice for managing settings that differ between environments (like DEBUG status or database credentials) is to use environment variables. In the last lesson, we introduced the concept of reading settings from an .env file. Now, we'll formalize this process using a dedicated library.
The video below provides an excellent explanation of why we need environment variables and demonstrates how to use the django-dotenv package to load them into a Django application.
31 - Environment Variables & dotenv - Python & Django 3.2 Tutorial Series
This video from CodingEntrepreneurs clearly explains the rationale for using environment variables and provides a step-by-step guide to integrating them into your Django project.
Please watch the following two segments: 00:00 - 01:57: Focus on the introduction to development vs. production environments and the need to abstract settings like SECRET_KEY and DEBUG. 04:56 - 07:49: Observe how to create a .env file and use the django-dotenv library to load these variables by modifying manage.py and settings.py.
To summarize the key steps from the video:
- Install the library:
pip install django-dotenv - Create a
.envfile in your project's root directory (next tomanage.py). - Add
dotenv.read_dotenv()to yourmanage.pyfile to load the variables. - Use
os.environ.get('VARIABLE_NAME', 'default_value')insettings.pyto access them.
Crucially, you must add .env to your .gitignore file to prevent committing secrets to version control.
3. Critical Production Settings
With our environment variable system in place, let's configure the three most critical settings for production.
a) DEBUG = False
This is the single most important security setting. Leaving DEBUG = True in production exposes your application's configuration, source code snippets, and settings in case of an error. This is a massive security vulnerability.
The following short clip visually demonstrates the difference between a debug error page and a production error page.
7 Critical Django Production Server Settings to Configure Before Going Live
This clip from Tony Teaches Tech clearly shows what a user sees when an error occurs with DEBUG=True versus DEBUG=False.
Watch from 05:08 to 06:12. Notice the amount of sensitive information leaked on the debug page, which is completely hidden on the production page.
To configure this dynamically, modify your settings.py:
# settings.py
import os

# ... other imports

# The value from .env will be a string '0' or '1'.
# We convert it to a boolean. Default to True for development.
DEBUG = os.environ.get('DJANGO_DEBUG', '1') == '1'
In your .env file for production, you would set DJANGO_DEBUG=0. For development, you can set DJANGO_DEBUG=1 or omit it to use the default.
b) ALLOWED_HOSTS
When DEBUG is False, Django requires you to specify which domain names (hosts) are allowed to serve your application. This prevents a type of vulnerability called an HTTP Host header attack, where an attacker can trick your application by manipulating the Host header in an HTTP request.
Your ALLOWED_HOSTS should be a list of strings containing the domain names for your site.
# settings.py

# ...

# This will get the hostname from an environment variable.
# For example, in .env: ALLOWED_HOSTS=myapp.com,www.myapp.com
# We split the string by commas to create the Python list.
ALLOWED_HOSTS_str = os.environ.get('ALLOWED_HOSTS', '')
ALLOWED_HOSTS = ALLOWED_HOSTS_str.split(',') if ALLOWED_HOSTS_str else []

# In development with DEBUG=True, you can often leave this empty or use ['*'].
if DEBUG:
    ALLOWED_HOSTS = ['*']
For your production environment, you would set ALLOWED_HOSTS=yourdomain.com,www.yourdomain.com in your .env file.
The Mozilla Developer Network (MDN) has an excellent guide that covers these initial production steps.
Django Tutorial Part 11: Deploying Django to production
This MDN article, 'Deploying Django to production', provides a solid textual reference for the settings we're discussing. It reinforces the importance of DEBUG and SECRET_KEY and introduces the use of environment variables.
Read the following sections: Start at 'Getting your website ready to publish'. Read until just before the 'Gunicorn' subheading. This covers DEBUG, SECRET_KEY, and setting them up with python-dotenv (a similar library to django-dotenv). Skim the sections 'Set ALLOWED_HOSTS and CSRF_TRUSTED_ORIGINS' to see real-world examples of how ALLOWED_HOSTS is configured for deployment platforms. Focus on the ALLOWED_HOSTS setting itself, not the platform specifics.
4. Handling Static Files in Production
In development, Django's runserver conveniently serves your static files (CSS, JavaScript, images). In production, this is disabled for performance and security reasons. A dedicated web server like Nginx is much more efficient at serving static assets.
Our production strategy involves two steps:
- Collect: Gather all static files from your various apps into a single directory.
- Serve: Configure a server to make the files in that directory available to users.
The diagram below clearly illustrates the difference in workflows.
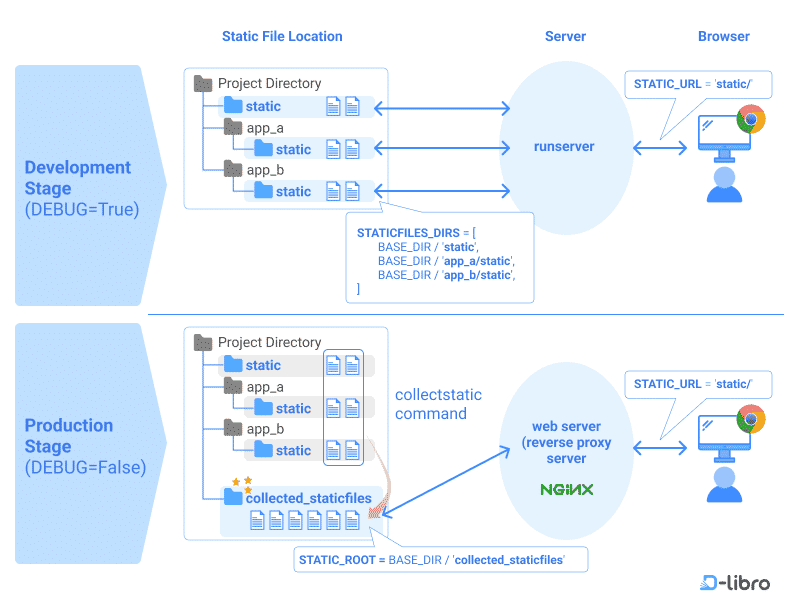
Configuration for collectstatic
You need to configure two settings in settings.py:
STATIC_URL: The URL prefix your browser will use to request static files (e.g.,/static/). This is usually already defined.STATIC_ROOT: The absolute path to the directory wherecollectstaticwill copy all static files. This directory should be dedicated to this purpose.
# settings.py

# ...

# The URL to use when referring to static files (where they will be served from)
STATIC_URL = '/static/'

# The absolute path to the directory where collectstatic will collect static files for deployment.
# This should be a path inside your container.
STATIC_ROOT = os.path.join(BASE_DIR, 'staticfiles')
You then run the management command:
python manage.py collectstatic
This command will find all static files in your project and copy them into the directory specified by STATIC_ROOT.
Serving Static Files with WhiteNoise
While a full Nginx setup is the most robust solution (which we'll cover later), a simpler and very popular method is to use a library called WhiteNoise. WhiteNoise allows your Python application to serve its own static files in production, but in a highly efficient and secure way, unlike runserver. It's a perfect solution for getting started with production deployments.
The MDN guide provides a clear walkthrough for setting up static files and WhiteNoise.
Django Tutorial Part 11: Deploying Django to production
Let's return to the MDN guide to see how to configure static files and integrate WhiteNoise.
Read the sections titled 'Serving static files in production' and 'Whitenoise'. Pay close attention to the purpose of STATIC_ROOT, the collectstatic command, and the steps to add WhiteNoise to your middleware.
Here's a quick summary of the WhiteNoise setup:
- Install it:
pip install whitenoise - Add it to your middleware in
settings.py, just after theSecurityMiddleware:MIDDLEWARE = [ 'django.middleware.security.SecurityMiddleware', 'whitenoise.middleware.WhiteNoiseMiddleware', # ... other middleware ] - Run
python manage.py collectstatic.
Now, when you run your application with a production WSGI server (like Gunicorn), WhiteNoise will automatically intercept requests for files under STATIC_URL and serve them directly from your STATIC_ROOT directory.
Test your understanding!
Imagine you've deployed your application with DEBUG=False and a correctly configured STATIC_ROOT. You then add a new CSS file to one of your apps. When you push this code change to your server, users report that the new styles are not appearing. What essential step did you likely forget in your deployment process?
Show answer
You likely forgot to run python manage.py collectstatic after deploying the new code. This command is necessary to copy the new CSS file from your app's static directory into the STATIC_ROOT directory, from where WhiteNoise (or Nginx) serves it. Simply deploying the code file is not enough.
Conclusion
You have now taken the critical steps to prepare your Django application for a production environment. By externalizing configuration and handling static files correctly, you've made your application more secure, performant, and maintainable.
Key Takeaways:
- Production is different: Prioritize security and performance over developer convenience.
- Use environment variables: Never hardcode secrets or environment-specific settings. Use a library like
django-dotenvand a.envfile (kept out of version control) to manage them. DEBUG = Falseis non-negotiable: This is the first line of defense against information leakage.ALLOWED_HOSTSis mandatory in production: It protects against Host header attacks.- Static files require a strategy: Use the
collectstaticcommand to gather files intoSTATIC_ROOTand a tool likeWhiteNoiseor a web server to serve them efficiently.
Preview of the Next Lesson:
We've started using environment variables for configuration. In the next lesson, we will dive deeper into this topic: Store sensitive configuration and secrets securely using environment variables. We'll explore best practices for managing secrets not just locally, but also in cloud deployment environments where a simple .env file isn't always the best or most secure option.