Hello! Welcome to the first lesson in our new module, "Advanced Database Operations and Performance."
In our previous work, we've successfully built and tested Django applications using the default SQLite database. While SQLite is wonderfully simple for development and prototyping, it has limitations, especially concerning concurrency and performance, that make it unsuitable for most production applications.
Today, we will take a significant step towards building production-ready systems. This lesson is dedicated to migrating our Django project from SQLite to PostgreSQL, a powerful, open-source, and enterprise-grade relational database. You will learn how to install PostgreSQL, create a dedicated database and user, install the necessary adapter for Python, and finally, reconfigure your Django settings.py file to establish the connection.
1. Why PostgreSQL? From a File to a Server
So far, our database has been a single file (db.sqlite3) in our project directory. SQLite is an "embedded" database, meaning the database engine runs as part of your application. This is simple but doesn't scale well when multiple processes or users need to access the data simultaneously.
PostgreSQL, on the other hand, is a client-server relational database management system (RDBMS).
- The Server: A dedicated process (the PostgreSQL server) runs continuously on a machine, managing the data, handling connections, and ensuring data integrity.
- The Client: Your Django application acts as a client, sending requests (SQL queries) to the server and receiving data in return.
This model is fundamental to building scalable backend systems. It allows multiple application instances to connect to a single, robust database server, which is designed for high concurrency, data safety (ACID compliance), and advanced features.
Your computer science background might make you curious about what this server architecture looks like.
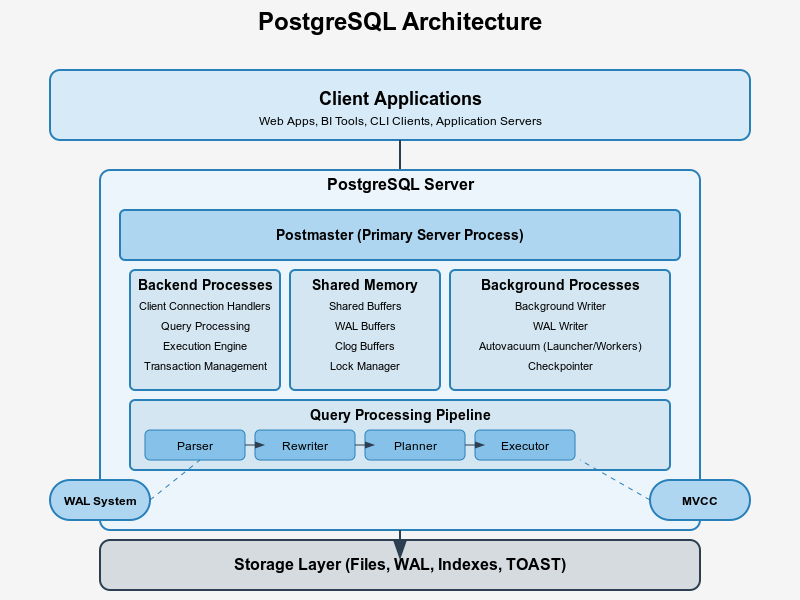
2. The Configuration Process: A Step-by-Step Guide
Switching your Django project to PostgreSQL involves a clear, five-step process.
Step 1: Install PostgreSQL
First, you need to install the PostgreSQL server on your machine. The installation process varies depending on your operating system.
- You can find the appropriate installer for your OS on the official PostgreSQL downloads page.
- During installation, you will be asked to set a password for the default superuser,
postgres. Remember this password, as you will need it to create your application's database.
The videos and articles in this lesson will show parts of the installation on Windows and Ubuntu, which you can use as a reference.
Step 2: Install the Python-PostgreSQL Adapter
Django does not communicate with PostgreSQL natively. It relies on a third-party "adapter" or "driver" library that handles the low-level communication protocol. The most widely used adapter for Python is Psycopg2.
To install it, activate your project's virtual environment and run the following command:
pip install psycopg2-binary
The -binary suffix installs a pre-compiled version of the library, which avoids potential compilation issues.
Step 3: Create a Dedicated Database and User
It is a crucial security best practice to create a separate database and a dedicated user with specific privileges for each of your applications, rather than using the postgres superuser.
You can do this using a graphical tool like pgAdmin (which comes with the Windows installer) or via the command-line interface psql. Learning the psql commands is a valuable skill for any backend developer.
Building CRUD Applications with Django and PostgreSQL
This article provides a clear, command-line-driven approach to setting up the database, user, and permissions using psql. This is a common and scriptable task you will perform often as a backend developer.
Read 'Step 3 — Setting up a PostgreSQL database'. Focus on the psql commands for CREATE USER, CREATE DATABASE, and ALTER ROLE. For a standard local setup, you likely won't need to edit the pg_hba.conf file, but it's good to be aware of its role in managing client authentication.
Step 4: Configure Django's settings.py
This is where we tell Django to stop using SQLite and start using our new PostgreSQL database.
Your current DATABASES setting in settings.py looks like this:
DATABASES = {
    'default': {
        'ENGINE': 'django.db.backends.sqlite3',
        'NAME': BASE_DIR / 'db.sqlite3',
    }
}
We will replace this. However, hardcoding credentials like your database password directly into settings.py is a major security risk. A better approach is to store them in environment variables and have your code read them at runtime.
Building CRUD Applications with Django and PostgreSQL
Now, let's connect Django to our new database. We will use a best-practice approach to keep sensitive credentials out of our source code. The same article demonstrates this elegantly using the python-decouple library.
In 'Step 4 — Setting up your Django project', focus on the subsection 'Connecting to the database'. Follow the instructions to: Install python-decouple. Create a .env file at your project root to store your database credentials. Update your DATABASES setting in settings.py to use the config() function to read these values.
For a visual reinforcement of the DATABASES dictionary structure, the following video is a helpful supplement.
How to connect postgresql with django project ? | DRF
For a visual walkthrough of editing the settings.py file, this video from Codemiax is very direct. It will help you visualize the final configuration. Note that the video hardcodes credentials; we are improving upon this by using the environment variable method from the article.
Watch from 01:50 to 05:02. This will reinforce your understanding of the keys required in the DATABASES dictionary: ENGINE, NAME, USER, PASSWORD, HOST, and PORT.
Test your understanding!
Suppose your .env file contains the following:
DB_NAME=my_app_db
DB_USER=app_user
DB_PASSWORD=supersecret
And your PostgreSQL server is running on your local machine (localhost) on the default port (5432). What would the complete DATABASES dictionary in your settings.py look like, assuming you've imported config from decouple?
Show answer
from decouple import config

# ... other settings

DATABASES = {
    'default': {
        'ENGINE': 'django.db.backends.postgresql',
        'NAME': config('DB_NAME'),
        'USER': config('DB_USER'),
        'PASSWORD': config('DB_PASSWORD'),
        'HOST': 'localhost', # or config('DB_HOST', default='localhost')
        'PORT': '5432',     # or config('DB_PORT', default='5432')
    }
}
Note that while HOST and PORT can also be put in the .env file, they are less sensitive and often have standard defaults.
Step 5: Migrate and Verify
This is the moment of truth. To verify that Django can successfully connect to your PostgreSQL database, run the migrate command.
python manage.py migrate
If the connection settings are correct, Django will connect to the PostgreSQL server, authenticate with the user and password you provided, and execute the SQL commands needed to create the tables for its built-in apps (auth, admin, contenttypes, etc.). A successful run will produce output like this:
Operations to perform:
  Apply all migrations: admin, auth, contenttypes, sessions
Running migrations:
  Applying contenttypes.0001_initial... OK
  Applying auth.0001_initial... OK
  Applying admin.0001_initial... OK
  ...
If you see this, congratulations! Your Django application is now successfully connected to PostgreSQL.
3. Tying It All Together
Let's visualize how this new component fits into the overall Django architecture that we've been building.

Conclusion
In this lesson, you've replaced the development-focused SQLite database with the production-grade PostgreSQL. This is a critical milestone in your journey as a backend engineer.
Key Takeaways:
SQLiteis a file-based embedded database suitable for development, while PostgreSQL is a robust, client-server RDBMS designed for production.- Connecting Django to PostgreSQL requires three main parts: installing the PostgreSQL server, installing the
psycopg2-binaryadapter, and configuring theDATABASESdictionary insettings.py. - It is a security best practice to create a dedicated database and user for your application and to store credentials in environment variables, not directly in your code.
- The
python manage.py migratecommand is the ultimate test of a successful database connection.
Preview of the Next Lesson:
Now that we have a powerful database engine at our disposal, our next challenge is ensuring our application interacts with it efficiently. A poorly written query can cripple performance, no matter how powerful the database. In the next lesson, we will begin exploring query optimization by learning about its most fundamental tool: database indexing. You will learn what indexes are and how to create them on your Django models to drastically speed up data retrieval.