Hello! Welcome to the final lesson of our module on testing backend applications.
In our previous lessons, we've built a solid foundation in testing. We started by writing unit and integration tests, learned to manage test data, measured our test coverage, and finally, embraced the Test-Driven Development (TDD) cycle. TDD taught us to let tests guide our design. But what happens when our code needs to interact with services that are outside our control, like a third-party API or an email server? Running tests that depend on these external systems can be slow, unreliable, and sometimes costly.
Today, we will tackle this exact problem. This lesson focuses on a crucial testing technique: mocking. You will learn how to isolate your code during tests by replacing external dependencies with "mock" objects that you can control.
By the end of this lesson, you will be able to mock external dependencies like APIs and email services in your tests to ensure they are fast, reliable, and isolated.
1. What is Mocking and Why Do We Need It?
When you write a unit or integration test, your goal is to verify that your code works as expected. If your code makes a call to an external API, a test failure could be due to a bug in your code, a problem with the API, or even just a network issue. This ambiguity makes the test unreliable.
Mocking solves this by replacing the real external dependency with a "test double" or "mock object". This object simulates the behavior of the real dependency, allowing you to test your code in complete isolation.
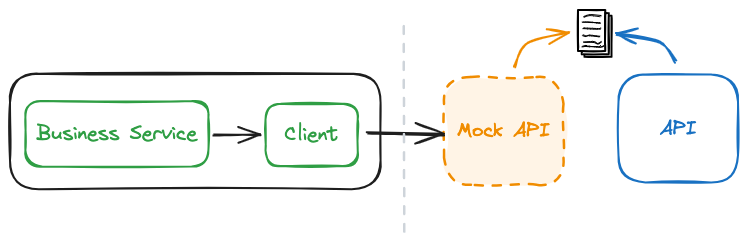
The key reasons for using mocks are:
- Isolation & Reliability: Your tests won't fail because a third-party service is down or a network connection is flaky.
- Speed: Network calls are slow. Replacing them with in-memory mock objects makes your test suite run much faster.
- Control: You can easily simulate various scenarios, including error conditions (like a 500 server error) or specific data responses, which might be difficult to trigger with the real service.
- Cost: Some APIs are metered and charge per call. Mocking avoids incurring costs during testing.
Professional Python Testing with Mocks
To begin, let's get a clear overview of what mock objects are and why they are so fundamental to professional testing. This video from NeuralNine provides an excellent conceptual introduction.
Watch the first two minutes of the video. Focus on the explanation of what a mock object is and the benefits of using one to isolate your code from external systems like APIs and mail servers.
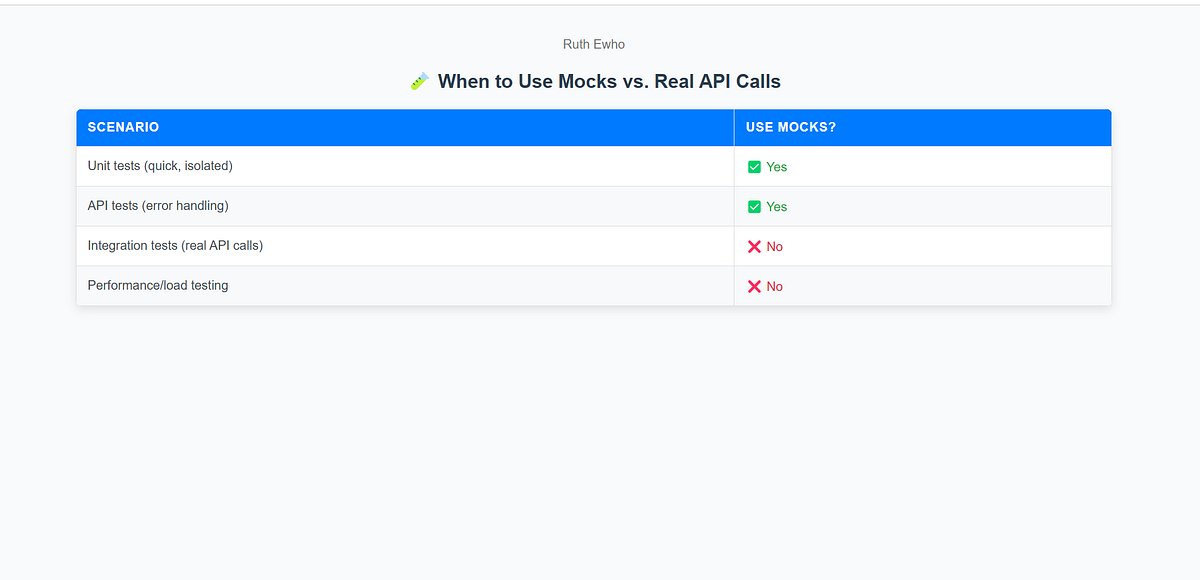
2. Understanding Mocks from First Principles: Monkeypatching
Before using a dedicated library, it's useful to understand how mocking is even possible in Python. Given your background in computer science, you'll appreciate that this is a direct result of Python's dynamic nature. At runtime, you can change almost anything, including replacing functions and objects in a module with your own versions. This is often called monkeypatching.
Using Mocks to Test External Dependencies
The book 'Test-Driven Development with Python' offers a great explanation of this concept by first showing how to mock manually. This will help you understand what's happening 'under the hood' before we use any shortcuts.
Read the section 'Mocking Manually—aka Monkeypatching'. Pay attention to how a fake_send_mail function is defined and then used to replace the real send_mail function within the test's scope. Note the line accounts.views.send_mail = fake_send_mail—this is the monkeypatch itself.
As you read, you'll notice that while manual monkeypatching is powerful, it has drawbacks:
- It requires writing boilerplate code to create the fake function and track its state.
- More importantly, you have to manually clean up and restore the original function after the test. Forgetting to do this can cause strange failures in other tests, breaking test isolation.
To solve these problems, Python's standard library provides a powerful tool: unittest.mock.
3. Mocking in Practice: unittest.mock.patch
The unittest.mock library provides the tools to create and manage mocks easily. The most common tool you'll use is the patch decorator. It automates the process of monkeypatching for the duration of a single test and then automatically cleans up afterward.
Let's see how to apply this in a Django context. We'll examine a scenario where a view makes an API call using the requests library.
Testing in Django Tutorial #12 - Mocking External Services
This video from Net Ninja provides a practical, step-by-step guide to mocking an external API call in a Django view. It's a perfect demonstration of the concepts we've just discussed.
Watch from 01:18 to 09:10. This segment covers two key parts: Setting the Scene (01:18 - 03:24): The instructor creates a simple Django view that uses requests.get to fetch data from an external API. This is the code we want to test. Mocking a Successful Call (03:24 - 09:10): This is the core of the technique. Pay close attention to: How @patch('products.views.requests.get') is used to target the get function where it is used. How the mock_get object is passed as an argument to the test function. How mock_get.return_value is configured to simulate a successful response from the API. The assertions used: self.assertEqual(response.status_code, 200) and mock_get.assert_called_once_with(...).
Simulating Success vs. Failure
The video demonstrated simulating a successful API call using mock.return_value. But one of the biggest benefits of mocking is the ability to test how your application handles failures. unittest.mock provides another attribute for this: side_effect.
You can set side_effect to an exception, and the mock will raise that exception when it is called.
Testing in Django Tutorial #12 - Mocking External Services
Let's continue with the same video to see how to simulate an API failure.
Watch from 09:10 to 10:26. Notice how mock_get.side_effect is set to a RequestException. The test then asserts that the view correctly handles this exception and returns a 503 Service Unavailable status code.
In summary:
return_value: Use this when you want the mock to return a specific value (e.g., a mock response object with a status code of 200 and some JSON data).side_effect: Use this when you want the mock to perform an action, such as raising an exception, or to return different values on subsequent calls.
Test your understanding!
Imagine you have a Django view function in myapp/views.py that sends data to an external service:
# myapp/views.py
import requests
from django.http import JsonResponse

def submit_data(request):
    try:
        response = requests.post("https://api.service.com/data", json={"key": "value"})
        response.raise_for_status()
        return JsonResponse({"status": "ok"})
    except requests.exceptions.RequestException:
        return JsonResponse({"status": "error"}, status=500)
How would you write the basic structure of a test in myapp/tests.py to verify the successful submission case using @patch? What would you configure on the mock object, and what would you assert?
Show answer
Your test structure would look like this:
# myapp/tests.py
from django.test import TestCase
from unittest.mock import patch, Mock

class SubmitDataTest(TestCase):
    @patch('myapp.views.requests.post')
    def test_submit_data_success(self, mock_post):
        # 1. Configure the mock's return_value
        # We create a mock response object that won't raise an exception.
        mock_response = Mock()
        mock_response.status_code = 200
        # The raise_for_status method on the mock should do nothing for a success case.
        mock_response.raise_for_status.return_value = None

        mock_post.return_value = mock_response

        # 2. Call the view
        response = self.client.post('/submit-data/') # Assuming this URL is configured

        # 3. Assert the results
        # Assert our view returned the correct success response
        self.assertEqual(response.status_code, 200)
        self.assertEqual(response.json(), {"status": "ok"})

        # Assert the mock was called correctly
        mock_post.assert_called_once_with(
            "https://api.service.com/data",
            json={"key": "value"}
        )
4. Common Scenarios and a Word of Caution
The pattern you've learned for mocking requests is applicable to any external interaction. Common use cases include:
- Email Services: You don't want your tests to send real emails. You can mock Django's
send_mailfunction to verify it was called with the correct subject, body, and recipients. - Payment Gateways: You would never want to make real charges during tests.
- File Storage Services (e.g., AWS S3, Cloudinary): You can mock the SDK calls to simulate file uploads without actually uploading anything.
Writing comprehensive integration tests for Django applications
To see another practical example, let's look at this article from Honeybadger that demonstrates mocking the Cloudinary SDK for image uploads in a Django project. This reinforces the general applicability of the technique.
Read the sections starting from the first code block @patch('cloudinary.uploader.upload') down to where the DELETE test is described. Notice how it uses the exact same @patch decorator. Also, pay attention to the use of mock_upload.side_effect with a list to provide different mock responses for multiple calls within the same test.
A Word of Caution: Mocks and Tight Coupling
While incredibly useful, mocks come with a risk. If used excessively, they can tightly couple your tests to the implementation details of your code, rather than its behavior.
Using Mocks to Test External Dependencies
The 'obeythetestinggoat' article has an excellent sidebar that explains this problem clearly.
Read the sidebar titled 'Mocks Can Leave You Tightly Coupled to the Implementation'. The key takeaway is that it's generally better to test what your code does (its behavior) rather than how it does it (its implementation). A test that relies on a specific sequence of mock calls can break when you refactor the code, even if the end result is still correct.
Conclusion
Congratulations on completing the testing module! You've learned how to isolate your application from the outside world, making your tests faster, more reliable, and more robust. This is a fundamental skill for any professional backend developer.
Key Takeaways:
- Mocking is the practice of replacing external dependencies with controlled "test doubles" in your tests.
- It provides isolation, speed, and control, allowing you to test your code without relying on flaky or slow external services.
- Python's
unittest.mock.patchdecorator is the standard tool for mocking in Django tests. - Use
mock.return_valueto simulate successful responses andmock.side_effectto simulate errors or other actions. - Be mindful not to overuse mocks, as they can couple your tests to implementation details, making refactoring more difficult.
Preview of the Next Module:
With a strong foundation in testing, we are now ready to move on to another cornerstone of backend engineering: the database. In the next module, "Advanced Database Operations and Performance," we will graduate from the simple SQLite database used for development. Our first lesson will guide you through configuring your Django project to use a production-grade database, PostgreSQL.