Hello! Welcome back to our backend engineering course.
In our last lesson, you built a solid theoretical foundation by understanding the crucial difference between authentication (verifying who you are) and authorization (determining what you can do). We established that authentication is always the first step in any secure system.
Today, we transition from theory to practice. This lesson directly addresses the learning outcome: Implement user registration and login using Django's built-in authentication system. We will take our currently open and unsecured API and build the front door—allowing users to create accounts and sign in securely. You'll see firsthand how Django's powerful features abstract away much of the complexity, letting you build robust systems efficiently.
1. Django's Built-in Authentication Framework
One of Django's most powerful features is its included "batteries"—a rich set of pre-built components. For user management, this is the django.contrib.auth framework. It provides nearly everything we need to handle authentication out of the box.
Before we write any code, it's useful to understand the key pieces you'll be working with. Since you're interested in the underlying mechanisms, the official Django documentation is the best place for a high-level overview.
Using the Django authentication system
Let's start by exploring the core components of Django's authentication system. This documentation page, 'Using the Django authentication system', is the canonical source.
Please read the introduction section 'User objects', then skim the sections 'Authentication Views' and 'Built-in forms'. Don't worry about understanding every detail. Focus on recognizing these key components: The User model: Django's default object for storing user data. Built-in Views: Like LoginView and LogoutView, which handle the logic for us. Built-in Forms: Like AuthenticationForm and UserCreationForm, which handle data input and validation.
To summarize, Django provides:
- A pre-built
Usermodel to store usernames, (hashed) passwords, and other details. - Forms to handle user input for registration (
UserCreationForm) and login (AuthenticationForm). - Views that contain the logic to process these forms.
- Helper functions like
authenticate,login, andlogoutthat manage the session lifecycle.
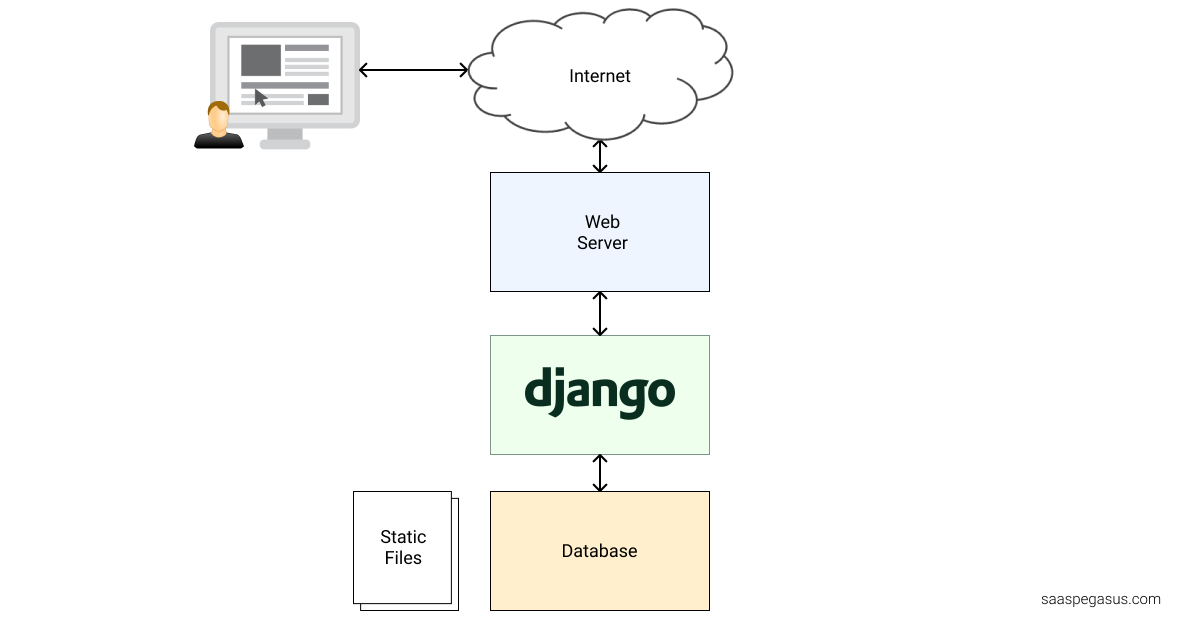
These components work together within the familiar Django request-response cycle.
2. Implementing User Registration
The first feature we'll build is a sign-up page. This involves creating a URL, a view to process the registration, and a template to display the form. We'll use Django's UserCreationForm to do most of the heavy lifting.
The following article from Real Python provides an excellent step-by-step guide.
Get Started With Django User Management
The article 'Get Started With Django User Management' will be our primary guide for this section. It clearly explains how to set up the necessary components for registration.
Please follow the instructions in the section 'Implement User Registration'. You will: Add a sign_up URL to your users/urls.py. Create the sign_up view in users/views.py. Pay close attention to how UserCreationForm is used and how the login() function is called immediately after form.save(). Create the registration/sign_up.html template.
Let's break down the key parts of the sign_up view you just created:
# users/views.py

from django.contrib.auth import login
from django.contrib.auth.forms import UserCreationForm
from django.shortcuts import redirect, render

def sign_up(request):
    if request.method == "POST":
        form = UserCreationForm(request.POST)
        if form.is_valid():
            user = form.save()  # Creates the user and hashes the password
            login(request, user)  # Logs the new user in immediately
            return redirect("dashboard") # Or your desired homepage
    else:
        form = UserCreationForm()
    return render(request, "registration/sign_up.html", {"form": form})
Key Points:
- GET Request: When the user first visits the page, an empty
UserCreationFormis created and rendered in the template. - POST Request: When the user submits the form:
form.is_valid()checks if the username is unique and if the two password fields match.form.save()is the most critical step. It creates a newUserinstance in the database and, most importantly, securely hashes the password. We will explore exactly how this hashing works in the next lesson.login(request, user)creates a session for the newly registered user, so they don't have to immediately log in again.
Test your understanding!
In the sign_up view, what would be the user experience if you removed the line login(request, user)? Why might this be desirable or undesirable?
Show answer
If you removed login(request, user), the user would be successfully registered (their account would be created in the database), but they would not be automatically logged in. After being redirected, they would see the site as an anonymous user and would have to navigate to the login page to sign in manually.
- Undesirable: This adds an extra step for the user, creating friction in the sign-up process. Most modern web applications log users in immediately upon registration.
- Desirable: In some specific scenarios, you might want this behavior. For example, if an administrator creates an account for a user, or if you require an email verification step before the user can log in for the first time.
3. Implementing Login and Logout
Now that users can register, they need a way to log in and out. Django's built-in auth views make this incredibly simple. Instead of writing our own views, we can just include Django's pre-made URL configurations and provide the templates.
The Login/Logout Flow
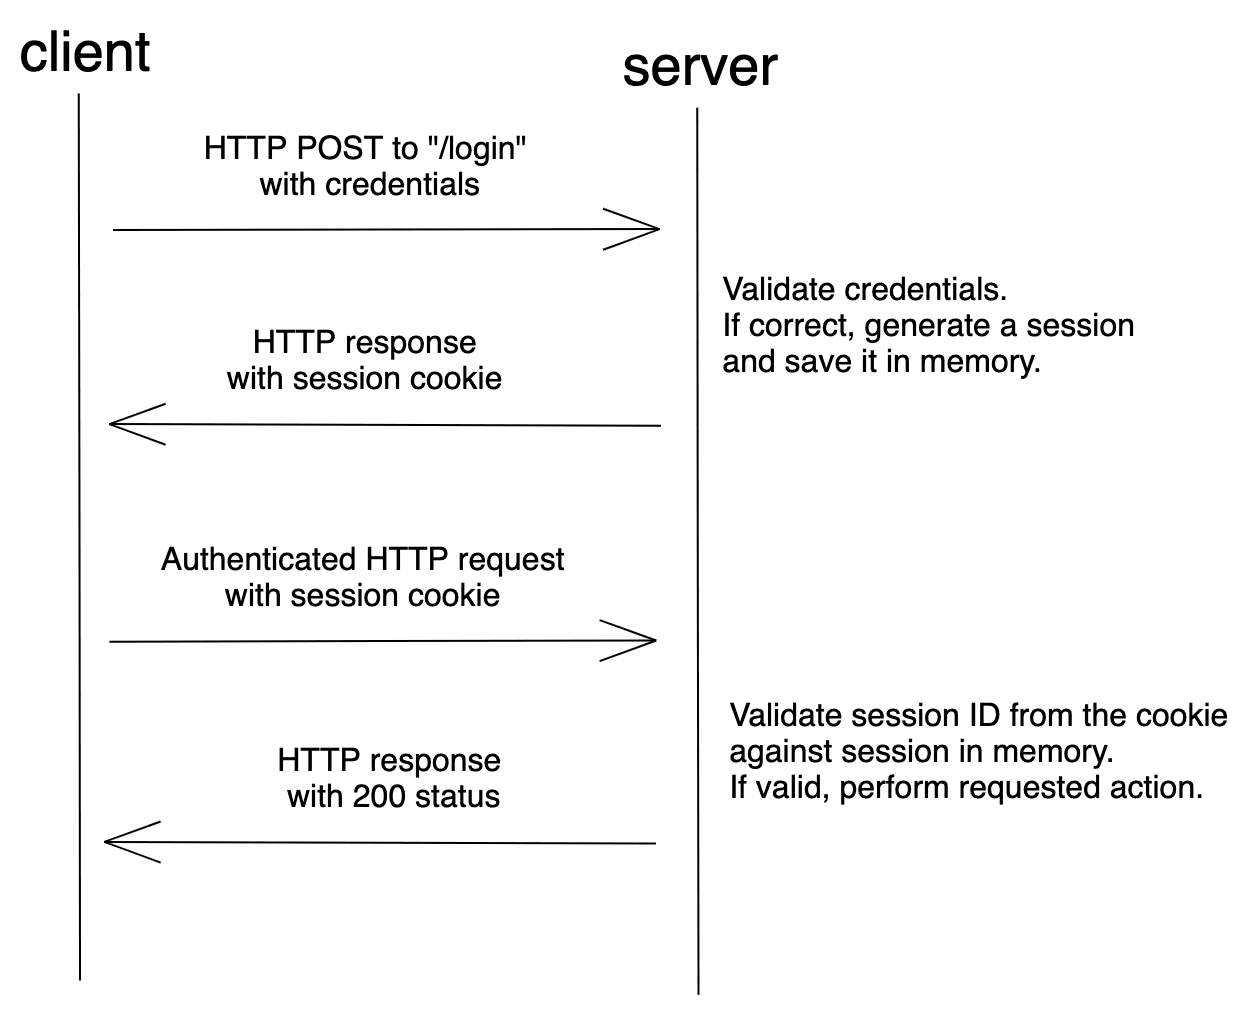
When a user logs in, Django verifies their credentials using authenticate(). If successful, the login() function creates a server-side session and sends a unique sessionid cookie to the user's browser. For all subsequent requests, the browser sends this cookie back, and Django uses it to retrieve the user's session and identify them. This is known as session-based authentication.
Implementation Steps
Let's implement this flow. We will continue following the Real Python article, as it provides a clear path.
Get Started With Django User Management
This next section of the Real Python article guides you through integrating Django's built-in authentication views for login and logout.
Read and implement the steps from 'Connect the Auth URLs and Views' through to 'Update the Dashboard'. This will involve: Including django.contrib.auth.urls in your project's urls.py. Creating the registration/login.html template. Setting up a redirect after login so users land on your dashboard. Implementing the logout functionality, which now requires a POST request. Updating your main template to conditionally show login/signup links or a logout button.
For a live demonstration of building the login, logout, and registration logic from scratch (without relying on the built-in LoginView), the following video is an excellent resource. It reinforces the core concepts you just read about.
User Registration and Login Authentication | Django (3.0) Crash Course Tutorials (pt 14)
This video from Dennis Ivy provides a practical, code-along demonstration of building registration and login functionality. It's a great way to see the concepts you've just implemented put into action.
Watch these sections to see how the registration, login, and logout views are built and connected. Notice the use of authenticate, login, and logout functions in the views, which mirrors the logic handled automatically by Django's class-based views.
After completing these steps, you will have a complete, basic authentication flow:
- A user can visit
/sign_up/to create an account. - An anonymous user sees links to "Log In" and "Sign Up".
- A logged-in user sees "Hello, [username]" and a "Logout" button.
- The login form is available at the path you configured (e.g.,
/accounts/login/). - Logging out clears the session and returns the user to an anonymous state.
Conclusion
Congratulations! You've successfully implemented the foundational authentication features for your Django application. You now have a system that can distinguish between anonymous guests and known, authenticated users. This is a massive step forward from a completely public API.
Key Takeaways:
- Django’s
django.contrib.authframework provides most of the tools needed for authentication, including theUsermodel, forms, and views. - The
UserCreationFormis a convenient and secure way to handle user registration, as it automatically validates input and hashes passwords. - The login process involves
authenticate()(to verify credentials) andlogin()(to create a session). - Django’s built-in
LoginViewandLogoutViewcan be used by simply includingdjango.contrib.auth.urlsand creating the corresponding templates, which saves significant development time.
Preview of the Next Lesson:
We've seen that form.save() on UserCreationForm and user.set_password() handle password security for us. But how? In our next lesson, we will perform a deep dive to answer the question: "How does Django securely store passwords using hashing?". This will satisfy your curiosity about the "under the hood" cryptographic mechanisms that protect user credentials.