Hello! Welcome back to our backend engineering course.
In our last lesson, we explored the theoretical foundations of caching, discussing common strategies like Cache-Aside and the importance of invalidation. We learned why and how caching patterns are designed to balance performance and data consistency.
Today, we transition from theory to practice. This lesson is designed to meet the learning outcome: Implement caching in Django using Redis as the cache backend. We will take the concepts from our previous discussion and apply them directly to our Django project. You will see firsthand how adding a cache can dramatically improve your API's response time by reducing database load.
Your previous work with Redis as a message broker for Celery provides a great starting point. We'll leverage that same high-speed, in-memory data store, but this time for a different, equally critical purpose.
Let's begin by visually recapping the core idea.
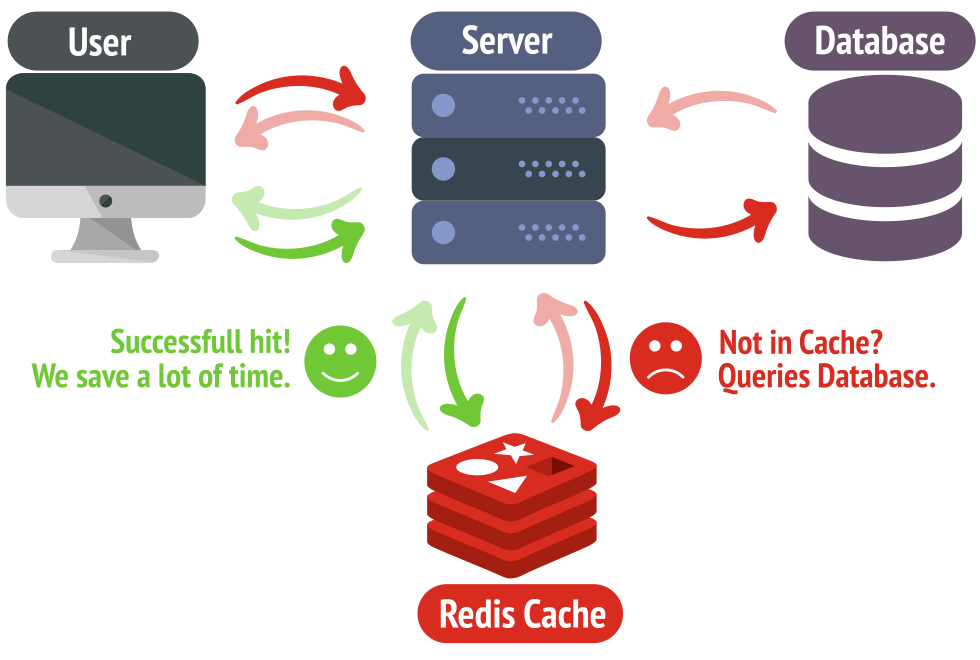
1. Configuring Django for Redis Caching
Just like with Celery, the first step is to configure our Django project to communicate with Redis. This involves installing a helper library and updating our settings.py file.
We will use a fantastic video from the BugBytes channel to guide our implementation. It provides a clear, step-by-step walkthrough.
Caching with Redis and Django!
This first video segment covers the complete setup process. It will show you how to get Redis running with Docker (which you've done before), install the necessary Python packages, and configure Django to use Redis as its cache.
Watch from 00:39 to 04:06. Focus on these key actions: Setting up Redis: You can skip the Docker command if your Redis container from the Celery lesson is still running. The key insight is that Redis can serve multiple purposes. Installing Packages: Note the two packages being installed: redis (the low-level client) and django-redis (the Django integration library). Configuring settings.py: Pay close attention to the CACHES dictionary. Notice the LOCATION string, especially the /1 at the end. This tells Django to use Redis database #1, effectively creating a separate namespace for our cache data, distinct from the Celery data which uses database #0 by default. This is a crucial practice for preventing data collisions.
To summarize the configuration, your settings.py should now include a CACHES block that looks like this:
# settings.py

CACHES = {
    "default": {
        "BACKEND": "django_redis.cache.RedisCache",
        "LOCATION": "redis://127.0.0.1:6379/1", # Using DB 1 for caching
        "OPTIONS": {
            "CLIENT_CLASS": "django_redis.client.DefaultClient",
        }
    }
}
With this configuration, Django now knows that whenever it needs to perform a cache operation, it should use the django-redis backend to talk to our Redis server on database #1.
2. Implementing View Caching with cache_page
The most straightforward way to start caching is to cache the entire response of a view. Django provides a powerful decorator, @cache_page, for exactly this purpose. This decorator automatically implements the Cache-Aside pattern we discussed previously.
Let's apply this to a read-heavy endpoint, like a list of products, to see the performance benefits.
Caching with Redis and Django!
This part of the video demonstrates how to apply the @cache_page decorator to a Django REST Framework class-based view. It includes a clever use of time.sleep() to simulate a slow database query, making the effect of caching immediately obvious.
Watch from 03:57 to 09:24. Follow along with the code: Note the use of @method_decorator to apply cache_page to the list method of the DRF view. Understand that cache_page(60 * 15) sets a 15-minute timeout (TTL) on the cached data. Observe the first request: it's slow because of the sleep(). This is a cache miss. Observe the second request to the same URL: it's instantaneous. This is a cache hit! Pay attention to what happens when you add a query parameter (like ?ordering=name). The cache sees this as a new URL and creates a separate cache entry for it.
This demonstration is a powerful illustration of caching's value. A two-second delay on every request would make an application feel unusably slow. By caching the response, we reduce that delay to zero for subsequent requests until the cache expires.
Test your understanding!
You have cached your product list view with cache_page(300). A user first requests /api/products/. A few seconds later, another user requests /api/products/?page=2.
Will the second request be a cache hit or a cache miss? Why?
Show answer
It will be a cache miss. The cache_page decorator generates a unique cache key based on the full request URL, including the path and any query parameters. Since /api/products/ and /api/products/?page=2 are different URLs, Django will see them as two distinct items to be cached. The second request will result in a new database query, and its response will be stored under a new key in the cache.
3. The Stale Data Problem: Cache Invalidation
We've made our API fast, but we've also introduced a new problem: stale data.
Imagine you use the Django admin to add a new product to the database. If you then refresh the product list page, the new product won't appear. Why? Because Django is still serving the old, cached version of the page. The cache is now out of sync with the database.
To solve this, we must implement a cache invalidation strategy. When the underlying data changes, we need to explicitly delete the old data from the cache. One of the most common ways to do this in Django is with signals.
Let's see how to set this up.
Caching with Redis and Django!
This final segment of the video addresses the stale data problem head-on. It shows how to use Django's post_save and post_delete signals to trigger cache invalidation whenever a product is created, updated, or deleted.
Watch from 10:01 to 18:08. Key concepts to grasp are: Signals (post_save, post_delete): Think of these as event listeners for your models. Signal Receiver: A function that is executed when the signal is fired. Invalidation Logic: The receiver calls cache.delete_pattern(). This is a special function from django-redis that can delete keys using a wildcard pattern (e.g., delete all keys that start with product_list*). This is extremely useful for clearing all cached variations of our list view (with different orderings, paginations, etc.) at once. Observe the final demonstration: adding or deleting a product makes the next page load slow (a cache miss), but correctly shows the updated data. All subsequent loads are fast again.
By connecting the post_save and post_delete signals of our Product model to a function that clears the relevant cache entries, we ensure that our cache stays reasonably fresh.
4. A Glimpse at the Low-Level Cache API
While @cache_page is excellent for caching entire views, sometimes you need more granular control. You might want to cache just the result of a very expensive database query or a complex computation within a view, not the entire HTTP response.
For these cases, Django provides a low-level cache API. For a quick overview of how it works, please review the following guide.
Django + Redis: The Complete Caching Guide
This article provides excellent code examples for Django's low-level cache API. It complements the video by showing you a different, more granular way to interact with the cache.
Read 'Step 4: Basic Caching Operations' and the 'With Caching (Fast)' example under 'Step 5: Cache Database Queries'. Notice the simple cache.get() and cache.set() pattern. This is the manual implementation of the Cache-Aside logic.
The basic pattern looks like this:
from django.core.cache import cache

def get_products(request):
    # Try to get data from cache
    products = cache.get('active_products')

    if products is None:
        # Data not in cache, so query the DB
        products = Product.objects.filter(active=True)
        # Store the result in the cache for next time (e.g., for 10 minutes)
        cache.set('active_products', products, timeout=600)

    # ... return products
We won't implement this today, but it's important to know this API exists for situations where @cache_page is too broad.
Conclusion
In this lesson, we successfully bridged the gap between caching theory and practice. You have configured a production-grade cache backend and implemented a caching strategy that provides a tangible performance boost to your application.
Key Takeaways:
- You can configure Django to use Redis as a cache backend by installing
django-redisand setting up theCACHESdictionary insettings.py. - Using separate Redis database numbers (e.g.,
.../0for Celery,.../1for cache) is a best practice to isolate data. - The
@cache_pagedecorator is a high-level, powerful tool for implementing the Cache-Aside pattern on entire views. - Caching creates the challenge of stale data, which can be solved by implementing cache invalidation strategies.
- Django signals (
post_save,post_delete) provide a convenient way to trigger cache invalidation when model data changes.
Preview of the Next Lesson:
Our signal-based invalidation works well, but what about more complex scenarios? What if a cached response should be different for different users, even at the same URL? The next lesson, "Apply cache invalidation strategies to ensure data consistency," will explore these advanced topics. We'll look at per-user caching using request headers and discuss more sophisticated approaches to keeping your cache and database in perfect harmony.