Hello! Welcome back.
In our last lesson, we explored how to implement role-based access control (RBAC) to secure API endpoints based on a user's group and permissions. We now have a solid framework for managing what authenticated users are allowed to do.
Today, we'll tackle another critical aspect of user management: what happens when a user can't authenticate because they've forgotten their password. We will design and implement a secure password reset flow that allows a user to regain access to their account by receiving a unique, secure link via email. This is a fundamental feature for any application with user accounts.
By the end of this lesson, you will be able to:
- Explain the security principles behind Django's password reset tokens.
- Implement the full password reset flow using Django's built-in views for traditional web applications.
- Build a set of API endpoints using Django REST Framework to handle the same flow for a headless backend.
1. The Password Reset Flow: A High-Level View
Before we dive into code, let's establish a clear mental model of the entire process. A secure password reset mechanism is a multi-step dance between the user and your backend system.
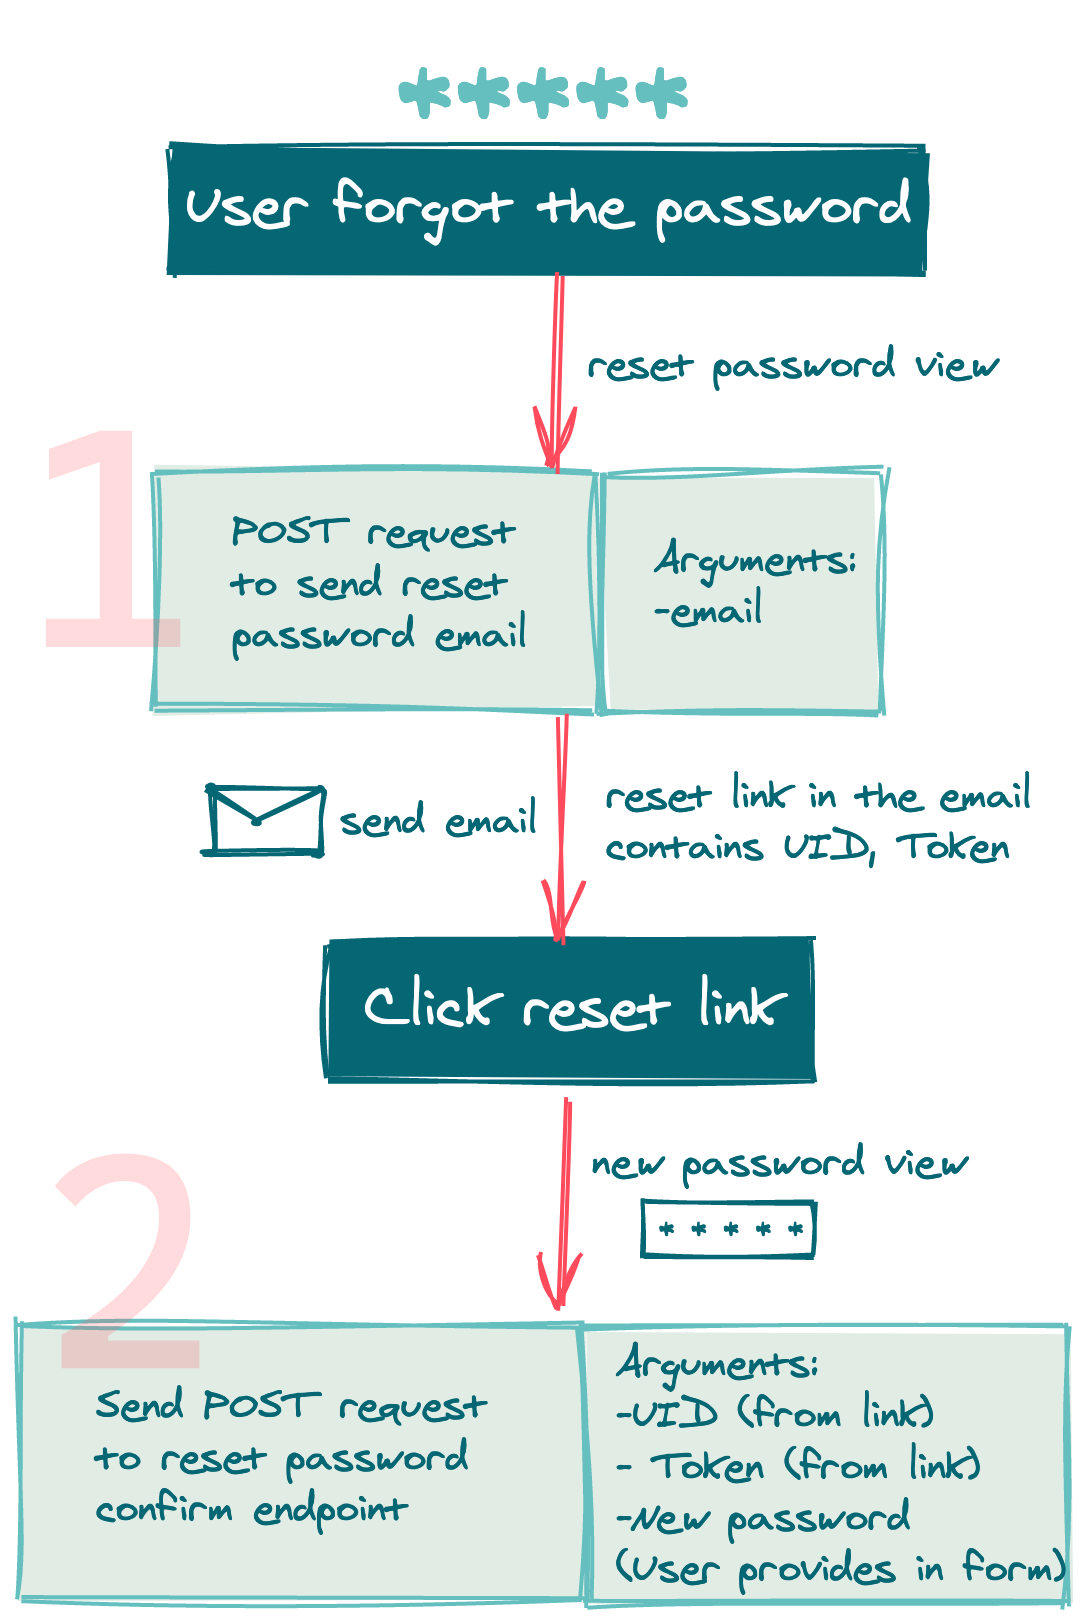
As the diagram illustrates, the process involves two main phases:
- Requesting the Reset Link: The user provides their email address to a public endpoint. Your backend validates the email, generates a secure, single-use token, and sends an email to the user containing a link with this token.
- Setting the New Password: The user clicks the link in their email. The frontend application (or a Django template) presents a form to enter a new password. When submitted, the backend receives the new password along with the token. It validates the token's authenticity and expiry, and if everything checks out, it updates the user's password and invalidates the token.
2. Under the Hood: Django's Secure Token Generation
A crucial question is: how does Django generate a "secure" token? A naive approach might be to generate a random string and store it in the database with an expiration date. Django, however, uses a more elegant and stateless approach.
This statelessness is achieved by generating the token as a cryptographic hash of several user properties, signed with your project's SECRET_KEY. This means the token itself contains all the information needed for verification, without needing to be stored in your database.
Django's reset password mechanism
To understand the security engineering behind this, let's look at an article that breaks down Django's token generator.
Please read the entire article. As you read, focus on how Django's implementation achieves three critical security properties: 1. Tokens cannot be forged. 2. Tokens expire after a set time. 3. Tokens are automatically invalidated once used (or if the user logs in).
The key takeaways from the article are:
- No Forgery: The token is a
salted_hmacthat uses your project'sSECRET_KEY. Without the key, an attacker cannot generate a valid token for a user. - Expiration: A timestamp (the number of days since a fixed date) is included in the token's hash and as plain text in the token string. The backend first verifies the hash is correct, then checks if the timestamp is within the allowed window (e.g., 3 days).
- Single-Use Invalidation: This is the cleverest part. The hash includes the user's current password hash and their
last_logintimestamp. If the user successfully resets their password, their password hash changes, invalidating all old tokens. If they remember their password and log in, thelast_logintimestamp changes, also invalidating the token.
Test your understanding!
A user requests a password reset link at 10:00 AM. At 10:05 AM, before using the link, they suddenly remember their old password and successfully log in to the application. At 10:10 AM, they decide to click the reset link from the email anyway. Will the link still be valid? Why or why not?
Show answer
The link will not be valid. When the user logged in at 10:05 AM, their last_login timestamp was updated in the database. Because the last_login timestamp is part of the data hashed to create the reset token, the token from the 10:00 AM email is now cryptographically invalid. When the backend tries to re-generate the token to verify it, the new hash (using the updated last_login time) will not match the token in the URL.
3. Implementation with Django's Built-in Views
For traditional, server-rendered web applications, Django provides a complete set of views and URL patterns to handle this entire flow. This is a great way to understand the components involved before we adapt them for a REST API.
Python Django Tutorial: Full-Featured Web App Part 12 - Email and Password Reset
Corey Schafer's tutorial is a classic and provides a very clear, step-by-step walkthrough of implementing the entire password reset flow using Django's built-in authentication views.
Please watch the video from the beginning to 19:24, and then from 20:57 to 23:09. (You can skip the section from 19:24 to 20:57 which is just a final test). Follow along as he sets up the URLs, creates the required HTML templates, configures email sending, and links the flow together.
This process involves four main pairs of URLs and templates:
-
Password Reset Request (
password_reset)- View:
PasswordResetView - Purpose: Displays a form asking for the user's email. On submission, it handles sending the reset email.
- Template:
registration/password_reset_form.html
- View:
-
Password Reset Done (
password_reset_done)- View:
PasswordResetDoneView - Purpose: A confirmation page informing the user that the email has been sent.
- Template:
registration/password_reset_done.html
- View:
-
Password Reset Confirmation (
password_reset_confirm)- View:
PasswordResetConfirmView - Purpose: The page the user lands on after clicking the email link. It validates the
uidb64andtokenfrom the URL and displays the form to enter a new password. - Template:
registration/password_reset_confirm.html
- View:
-
Password Reset Complete (
password_reset_complete)- View:
PasswordResetCompleteView - Purpose: The final confirmation page shown after the password has been successfully changed.
- Template:
registration/password_reset_complete.html
- View:
Email Backend Configuration
As shown in the video, to actually send emails, you must configure an email backend in your settings.py. For development, the console backend is extremely useful as it prevents accidental emails and prints the content directly to your terminal.
# settings.py

# For development: prints emails to the console
EMAIL_BACKEND = 'django.core.mail.backends.console.EmailBackend'
For production, you would switch to the SMTP backend and provide your credentials, ideally via environment variables for security.
# settings.py (for production)
import os

EMAIL_BACKEND = 'django.core.mail.backends.smtp.EmailBackend'
EMAIL_HOST = 'smtp.gmail.com'
EMAIL_PORT = 587
EMAIL_USE_TLS = True
EMAIL_HOST_USER = os.environ.get('EMAIL_USER')
EMAIL_HOST_PASSWORD = os.environ.get('EMAIL_PASS')
4. Implementation with Django REST Framework
The built-in views are great, but they serve HTML. For a REST API that communicates with a frontend framework or mobile app, we need to expose this functionality through JSON endpoints. The logic remains the same, but we'll wrap it in APIViews and Serializers.
The video below demonstrates how to build this. While the implementation details can vary, focus on the core logic: using Django's token generator and check functions within your API views.
Django Rest Authentication (Reset password by Email). Django rest framework project tutorial[13]
This video from Cryce Truly demonstrates how to build the password reset API endpoints from scratch using Django REST Framework.
This is a dense video, but it covers the entire API flow. Watch it through to see how each piece is built. Pay close attention to these key moments: Request Endpoint (0:00 - 5:38 & 5:38 - 18:51): How a view and serializer are created to accept an email, generate the uidb64 and token, and send the email. Token Validation Endpoint (18:51 - 31:27): How an endpoint receives the token and uidb64 from the URL and uses check_token to validate them. Set New Password Endpoint (31:27 - end): How a final endpoint takes the new password, token, and uidb64, re-validates them, and saves the new password.
Let's summarize the API endpoints you need to build:
Endpoint 1: Request Password Reset
- URL:
/api/password-reset/ - Method:
POST - Request Body:
{ "email": "user@example.com" } - Logic:
- Validate that the email is provided.
- Find the user associated with the email. If not found, you should still return a success message to prevent user enumeration attacks.
- Generate the URL-safe base64 encoded user ID (
uidb64) and thetokenusing Django'sPasswordResetTokenGenerator. - Construct the full reset URL that your frontend application will use (e.g.,
https://my-frontend.com/reset-password/<uidb64>/<token>/). - Send an email to the user with this link.
- Return a
200 OKresponse.
Endpoint 2: Validate Reset Token
- URL:
/api/password-reset-confirm/<uidb64>/<token>/ - Method:
GET - Logic:
- Decode the
uidb64to get the user's primary key. - Retrieve the user object.
- Use
PasswordResetTokenGenerator().check_token(user, token)to verify the token is valid for that user. - If valid, return
200 OK. The frontend can now display the password change form. - If invalid (expired, already used, or tampered with), return a
401 Unauthorizederror.
- Decode the
Endpoint 3: Set New Password
- URL:
/api/password-reset-complete/ - Method:
PATCHorPOST - Request Body:
{ "password": "new-strong-password-123", "uidb64": "...", "token": "..." } - Logic:
- Run the same validation logic as in Endpoint 2 to ensure the token is still valid before proceeding.
- If valid, take the new password from the request body.
- Use the user object's
set_password()method to securely hash the new password. - Save the user object
user.save(). - Return a
200 OKresponse confirming the password has been changed.
This three-endpoint design provides a clean separation of concerns and a secure workflow for headless applications.
Conclusion
You've now learned how to implement one of the most essential security and user management features in a web application. This process reinforces the importance of understanding both the practical implementation and the underlying cryptographic principles that make it secure.
Key Takeaways:
- A password reset flow is a multi-step process involving a request, an email with a secure link, token validation, and password submission.
- Django's stateless token generation is highly secure, preventing forgery and ensuring tokens expire and are invalidated upon use without needing to be stored in the database.
- For traditional web apps, Django provides a comprehensive set of built-in views (
PasswordResetView, etc.) that you can quickly configure with URLs and templates. - For REST APIs, you replicate the same logic using custom API views and serializers, creating distinct endpoints for requesting a reset, validating the token, and submitting the new password.
Preview of the Next Lesson:
A complex, multi-step process like password reset is a perfect candidate for automated testing. How can you be sure you haven't introduced a security hole or broken the flow while making other changes? In our next lesson, we will introduce the "testing pyramid" and learn how to write unit and integration tests for our Django backend, ensuring our application remains robust and reliable.