Hello! In our last lesson, you learned about the Unity Game Loop and the crucial roles of Awake(), Start(), and Update(). We saw how Update() runs on every frame, making it the perfect place to check for things that happen continuously, like player input.
Today, we'll take that concept and build a robust system for handling player controls. You'll learn how to implement basic input for both keyboard and gamepad, moving beyond the simple Input.GetKeyDown() we briefly saw. We will use Unity's modern Input System, a powerful and flexible tool that forms the foundation of player interaction in most new Unity projects. By the end of this lesson, you will be able to make a GameObject move based on player commands, a truly significant step in bringing your game idea to life.
From Direct Commands to Abstract Actions
In the last lesson's example, we used Input.GetKeyDown(KeyCode.Space). This is a direct way of handling input. Your code is specifically listening for the spacebar. But what happens if a player wants to use a different key? Or what if they're using a gamepad? You would have to write complex code to handle all these possibilities.
Modern game development solves this by separating the player's intent from the physical button they press. This is the core philosophy of Unity's new Input System. Instead of listening for a "W key", your script listens for a "Move" action. You then define, separately, that the "Move" action can be triggered by the W key, the arrow keys, or a gamepad's joystick.
This diagram illustrates the flow: a physical device triggers an abstract Action, which is then picked up by a component that calls a method in your script.
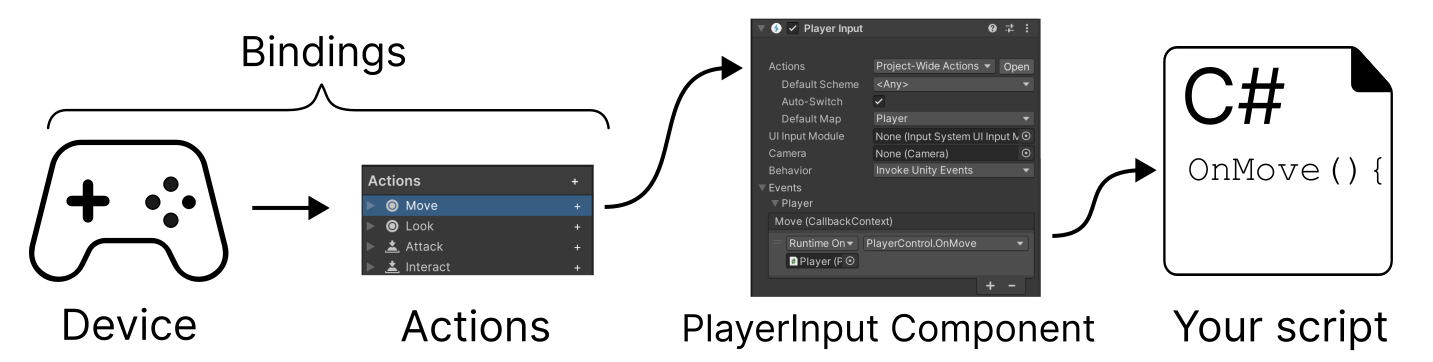
Let's explore this idea of a modular system.
Unity's new Input System, made easy (complete beginner's ...
This article from Game Dev Beginner provides an excellent introduction to why a modular input system is superior to direct input checks.
Read the section from the beginning down to the explanation of a modular input system. Pay close attention to the diagrams that show the difference between a "tightly coupled" system and a "modular" one. This concept is key to understanding the benefits of what we're about to build.
Setting Up the Input System
Unity's new Input System is delivered as a package, so the first step is to install it into your project.
Unity's NEW input system in 13 minutes
This video from BiteMe Games clearly shows the installation process.
Watch the segment from installing the package to restarting Unity. This will walk you through finding the Input System in the Package Manager and enabling it. When prompted by Unity, click "Yes" to restart the editor and switch to the new input handling backend.
The Building Blocks of Input
With the package installed, let's dissect its main components. All your input configurations will live inside a special file called an Input Actions Asset. Inside this asset, you'll work with three key concepts:
-
Action Maps: These are sets of Actions that are used together in a specific context. For example, you might have a
GameplayAction Map for when the player is running and jumping, and a separateUIAction Map for navigating menus. This lets you use the same buttons for different things depending on what the player is doing. -
Actions: An Action represents a specific player intent, like "Move", "Jump", or "Interact". It's an abstract concept, not tied to any specific button yet. You'll define the type of input it expects, for example:
- Button: A simple press-and-release action, like firing a weapon or jumping.
- Value: An action that has a continuous value. A
Vector2is perfect for 2D movement, representing both horizontal (X) and vertical (Y) input.
-
Bindings: A Binding is the connection between an Action and a physical control on a device. The "Move" Action, for instance, might have a "WASD" binding for keyboards and a "Left Stick" binding for gamepads.
This structure is incredibly powerful. It allows you to support multiple devices and makes it easy for players to remap controls, all without changing a single line of your gameplay code.
Implementation: Bringing Your Player to Life
Now for the practical part. We'll create a simple player object, add the necessary components, and write a script to make it move. The easiest way to get started is by using the Player Input component, which can automatically listen for actions and call corresponding methods in your script.
We'll follow a comprehensive video guide for this process. It covers everything from creating the object to writing the final code.
2D Top Down Player Movement Using the New Input System (Unity Tutorial | 2D Top Down Shooter)
This tutorial from Ketra Games provides a complete, step-by-step guide to implementing 2D top-down movement using the new Input System. It's a perfect starting point for your action-adventure game.
Follow this video carefully. I'll break down the key segments for you: Player Object Setup (02:21 - 04:42): Follow the steps to create an empty GameObject, name it "Player", and add a Sprite Renderer so you can see it. Use any of the default sprites for now. Crucially, add a Rigidbody2D component and set its Gravity Scale to 0. This is essential for a top-down or side-scrolling game where you don't want the player to fall constantly. Scripting Foundation (04:42 - 08:00): Create a "Scripts" folder and a C# script named PlayerMovement. Attach the script to your Player GameObject. In the script, you'll get a reference to the Rigidbody2D in the Awake() method, just as we learned about in the last lesson. The code added in FixedUpdate() is a placeholder to show the Rigidbody works; we'll replace this logic soon. Input System Setup (08:00 - 09:53): The video will guide you to add the Player Input component to your Player object. You'll then click "Create Actions..." to generate a new Input Actions Asset. Save it in a new "Input" folder. Take a moment to inspect the generated asset. Notice it has a "Gameplay" Action Map with "Move", "Look", and "Fire" Actions already defined. The "Move" action is already bound to both Gamepad Left Stick and WASD, fulfilling our lesson goal right out of the box! Connecting Script and Input (09:53 - 13:09): This is the most important part. In the Player Input component you added, the "Behavior" is set to "Send Messages" by default. This tells Unity to look for methods in your script whose names match the Actions, prefixed with "On". So, for the "Move" Action, it will call a method named OnMove. Follow the video to implement the OnMove(InputValue value) method. You'll need to add using UnityEngine.InputSystem; at the top of your script. The code will read a Vector2 from the InputValue, store it in a field, and then use that field in FixedUpdate() to set the Rigidbody2D.velocity. Finally, you'll add a public speed variable (using [SerializeField]) to control how fast the player moves from the Inspector.
After following the video, your PlayerMovement.cs script should look similar to this. I've added extra comments to reinforce the concepts:
using UnityEngine;
using UnityEngine.InputSystem; // Required to use InputValue and other Input System types

public class PlayerMovement : MonoBehaviour
{
    // A variable to control the player's speed.
    // [SerializeField] makes it visible in the Unity Inspector without making it public.
    [SerializeField]
    private float speed = 5f;

    // A reference to the Rigidbody2D component, used for physics-based movement.
    private Rigidbody2D rb;

    // A Vector2 to store the player's movement input (e.g., from WASD or a joystick).
    private Vector2 movementInput;

    // Awake is called when the script instance is being loaded.
    // It's the ideal place to get component references.
    private void Awake()
    {
        // Get the Rigidbody2D component attached to this same GameObject.
        rb = GetComponent<Rigidbody2D>();
    }

    // FixedUpdate is called at a fixed interval and is used for physics calculations.
    // All Rigidbody manipulations should happen here.
    private void FixedUpdate()
    {
        // Set the velocity of the rigidbody.
        // The movement is the input direction multiplied by the speed.
        rb.velocity = movementInput * speed;
    }

    // This method is called by the PlayerInput component when the "Move" action is triggered.
    // The name "OnMove" MUST match the action name "Move".
    private void OnMove(InputValue value)
    {
        // Read the Vector2 value from the input (e.g., WASD produces (-1,0) to (1,1) vectors).
        movementInput = value.Get<Vector2>();
    }
}
Once this is all set up, enter Play mode. You should now be able to move your hexagon sprite around using both the WASD keys and the left stick of a connected gamepad. Congratulations! You've just implemented a modern, flexible input system.
Conclusion
In this lesson, you've bridged the gap between code and player interaction. You now have the fundamental skill needed to make any object in your game respond to player commands.
Here are the key takeaways:
- Unity's Input System decouples player intent (Actions) from physical controls (Bindings), creating a flexible and scalable control scheme.
- The system's main parts are Action Maps, Actions, and Bindings, all configured within an Input Actions Asset.
- The
Player Inputcomponent is a quick and easy way to connect your Input Actions to your scripts. - Using the "Send Messages" behavior, the
Player Inputcomponent calls methods in your script named after your actions (e.g.,OnMove,OnJump). - You can read input values like a
Vector2from theInputValueparameter to drive physics-based movement via aRigidbody2D.
Next Steps
You've now attached several components to a GameObject (SpriteRenderer, Rigidbody2D, PlayerInput, and your own PlayerMovement script) and even modified a property (speed) in the Inspector. In the next lesson, we will formalize this process. You'll learn more about how components work together and how to access and modify them not just in the editor, but also directly from your C# scripts. This will unlock the ability for different game systems to communicate and interact with each other.