Welcome to the first lesson in our new module, "Connecting and Monitoring with Google." In the previous module, you built a strong on-page SEO foundation by optimizing your product pages, collections, and internal linking structure. Now, it's time to connect your store to the most critical tool for understanding and improving your performance on Google.
This lesson will guide you through setting up Google Search Console (GSC) for your Shopify store. We'll cover what GSC is, why it's essential, and most importantly, walk step-by-step through the process of verifying that you are the owner of your site. This verification is the necessary first step to unlocking the invaluable data Google has about your store's visibility in search results.
What is Google Search Console?
Before we begin the setup process, it's helpful to understand what Google Search Console is and why it's so important for your e-commerce business. In short, GSC is a free service offered by Google that helps you monitor, maintain, and troubleshoot your site's presence in Google Search results.
By connecting your Shopify store to GSC, you gain access to a dashboard that shows you:
- Which search queries are bringing users to your site.
- How often your pages are seen (impressions) and clicked on (clicks) in search results.
- Whether Google has encountered any issues crawling or indexing your pages.
- The overall health of your site from Google's perspective.
Verification is the process of proving to Google that you are the authorized owner of your website. It's a security measure that ensures only you can access this sensitive performance data.
Choosing the Right Verification Method
Google provides several ways to verify ownership, but due to Shopify's structure as a hosted platform, not all of them are compatible. For instance, the "HTML file upload" method requires access to a website's root directory, which Shopify does not provide for security reasons.
The most common and recommended method for Shopify store owners is the HTML tag method. This involves adding a small piece of code—a meta tag—to your theme's code. This is a straightforward process that you can complete entirely within your Shopify admin dashboard.
The article below provides a quick overview of the different verification methods and explains why the HTML tag approach is a good fit for Shopify.
How to Verify Your Shopify Website in Google Search Console
This article from Dawnify Themes explains which verification methods work with Shopify and why.
Please read the sections on the HTML Tag method and Why Some Methods Cannot Be Used. This will give you important context on why we are choosing this specific path.
Step-by-Step Guide to Verifying Your Store
Now, let's walk through the verification process. The following video from Shopify's own help channel provides a clear, official guide. We will follow its steps closely.
How to verify your site with Google and submit a sitemap || Shopify Help Center
This video from the Shopify Help Center will be our main guide for the verification process.
We will watch this video in segments as we go through the steps. For now, you just need to have it ready.
Step 1: Prepare Your Store and Google Account
Before you start, there are two prerequisites:
- Google Account: You need a Google account (like a Gmail address) to use Google Search Console. If you don't have one, create one first.
- Disable Store Password: Google needs to be able to "see" your site to find the verification tag. If your store is currently password-protected, you must temporarily disable the password. You can re-enable it immediately after verification is complete.
Watch the first part of the Shopify video for instructions on how to disable the password.
How to verify your site with Google and submit a sitemap || Shopify Help Center
This clip shows you how to disable password protection on your Shopify store.
Watch from this timestamp to see the steps for removing the password.
Step 2: Add Your Store as a Property in GSC
First, navigate to the Google Search Console homepage and sign in with your Google account.
You will be prompted to add a property. GSC offers two options: "Domain" and "URL prefix".
- Domain: A newer method that covers all versions of your site (e.g.,
http,https,www,non-www). It requires DNS verification, which is more technical. - URL prefix: The traditional method where you verify a specific URL.
For simplicity and compatibility, we will use the URL prefix method. Copy the full URL of your store's homepage (e.g., https://your-store-name.myshopify.com or https://www.yourcustomdomain.com) and paste it into the URL prefix box.
The video guide explains this step clearly.
How to verify your site with Google and submit a sitemap || Shopify Help Center
This segment shows how to choose the correct property type and enter your store's URL.
Watch the section from this timestamp for a visual guide.
Step 3: Copy the HTML Verification Tag
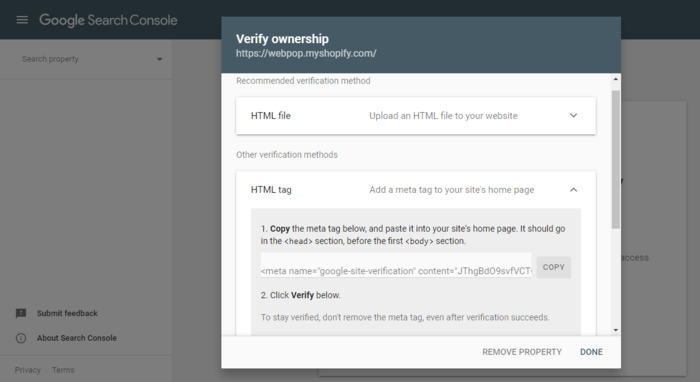
After you enter your URL and click "Continue," GSC will present you with the verification options.
- Find the HTML tag option and click the arrow to expand it.
- You will see a meta tag that looks something like
<meta name="google-site-verification" content="..." />. - Click the "Copy" button next to the tag.
Step 4: Add the Tag to Your Shopify Theme
Now, you need to paste this copied tag into your Shopify theme's code.
Important Best Practice: Before editing your theme's code, it's always a good idea to create a backup. You can do this by going to Online Store > Themes, clicking the ... (Actions) button on your current theme, and selecting Duplicate. If anything goes wrong, you can simply publish the duplicated copy. The video below demonstrates this safety step.
How to Connect Google Search Console with Shopify
This video from Stewart Gauld provides a practical walkthrough, including the crucial step of duplicating your theme as a backup before making code edits.
Please watch from this timestamp. Pay close attention to how to duplicate the theme for safety, navigate to theme.liquid, and paste the copied tag directly below the opening <head> tag.
To recap the steps shown in the video:
- In your Shopify admin, go to
Online Store > Themes. - Click
Actions > Edit codeon your current theme. - In the file list on the left, under the
Layoutfolder, click ontheme.liquid. - Find the opening
<head>tag near the top of the file. - Press Enter to create a new line directly below
<head>. - Paste the HTML tag you copied from GSC into this new line.
- Click "Save".
Step 5: Verify Your Ownership
You're on the final step. Go back to your Google Search Console browser tab and click the "Verify" button in the HTML tag section.
Google will now visit your site and look for the meta tag you just added. If it finds it, you'll see a success message confirming that your ownership is verified.
How to verify your site with Google and submit a sitemap || Shopify Help Center
This final clip from the Shopify video shows the verification click and the success message.
Watch from this timestamp to see the final step.
Congratulations! Your Shopify store is now connected to Google Search Console. It may take a day or two for data to start appearing in your dashboard.
Conclusion
In this lesson, you accomplished a critical milestone in your SEO journey. By verifying your Shopify store with Google Search Console, you have opened the door to a wealth of data that will guide your optimization efforts from now on.
Here are the key takeaways:
- Google Search Console is a free, essential tool for monitoring your site's performance in Google Search.
- Verification proves your ownership to Google, giving you access to performance data.
- The HTML tag method is the most straightforward way to verify a Shopify store.
- The process involves copying a meta tag from GSC and pasting it into your theme's
theme.liquidfile, right below the opening<head>tag.
Now that your site is verified, the next logical step is to ensure Google can efficiently find and understand all the pages on your site. In the next lesson, we will do just that by finding and submitting your Shopify store's sitemap to Google Search Console. This tells Google exactly what pages exist on your site and helps speed up the process of getting them indexed.