Welcome back! In our previous lesson, you built the foundational structure of a Notion workspace by creating and organizing pages with nesting, icons, and covers. You now have the "rooms" of your digital workspace set up.
Today, we'll start furnishing those rooms. This lesson focuses on the core of any document: the text itself. You will learn how to add and format various text blocks, including headings, lists, and styled text. Mastering text formatting is essential for creating clear, readable, and professional-looking templates that effectively guide your future customers.
1. Understanding Text Blocks
In Notion, every piece of content—a paragraph, a heading, an image—is a block. The most fundamental of these are the text-based blocks. They provide the structure and hierarchy for all the information on your page.
The main text blocks you'll use constantly are:
- Text: Your standard paragraph.
- Headings (H1, H2, H3): Used to create titles and subtitles, breaking up your page into logical sections.
H1is typically for the main page title,H2for major sections, andH3for subsections. - Bulleted List: For unordered items.
- Numbered List: For ordered steps or items.
- To-do List: A list with checkboxes, perfect for tasks.
- Quote: An indented block to make text stand out, ideal for testimonials or important notes in your templates.
You can add any block by typing / (the slash command) and selecting from the menu that appears.
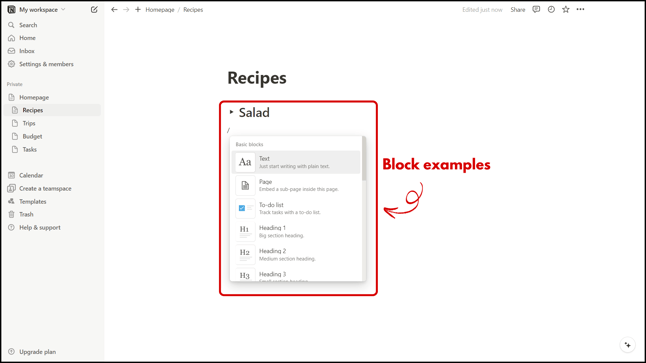
To see these basic blocks in action, let's watch a quick overview from the official Notion team.
This video, 'Types of content blocks', provides a rapid tour of the most common blocks, including the text-based ones we'll be focusing on today.
Watch from 01:06 to 03:21. This segment will quickly show you what each of the basic text blocks (Headings, Lists, Toggles, Quotes) looks like and introduce their shortcuts.
For a handy text-based reference that you can refer back to anytime, the following Notion Help Center article is perfect.
Intro to writing & editing – Notion Help Center
This article, 'Intro to writing & editing', serves as an excellent reference guide. We'll focus on the section that lists the basic block types.
Quickly scan the 'Basic blocks' section to reinforce what you just saw in the video. You don't need to memorize it, just familiarize yourself with the list.
2. Three Methods for Formatting Text
Efficiency is key when building complex templates. Notion provides three primary ways to format your text. As you become more proficient, you'll likely mix and match these methods for the fastest workflow.
Method 1: The Pop-Up Toolbar (The Intuitive Way)
When you highlight any text, a formatting toolbar automatically appears. This provides all the essential options: turning the block into a different type (like a heading), bolding, italicizing, adding color, and more. It's the most straightforward method for beginners.

Method 2: Keyboard Shortcuts (The Fast Way)
For common actions, keyboard shortcuts are much faster than using the mouse. You likely already know many of these:
- Bold:
Cmd/Ctrl+B - Italic:
Cmd/Ctrl+I - Underline:
Cmd/Ctrl+U - Strikethrough:
Cmd/Ctrl+Shift+S
Method 3: Markdown (The Power-User Way)
Markdown is a syntax that lets you format text as you type. This is the most efficient method and is invaluable for content creators who write a lot.
- To create an H1 Heading, type
#followed by aspace. - To create an H2 Heading, type
##followed by aspace. - To create a bulleted list, type
*or-followed by aspace. - To bold text, wrap it in double asterisks:
**like this**. - To italicize text, wrap it in single asterisks:
*like this*.
To see all these methods combined and in action, the following video is an excellent, comprehensive guide.
Notion Fundamentals - Master Notion's Text Editing Tools
This video, 'Notion Fundamentals - Master Notion's Text Editing Tools' by Thomas Frank, is a fantastic tutorial that covers Markdown, keyboard shortcuts, the pop-up toolbar, and using the slash command to format text.
Watch from 00:53 to 08:53. This is the core of our lesson. Pay close attention to: The explanation of Markdown (00:53). Using keyboard shortcuts (04:54). The pop-up editing toolbar (06:06). Using the slash command to 'turn into' other blocks and add color (06:55).
Test your understanding!
Using Markdown, how would you type to create an H2 heading that says "Project Goals" with the word "Goals" italicized?
Show answer
You would type: ## Project *Goals* and then press the spacebar.
3. Styling with Color
Strategic use of color is a hallmark of a great Notion template. It creates visual hierarchy, draws attention to important information, and can be used to establish a consistent brand aesthetic.
In Notion, you can apply:
- Text color to the text itself.
- Background color (a highlight) to the entire block.
You can apply color using the pop-up toolbar, or by using the slash command (e.g., /red for red text or /red background for a red highlight).
For a clear guide on the different ways to apply color, please review the "Colors" section of the following article.
Style & customize your page – Notion Help Center
The 'Style & customize your page' article from Notion's Help Center has a great, concise section on applying color.
Read just the 'Colors' section. Notice the different ways you can apply color to inline text versus an entire block.
✍️ Exercise: Flesh Out a Project Page
Now, let's apply these skills to the structure you built in the last lesson. Navigate to the "Q4 Initiative" page you created inside your "Projects" page.
Your task is to transform this blank page into a structured project brief.
- At the top of the page, add an H1 heading:
Q4 Initiative: New Website Launch. - Below the H1, add an H2 heading:
Project Overview. Give this heading a gray background color. - Under
Project Overview, write a short paragraph of placeholder text (1-2 sentences). Italicize a few key words. - Add another H2 heading:
Key Objectives. - Under
Key Objectives, create a numbered list with at least three goals (e.g., "1. Increase user engagement by 20%", "2. Modernize brand aesthetic", "3. Improve mobile performance"). - Add a final H2 heading:
Core Tasks. - Under
Core Tasks, create a to-do list (checkboxes) with a few sample tasks (e.g., "Wireframe new homepage", "Write copy for About page", "Test contact form"). Bold the first task. - At the bottom, add a Quote block and paste in this text:
The key to successful project management is to focus on goals and not activities.
When you're done, your page should have a clear, professional structure that is easy to read and understand at a glance.
Lesson Summary and Next Steps
Excellent work! You've now moved from building the structure of your workspace to adding and styling the content within it.
Key Takeaways:
- All content in Notion exists within blocks, and text blocks (Headings, Lists, etc.) are the most common.
- You can format text using the pop-up toolbar, keyboard shortcuts, or Markdown.
- Markdown is the most efficient method for formatting as you type (e.g.,
##for H2,*for lists). - Color and styling (bold, italic) are crucial for creating visual hierarchy and designing professional, easy-to-use templates.
In the next lesson, we will continue to build on this foundation. You'll learn how to structure content effectively using toggle, callout, and divider blocks, giving you even more powerful tools to organize information and improve the user experience of your Notion pages.