Hello! Welcome back.
In the last lesson, we focused on making your database interactive and time-aware by configuring Date, URL, and Email properties. You learned how to link your database entries to schedules and external web resources.
Today, we'll build on that by exploring a property that brings your resources directly into your Notion workspace. This lesson is all about the Files & Media property. While the URL property creates a pointer to a file on the internet, the Files & Media property lets you upload and store documents, images, and other assets right inside your database entries. This is a crucial skill for creating self-contained, professional templates for project management, content creation, and more.
By the end of this lesson, you will be able to confidently use the 'Files & Media' property to attach documents to database entries, keeping all your important assets organized in one place.
1. Attaching Files vs. Linking to Files
Before we dive into the "how," let's clarify the "when." In the last lesson, you learned about the URL property. So, when should you use Files & Media instead of URL?
The key difference is storage location:
URLProperty: Points to a file that lives elsewhere on the internet (e.g., a Google Doc, a webpage, a file in Dropbox). The file is not stored in Notion.Files & MediaProperty: Uploads a copy of the file from your computer or the web and stores it directly within the Notion database entry.
The following resource provides excellent strategic advice on this topic.
Notion Database Properties Explained: A Complete Guide (2025)
The article 'Notion Database Properties Explained' from NotionApps.com has a section on choosing the right property. It offers a clear guideline on when to use Files & Media.
Please read the short section titled 'Choosing the Right Property for the Right Job'. Focus specifically on point #8, 'Use Files & Media Only When You Need Actual Attachments', to understand the distinction from the URL property.
For your goal of creating sellable templates, this property is essential. Here are a few examples:
- Content Creation Hub: Store your thumbnail images, video B-roll clips, or final blog post drafts (as .docx or .pdf).
- Project Management System: Attach client briefs, signed contracts, design mockups, or brand asset files (logos, fonts).
- Personal Knowledge Management (PKM): Save research papers, highlighted articles as PDFs, or presentation slides for later reference.
2. How to Use the Files & Media Property
Now for the practical part. Adding files to a database entry is straightforward. You can upload files from your computer, or you can embed files from a web link.
This short video demonstrates the process clearly.
All Notion Databases Explained in Under 30 Minutes! (Full Guide)
Let's watch a segment from the 'All Notion Databases Explained in Under 30 Minutes!' video by Creative Cove. It provides a quick and effective demonstration of adding files.
Please watch from 11:38 to 12:22. Notice the two methods shown: uploading a file from your computer and embedding an image by pasting its web link. This second method is a very useful shortcut.
As you saw in the video, you have a couple of options when adding a file.
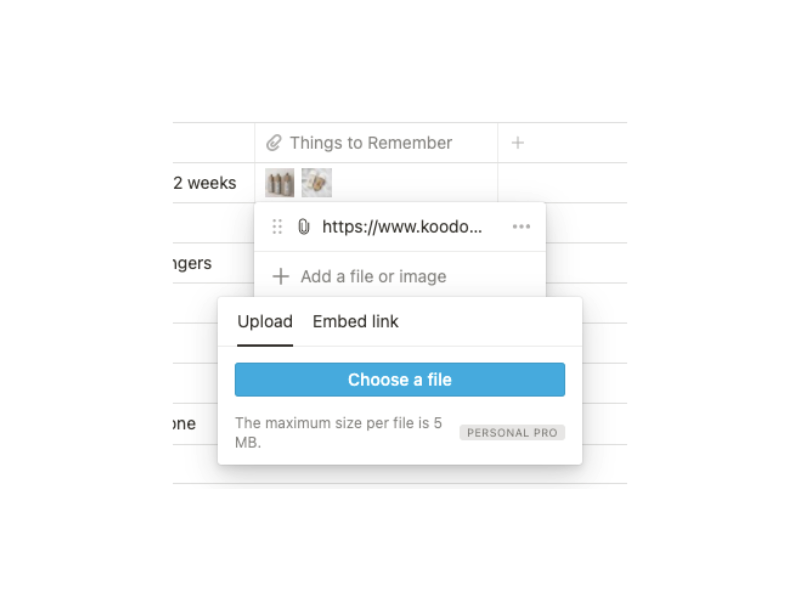
For a comprehensive guide on all the ways you can interact with this property, the official Notion documentation is the best reference. It covers uploading, drag-and-drop, and how to manage the files once they are in your database.
Database properties – Notion Help Center
The Notion Help Center article 'Database properties' contains the definitive guide on how to interact with this property type.
In the article, find the list under the 'Edit property values' section. Read the bullet point that begins with 'For Files & media properties'. It details uploading, dragging files, managing multiple files, and the options to delete, download, and re-order them.
Test your understanding!
You are building a content creation template. A user of your template needs to manage thumbnail images for their YouTube videos. Which of the following is the most direct way for them to add their finished thumbnail (a .png file on their desktop) to the correct database entry?
- Copy the file's path from their computer and paste it into a
URLproperty. - Use the
Files & Mediaproperty, click 'Embed link', and paste the file path. - Drag the .png file from their desktop directly into the
Files & Mediaproperty cell in the database.
Show answer
- Drag the .png file from their desktop directly into the
Files & Mediaproperty cell in the database. This is the most efficient method for uploading a local file. TheURLproperty would not work, and the 'Embed link' option is for web links, not local file paths.
✍️ Exercise: Add Assets to Your Content Hub
Let's put this into practice by adding a Files & Media property to your "Master Content Hub." This will be the home for any assets associated with a piece of content.
- Navigate to your "Master Content Hub" database.
- Add a new
Files & Mediaproperty:- Click the
+icon at the end of your property list (or in thePropertiesmenu) to add a new property. - Name it "Assets".
- Set the
TypetoFiles & Media.
- Click the
- Practice uploading a local file:
- For one of your content ideas, click into the new "Assets" cell.
- Choose Upload and select any image or document from your computer to attach.
- Practice embedding an image from the web:
- For a different content idea, find a relevant (and copyright-free) image online. A good source for this is a site like Unsplash or Pexels.
- Right-click the image and choose "Copy Image Address" or "Copy Image Link."
- In the "Assets" cell in Notion, click to open the dialog, select the Embed link tab, paste the link, and click "Embed link".
- Practice with drag-and-drop:
- Find another file on your computer and simply drag it from your file explorer or desktop and drop it directly onto the "Assets" cell for a third database entry.
You should now see the files or image previews directly within the cells of your new "Assets" column.
Lesson Summary and Next Steps
Fantastic work! You've now mastered a critical property for building robust, all-in-one Notion systems. By adding files directly to your database, you ensure that all necessary assets are organized and easily accessible right where you need them.
Key Takeaways:
- The
Files & Mediaproperty stores a copy of a file directly within a Notion database entry. - Use
Files & Mediafor essential assets you want to keep with a project, like images, PDFs, and documents. Use theURLproperty to link to external resources. - You can add files by uploading from your device, embedding from a web link, or using drag-and-drop.
This lesson concludes our exploration of the fundamental property types. You now have a complete toolkit for defining the data you want to track.
In our next lesson, we'll learn how to create database templates. This powerful feature will allow you to pre-define the structure of new pages within a database, saving you an enormous amount of time and ensuring every new project, task, or content idea starts with a consistent layout. This is a cornerstone of creating user-friendly templates for others.