Hello! In our last lesson, we put a critical security layer on our "My Reading List" application by implementing navigation guards. You now have a system that correctly redirects unauthenticated users to a login page, protecting the core parts of your app. This is a fundamental pattern in web development.
However, our protected pages are still just placeholders. It's time to bring them to life with real, dynamic data.
This lesson focuses on a core competency for any web developer: Fetch, display, and submit data to an external API, ensuring proper state management for loading, error, and success states. We will transform your SearchView from a static page into an interactive tool that searches a massive public library database and allows you to add books to your personal reading list.
1. The Anatomy of an API Call
At its heart, a modern web application is often a dynamic interface for data that lives somewhere else on the internet. We communicate with data sources using an Application Programming Interface (API). The most common way to do this on the web is by making HTTP requests.
For our project, we'll focus on two main types of requests:
- GET: To retrieve data (e.g., search for books).
- POST: To send data to create a new resource (e.g., add a book to our list).
Because these requests travel over a network, they are asynchronous—they don't complete instantly. Our application needs to handle this by managing different states:
- Loading: The request has been sent, and we are waiting for a response.
- Success: We received the data we wanted.
- Error: Something went wrong during the request.
We will use a library called axios to help us make these requests. It simplifies the process and is very popular in the Vue ecosystem.
Let's start by seeing how to make a basic GET request and display its data.
Vue and Axios (feat. Kanye REST API)
This video from LearnVue provides a clear, concise demonstration of making an API request using Axios. It will introduce you to the async/await syntax, which is the modern standard for handling asynchronous operations in JavaScript.
Watch from the beginning until 2:46. Pay attention to how axios.get is used within an async function and how the desired data is extracted from the response object.
2. Best Practice: Separating API Logic
As you saw in the video, you can make an API call directly inside a Vue component. However, this is not a scalable or maintainable practice. As your application grows, you might need to call the same API endpoint from multiple components. Duplicating that logic would be inefficient and error-prone.
A core principle of clean code is separation of concerns. Your Vue components should be primarily concerned with displaying data and handling user interaction, not with the nitty-gritty details of API communication.
Therefore, we'll create a dedicated "service" layer for our API calls.
Best Practices for Fetching Data in Vue.js
This article, 'Best Practices for Fetching Data in Vue.js', explains the importance of abstracting API logic into 'service' files. This is a key 'why' moment that aligns with industry standards.
Read the section titled 'Separate API Calls into Services'. Notice how they create an axios instance with a base URL and then export functions for specific API calls. This is the exact pattern we will implement.
3. Your Task: Fetch and Display Book Search Results
Let's apply these concepts to your SearchView. You'll fetch book data from the Open Library Search API, which is a free and public resource.
Step 1: Install Axios and Create the Book Service
-
Open your terminal in the project root and install
axios:npm install axios -
Create a new folder in your
srcdirectory calledservices. -
Inside
src/services, create a file namedbookService.js. This is where all our book-related API logic will live. -
Populate
bookService.jswith the following code. Read the comments to understand what each part does.// src/services/bookService.js import axios from 'axios'; // Create an Axios instance with a base URL. // This is helpful so you don't have to type the full URL for every request. const apiClient = axios.create({ baseURL: 'https://openlibrary.org', headers: { 'Content-Type': 'application/json' } }); // Export an object containing our API methods export default { // This function will search for books searchBooks(query) { // We use the `get` method and pass the specific endpoint (`/search.json`) // and any query parameters (`q` for the search term). return apiClient.get('/search.json', { params: { q: query } }); } // We can add more methods here later, like getBookById, etc. };
Step 2: Implement State Management in SearchView.vue
Now, let's wire this service into your search component and manage the loading, success, and error states.
Best Practices for Fetching Data in Vue.js
When fetching data, we need to track its state. The same article demonstrates a robust pattern for this using reactive variables and a try/catch/finally block.
Read the sections 'Use Composables for Reusable Logic' and 'Usage of useUser composable in component'. Focus on how they define and use isLoading and error refs. Most importantly, see how the template uses v-if, v-else-if, and v-else to display different content based on these states. We will apply this logic directly in our component for now.
Update your src/views/SearchView.vue to match the following. This incorporates all the state management logic we just read about.
<!-- src/views/SearchView.vue -->
<script setup>
import { ref } from 'vue';
import bookService from '@/services/bookService';

// State for the search form
const query = ref('');

// State for the API request
const searchResults = ref([]);
const isLoading = ref(false);
const error = ref(null);

const handleSearch = async () => {
  if (!query.value.trim()) {
    searchResults.value = [];
    return;
  }

  isLoading.value = true;
  error.value = null;

  try {
    const response = await bookService.searchBooks(query.value);
    // The API returns a 'docs' array with the books
    searchResults.value = response.data.docs;
  } catch (err) {
    console.error('Failed to fetch books:', err);
    error.value = 'Failed to fetch books. Please try again later.';
    searchResults.value = []; // Clear previous results on error
  } finally {
    isLoading.value = false;
  }
};
</script>

<template>
  <div>
    <h1>Search for Books</h1>
    <form @submit.prevent="handleSearch">
      <input v-model="query" type="text" placeholder="Search by title..." />
      <button type="submit">Search</button>
    </form>

    <!-- Loading State -->
    <div v-if="isLoading">
      <p>Searching...</p>
    </div>

    <!-- Error State -->
    <div v-else-if="error">
      <p style="color: red;">{{ error }}</p>
    </div>

    <!-- Success State (with results) -->
    <ul v-else-if="searchResults.length > 0">
      <li v-for="book in searchResults" :key="book.key">
        {{ book.title }} by {{ book.author_name?.join(', ') || 'Unknown Author' }}
      </li>
    </ul>

    <!-- Success State (no results) -->
    <div v-else>
      <p>No results found. Try a different search.</p>
    </div>
  </div>
</template>
Verify your work:
- Run your app and navigate to the search page.
- Type a book title (e.g., "Dune") and press Enter or click Search.
- You should see a "Searching..." message briefly, followed by a list of books.
- Try searching for something that doesn't exist to see the "No results found" message.
You have now successfully fetched and displayed data from a real-world API!
4. Centralizing Logic with Pinia
Our search component works, but we've run into a new problem. The search results, loading state, and error state all live inside SearchView.vue. What if we wanted to show the latest search results on another page? We'd have to fetch the data all over again.
This is where a state management library like Pinia becomes essential for asynchronous operations. We can move our API call and all its related state into a Pinia store. This makes the state global, centralized, and reusable across our entire application.
This diagram illustrates the data flow we are aiming for: the component triggers an action in the store, the store makes the API call and updates its state, and the component automatically reflects those changes.
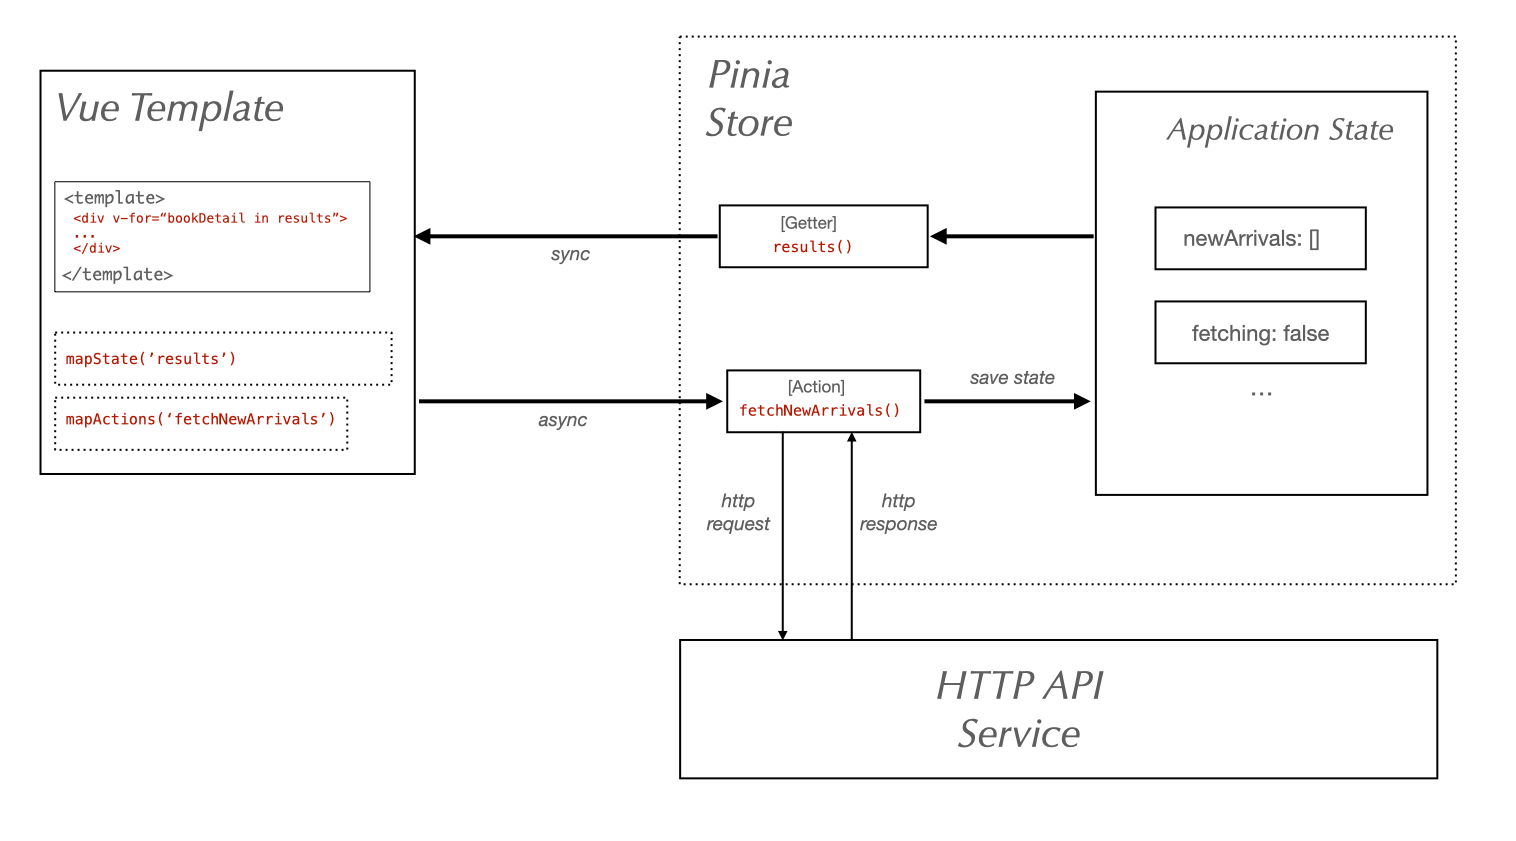
Let's refactor our application to use this robust pattern.
Comprehensive Guide to Pinia for State Management in Vue.js
This 'Comprehensive Guide to Pinia' provides an excellent, real-world example of creating a store to manage asynchronous data. It's the perfect blueprint for what we need to do.
Read the sections 'The Task Store: Heart of the Application' and 'Using the Task Store in Components'. Pay close attention to the fetchTasks async action in taskStore.js. It contains the exact try/catch/finally logic we need, but inside a Pinia action. Then, notice how much cleaner the component becomes; it just uses the reactive state provided by the store.
5. Your Task: Refactor to a Pinia Store
Now, let's move all the book-related logic and state into a new Pinia store.
Step 1: Create the Book Store
-
In your
src/storesdirectory, create a new file namedbookStore.js. -
This store will manage our search results and the user's personal reading list.
-
Add the following code to
src/stores/bookStore.js:// src/stores/bookStore.js import { defineStore } from 'pinia'; import { ref } from 'vue'; import bookService from '@/services/bookService'; export const useBookStore = defineStore('books', () => { // === STATE === // For the user's personal list const readingList = ref([]); // For the search functionality const searchResults = ref([]); const isLoading = ref(false); const error = ref(null); // === ACTIONS === // An async action to handle the book search async function searchBooks(query) { if (!query.trim()) { searchResults.value = []; return; } isLoading.value = true; error.value = null; try { const response = await bookService.searchBooks(query); searchResults.value = response.data.docs; } catch (err) { console.error('Failed to fetch books:', err); error.value = 'Failed to fetch books. Please try again.'; searchResults.value = []; } finally { isLoading.value = false; } } // An action to add a book to the user's list. // In a real app, this would be an async POST request. // For now, we'll just simulate it by adding to our local array. function addBookToReadingList(book) { // Prevent duplicates if (!readingList.value.find(item => item.key === book.key)) { readingList.value.push(book); } } return { readingList, searchResults, isLoading, error, searchBooks, addBookToReadingList }; });
Step 2: Refactor SearchView.vue
Now, simplify SearchView.vue to use the new store. It no longer needs to manage the state itself; it just needs to display it and call the store's actions.
-
Replace the entire content of
src/views/SearchView.vuewith this much cleaner version:<!-- src/views/SearchView.vue --> <script setup> import { ref } from 'vue'; import { storeToRefs } from 'pinia'; import { useBookStore } from '@/stores/bookStore'; const query = ref(''); const bookStore = useBookStore(); // Use storeToRefs to get reactive access to the store's state const { searchResults, isLoading, error } = storeToRefs(bookStore); const handleSearch = () => { bookStore.searchBooks(query.value); }; const handleAddBook = (book) => { bookStore.addBookToReadingList(book); // Optional: Give user feedback alert(`'${book.title}' added to your reading list!`); }; </script> <template> <div> <h1>Search for Books</h1> <form @submit.prevent="handleSearch"> <input v-model="query" type="text" placeholder="Search by title..." /> <button type="submit">Search</button> </form> <div v-if="isLoading"> <p>Searching...</p> </div> <div v-else-if="error"> <p style="color: red;">{{ error }}</p> </div> <ul v-else-if="searchResults.length > 0"> <li v-for="book in searchResults" :key="book.key"> {{ book.title }} by {{ book.author_name?.join(', ') || 'Unknown Author' }} <button @click="handleAddBook(book)">Add to List</button> </li> </ul> <div v-else> <p>No results found. Try a different search.</p> </div> </div> </template>
Step 3: Display the Reading List on the Dashboard
To prove that our state is truly centralized, let's display the readingList on the DashboardView.
-
Open
src/views/DashboardView.vueand update it:<!-- src/views/DashboardView.vue --> <script setup> import { storeToRefs } from 'pinia'; import { useBookStore } from '@/stores/bookStore'; const bookStore = useBookStore(); const { readingList } = storeToRefs(bookStore); </script> <template> <div> <h1>My Reading List</h1> <ul v-if="readingList.length > 0"> <li v-for="book in readingList" :key="book.key"> {{ book.title }} </li> </ul> <p v-else>Your reading list is empty. Go to the search page to add some books!</p> </div> </template>
Final Verification:
- Go to the search page, find a book, and click "Add to List".
- Navigate to the dashboard. You should see the book you just added!
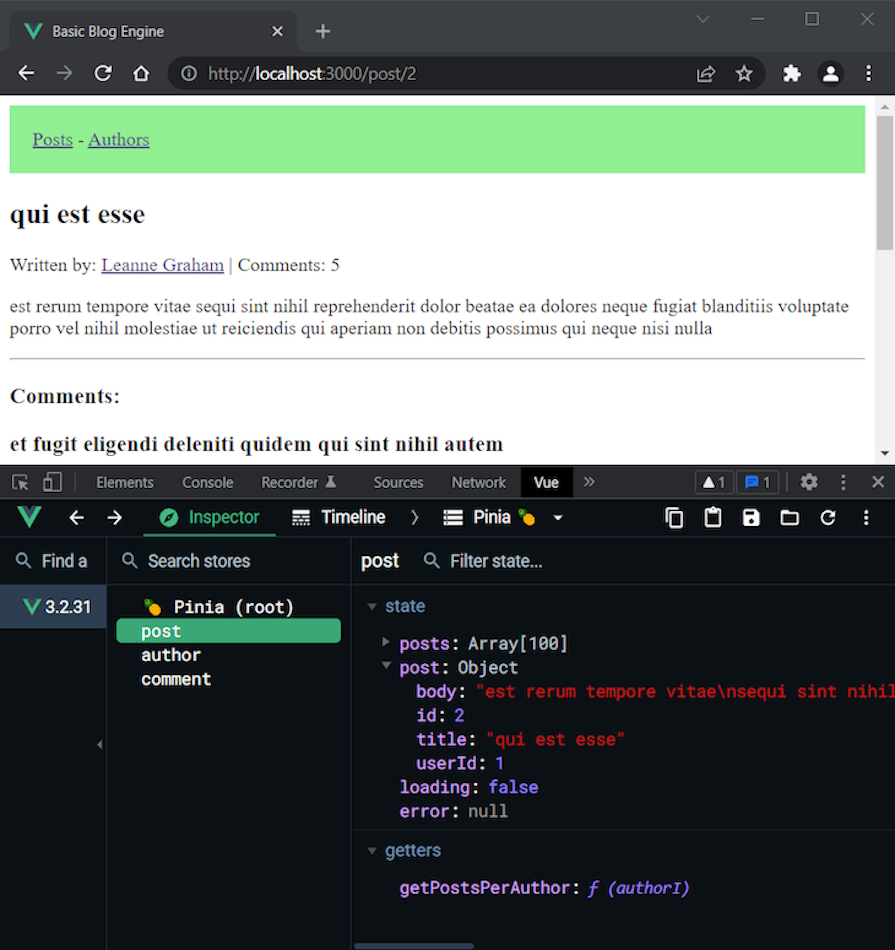
- This confirms that your state is being managed centrally by Pinia and is accessible from any component. You can use the Vue DevTools to inspect your Pinia store and see the state change in real-time, just like in the image below.
Conclusion
Excellent work! You have tackled one of the most critical aspects of modern frontend development. You've not only learned how to fetch and submit data but also how to structure your code in a scalable and maintainable way using services and a centralized Pinia store.
Key Takeaways:
- API Service Layer: Abstracting API calls into dedicated service files keeps your components clean and your API logic reusable.
- Asynchronous State Management: Every API request involves three potential states—loading, error, and success (data)—that you must manage to provide a good user experience.
try/catch/finallyis a robust pattern for handling the three states within anasyncfunction.- Pinia for Async Logic: Encapsulating async actions and their related state within a Pinia store is the best practice for managing global application data. It makes your components simpler and your state predictable.
Next Lesson:
Our application feels much more real now, but there's a small delay when a user adds a book to their list. In the next lesson, we will learn how to implement optimistic UI updates where appropriate to improve user experience. This advanced technique makes your app feel instantaneous, even when network requests are slow.