Hello! Congratulations on building a complete, functional, and responsive "My Reading List" application. You've come a long way, from setting up your environment to implementing advanced features like optimistic UI updates. Now, we're at the final step before the final challenge project.
This lesson focuses on the professional polish that separates a hobby project from a maintainable, production-ready application. Today's learning outcome is to maintain consistent code organization and follow best practices for Vue, Tailwind, and Git. We'll consolidate the principles of clean code, structured project layouts, and a professional version control history. This is the "why" behind how senior developers build software that is easy to manage, debug, and collaborate on.
1. Predictability: The Foundation of a Scalable Application
The single most important quality of a large-scale application is predictability. A new developer (or your future self) should be able to look at the project and intuitively know where to find components, state logic, or routes without a map. This is achieved through standards and conventions.
To start, let's explore why standards are so crucial and what conventions the Vue ecosystem provides.
Patterns for Large Scale Vue.js Applications - VueConf US 2023
The talk 'Patterns for Large Scale Vue.js Applications' by Daniel Kelly from VueConf US 2023 provides an excellent high-level overview of this topic. It emphasizes predictability and introduces key sources of standards in the Vue world.
Watch the first part of the talk, from 01:06 to 06:12. Pay close attention to the three sources of standards he mentions: the Vue.js Style Guide, officially recommended tooling (like Vite and Pinia), and frameworks like Nuxt.
The key takeaway is that following established conventions saves mental energy. Instead of reinventing the wheel, you can rely on a shared understanding, which makes development faster and less error-prone.
2. Best Practices for Vue Project Structure
Let's get specific about what these conventions look like in a Vue project. We'll cover file structure, component naming, and route naming.
A Standard File Structure
When you scaffold a project with create-vue, it generates a folder structure that is itself a convention. Adhering to it is the first step toward predictability.
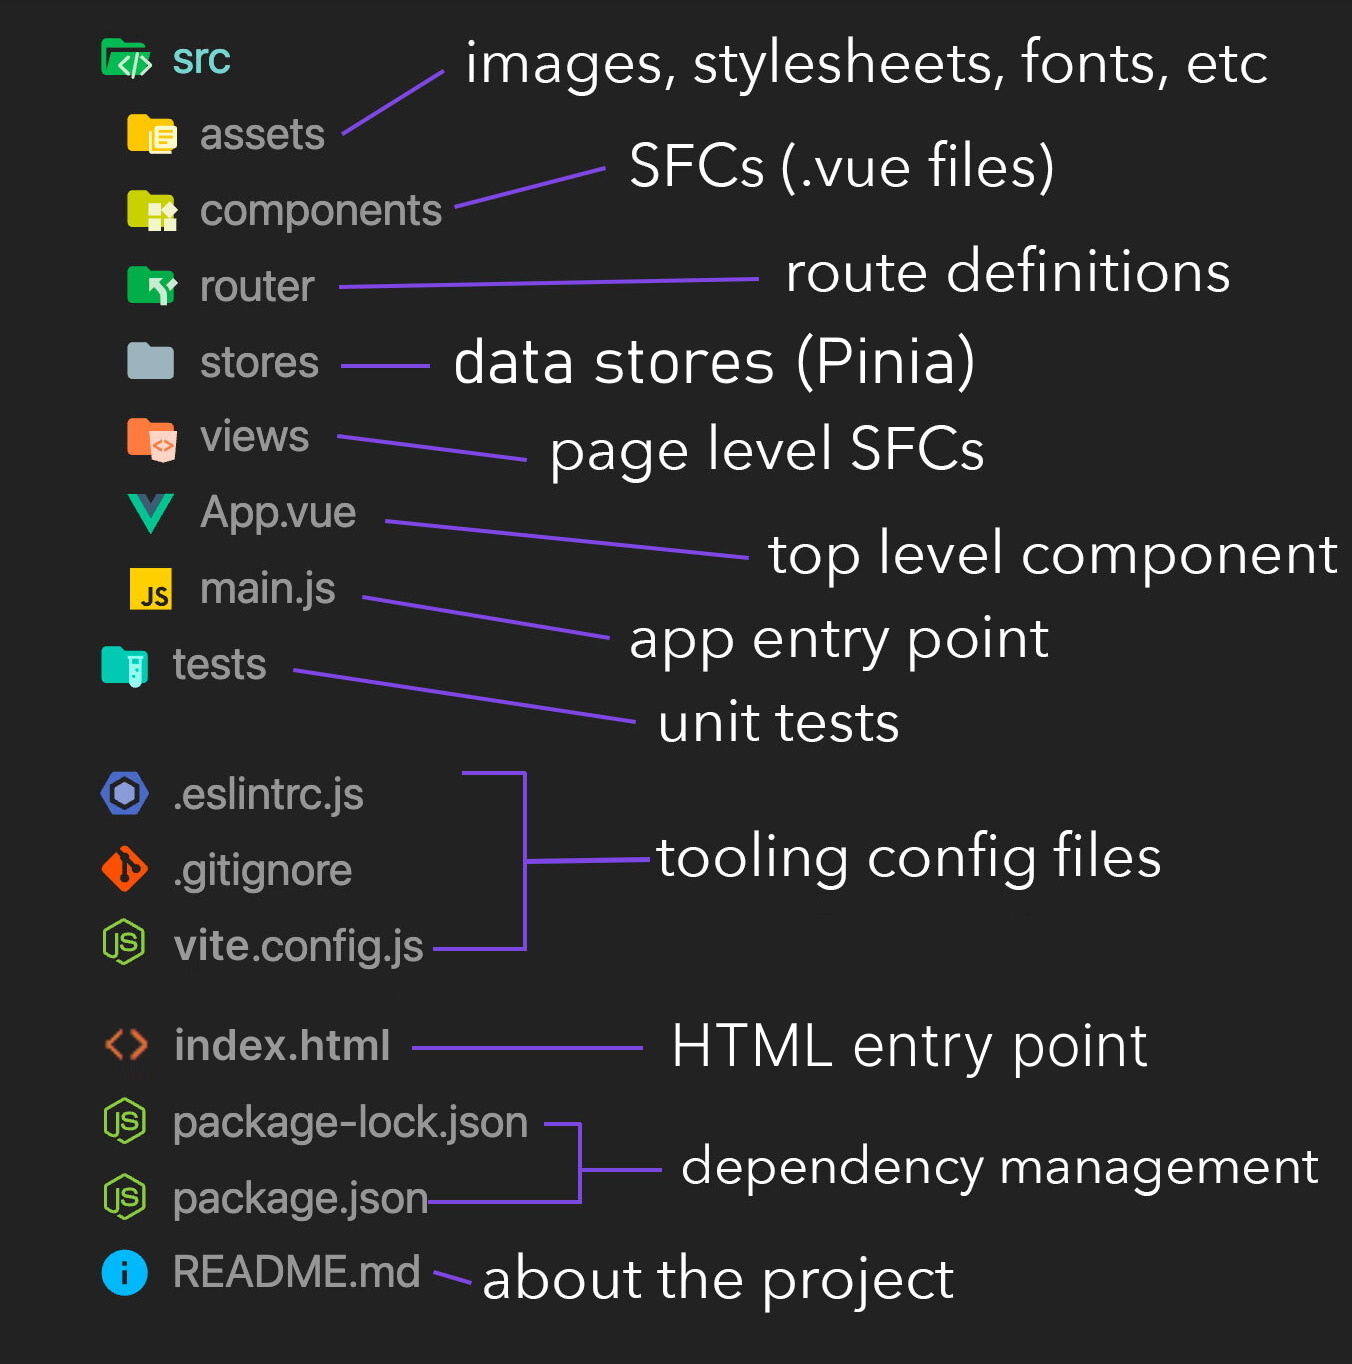
This structure separates concerns:
src/components: For reusable Vue components.src/views: For page-level components that are mapped to routes.src/router: For Vue Router configuration.src/stores: For Pinia state management stores.src/assets: For static assets like images and global CSS.
For a deeper dive into structural and naming conventions, the Vue School article "How to Structure a Large Scale Vue.js Application" is an excellent resource. It expands on the official Vue Style Guide.
How to Structure a Large Scale Vue.js Application
This article provides concrete rules and recommendations for organizing a Vue application. We'll focus on the sections covering component and route naming conventions.
Read the sections 'Component Recommended Rules', 'A Flat Component Directory', and 'Standardized Route/Page Naming Convention'. These sections provide actionable rules for naming and organizing your components and routes.
Based on the article, here are the key naming conventions to adopt:
- Component Naming:
- Use
PascalCasefor component file names (e.g.,BookCard.vue). - Prefix global, reusable components with
BaseorApp(e.g.,BaseButton.vue). - Prefix single-instance components (like a site-wide header) with
The(e.g.,TheNavbar.vue). - Prefix child components with the parent's name for clarity (e.g.,
BookList.vueandBookListItem.vue).
- Use
- Route Naming:
- For resources (like books, users, etc.), use a consistent pattern:
ResourceIndex: Shows a list.ResourceShow: Shows a single item.ResourceCreate: Form to create a new item.ResourceEdit: Form to edit an item.
- For resources (like books, users, etc.), use a consistent pattern:
Following these rules makes your components folder easier to navigate and your router file more understandable at a glance.
3. Git Best Practices: Crafting a Professional History
Your Git commit history is one of the most important forms of documentation for your project. A clean, well-written history allows you to understand why changes were made, track down bugs (git bisect), and easily review pull requests.
The GitHub blog post "Write Better Commits, Build Better Projects" is an exceptional guide on this topic.
Write Better Commits, Build Better Projects
This article outlines three core guidelines for writing high-quality commits. It explains the 'why' behind each rule and how it contributes to a better project.
Read the main section 'Writing better commits', which is broken down into three parts: 'Structure the narrative', 'Resize and stabilize the commits', and 'Explain the context'. This is the core of the lesson on Git hygiene.
Let's summarize the three golden rules from the article:
- Structure the Narrative: Your commits on a feature branch should tell a logical story. Avoid mixing unrelated changes. For example, a refactor should be a separate commit from the feature that uses it.
- Make Commits Small and Atomic: Each commit should represent a single, complete logical change. The project should be in a working state at every commit. This means no "WIP" (Work In Progress) commits on your main branch.
- Explain the Context with Great Messages: A commit message should be clear and concise. A widely-adopted standard is Conventional Commits.
The format is: type(scope): subject.
- type:
feat(new feature),fix(bug fix),docs(documentation),style(formatting),refactor,chore(build process, etc.). - scope (optional): The part of the codebase affected (e.g.,
auth,books,api). - subject: A short, imperative description (e.g.,
add user login form).
Good Commit Message Example:
feat(auth): implement password reset functionality

Users can now request a password reset email from the login page.
This introduces a new '/reset-password' route and a corresponding view.
The backend endpoint is assumed to be available at '/api/reset-password'.
Branching Strategy
A simple and effective branching strategy is essential. For all your projects, you should follow this model:
main: This branch should always be stable and deployable.- Feature Branches: All new work happens on a descriptive branch (e.g.,
feature/add-book-search,fix/navbar-bug). - Pull Requests (PRs): Once a feature is complete, you open a pull request to merge your feature branch into
main. This is where code review happens.

4. Automated Code Hygiene with Tooling
The best way to maintain consistency is to automate it. Linters and formatters are tools that automatically check your code against a set of rules, ensuring consistency and catching potential errors.
The create-vue scaffold already sets up ESLint for you. The next step is to integrate it deeply into your workflow.
Lint Like a Senior Developer w/ eslint + husky + lint staged + github actions
This video from the 'Syntax' channel demonstrates a professional-grade linting setup. It covers editor integration, pre-commit hooks, and even CI checks.
Watch from 00:56 to 11:10. This segment will show you: How ESLint integrates with VS Code for lint-on-save. How to set up pre-commit hooks with Husky and lint-staged to automatically lint your code before you can commit it.
Here's the workflow this enables:
- ESLint in VS Code: Catches errors and formatting issues as you type and fixes them automatically on save. This provides immediate feedback.
- Husky + lint-staged: This is a safety net. If you try to commit code that has linting errors, the commit will be blocked until you fix them. This prevents messy code from ever entering your repository.
This level of automation is a standard practice in professional development teams.
5. Your Task: A Professional Polish for "My Reading List"
Now, let's apply these best practices to your project. This will be a "refactoring" task focused on organization and conventions, not new features.
1. Review Project Structure & Naming:
- Open your "My Reading List" project in VS Code.
- Look through your
src/componentsdirectory. Are your components named usingPascalCase? - Do you have any tightly-coupled child components? If so, consider renaming them to follow the
ParentChildconvention (e.g.,BookList.vueandBookListItem.vue). - Use
git mv old-name.vue new-name.vueto rename files while keeping their history in Git.
2. Update Your README.md:
- A good README is the front door to your project.
- Open
README.mdand ensure it includes:- A clear project title and a brief description of what the application does.
- A "Getting Started" section with setup instructions (
pnpm install) and how to run the development server (pnpm dev). - A "Features" section listing what the app can do (e.g., search for books, add books to a list, responsive design).
3. Practice a Perfect Git Commit:
- After renaming your components and updating your README, you'll have changes to commit. Now is the perfect time to practice writing a great commit.
- Stage your changes (
git add .). - Write a commit that follows the Conventional Commits format. Since this is a refactoring and documentation task, you could have two separate commits:
refactor(components): align component names with style guidedocs(readme): update project description and setup instructions
- Push these clean commits to your GitHub repository.
Conclusion
Fantastic work! This lesson was about codifying the habits and practices that define professional software development. By focusing on consistency, clarity, and automation, you ensure that your projects are not just functional but also robust, maintainable, and easy for others (and yourself) to work with.
Key Takeaways:
- Prioritize Predictability: Use established conventions for file structure and naming to make your project easy to navigate. The Vue Style Guide is your best friend.
- Tell a Story with Git: Craft a clean, logical commit history with small, atomic commits and descriptive messages using the Conventional Commits standard.
- Automate Code Quality: Use tools like ESLint and pre-commit hooks (
husky,lint-staged) to enforce standards and prevent errors automatically. - Documentation Matters: A clear
README.mdis essential for any project.
Next Steps:
You are now fully equipped for the Final Challenge Project! You have refreshed your foundational skills and learned the modern toolchain of Vue, Tailwind, Pinia, and Vue Router, all while adhering to professional best practices. The next and final module will present the requirements for the final project you'll build from scratch, applying everything you've learned throughout this course. Get ready to build