Hello again! I hope you're ready to continue our journey with Tailwind CSS.
In our last lesson, you did an excellent job creating a custom theme for your profile site. You learned how to override and extend Tailwind's defaults to enforce a consistent and unique design system, which is a key practice in professional web development. This is perfect for the development phase, as it gives you a rich palette of pre-defined styles to work with.
However, this development convenience comes at a cost: a very large CSS file. This is because Tailwind generates thousands of utility classes for every color, spacing unit, and variant you've defined. Shipping such a large file to your users would result in slow page loads and a poor experience.
Today, we'll address this by learning how to optimize your project for production. You will learn how to configure Tailwind's build process to remove all unused styles, resulting in a tiny, lightning-fast CSS file. This is the final and most critical step in the Tailwind workflow.
1. The Problem: Why is the Development CSS File So Big?
During development, Tailwind's goal is to provide you with every possible class you might need. When you added your custom color palette, Tailwind didn't just create bg-primary; it also created text-primary, border-primary, hover:bg-primary, focus:bg-primary, md:bg-primary, and so on for every single color and variant.
This video from the creators of Tailwind CSS does a fantastic job of demonstrating just how quickly the file size can grow and why this is a problem for a production website.
08: Optimizing for Production – Tailwind CSS v2.0: From Zero to Production
Let's watch the first part of 'Optimizing for Production' from Tailwind Labs. It clearly illustrates how Tailwind generates a huge number of classes even from a small custom theme.
Watch from the beginning until 03:15. Focus on how adding just three custom colors results in hundreds of new CSS classes and a multi-megabyte CSS file.
As you saw, a nearly 4MB CSS file is not something we ever want to send to a user's browser. Now, let's look at the powerful and elegant solution.
2. The Solution: The Just-In-Time (JIT) Engine
In older versions of Tailwind, you had to manually set up a separate tool (PurgeCSS) to clean up your CSS file before deployment. However, since Tailwind CSS v3, this optimization process is built directly into Tailwind's core via its Just-In-Time (JIT) engine.
Here’s how it works:
Instead of generating all possible classes upfront, the JIT engine scans your project files (HTML, JavaScript, etc.), finds only the classes you've actually used, and generates a CSS file containing just those classes. This process is sometimes called "tree-shaking."
This flowchart provides a great visual summary of the process:
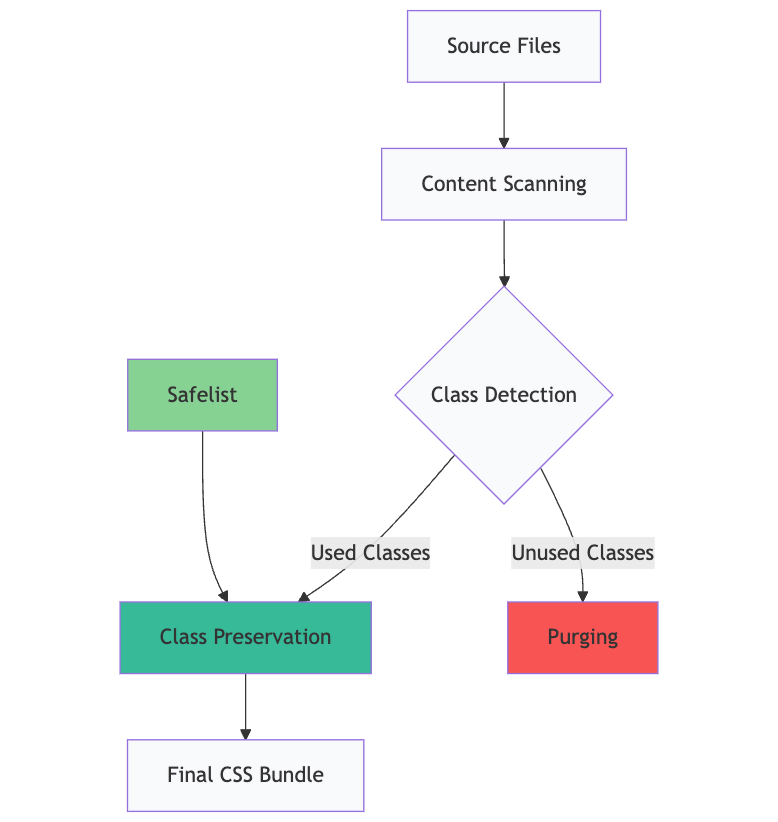
This automatic, on-demand approach is what makes modern Tailwind so powerful and efficient. You get a fantastic development experience without having to worry about a bloated production build.
A Comprehensive Guide to Setting Up and Using Tailwind CSS with Vite
This article, 'A Comprehensive Guide to Setting Up and Using Tailwind CSS with Vite', confirms this modern approach.
Please read these three short sections: 'Just-In-Time (JIT) Engine': This officially introduces the JIT concept. 'Production Optimization': This explains that optimization is now automatic in production mode. 'Q: Do I still need to purge unused CSS in Tailwind v3+?': This FAQ provides the final, clear answer.
3. Configuring the Production Build
The JIT engine is incredibly smart, but it's not a mind reader. You have to tell it which files to scan. This is done using the content array in your tailwind.config.js file. This is the most important step for production optimization.
// tailwind.config.js
module.exports = {
  content: [
    './*.html', // Scans all .html files in the root directory
    './src/**/*.{js,html}', // Scans .js and .html files in the src directory and its subdirectories
  ],
  theme: {
    // ...
  },
  plugins: [],
}
The strings in the content array are "glob patterns" that match file paths. The * is a wildcard, and ** matches any level of subdirectories.
The following video section shows exactly how to set this up and demonstrates the dramatic result.
Note: The video was made for Tailwind v2 and uses the property name purge. In v3+, this has been renamed to content. The functionality is identical.
08: Optimizing for Production – Tailwind CSS v2.0: From Zero to Production
Let's continue with the Tailwind Labs video. It will now show you how to configure the file paths for purging and the incredible impact it has on the final file size.
Watch from 03:15 to 06:16. Pay close attention to how a glob pattern is added to the purge array (which is now content) and how the final CSS file size drops from megabytes to kilobytes.
The difference is truly remarkable—from over 3MB down to just under 9KB! This is the power of Tailwind's production optimization.

4. Important Pitfalls: How to Avoid Breaking Your Styles
The JIT engine's scanner is fast because it's simple. It reads your files as plain text and looks for class names. It does not run your JavaScript or try to figure out variables. This can lead to a common pitfall: dynamically constructed class names.
Imagine you write code like this to set a text color:const myColor = 'green';element.className = \text-${myColor}-500`;`
When Tailwind scans this file, it will not find the full class text-green-500. It only sees parts like text- and -500. As a result, it will mistakenly think text-green-500 is unused and purge it from your final CSS file, breaking your styles in production.
The rule of thumb is: always write the full, complete class name in your code.
// BAD: Don't construct class names like this
const myColor = 'green';
element.className = `text-${myColor}-500`;

// GOOD: Write the full class name
const myClass = 'text-green-500';
element.className = myClass;
This next video segment demonstrates this problem perfectly and shows you the right way to handle dynamic classes. It also covers what happens when you forget to include a file in your content array.
08: Optimizing for Production – Tailwind CSS v2.0: From Zero to Production
This is perhaps the most important part of the lesson. Understanding how Tailwind's scanner works will save you from future headaches.
Watch from 06:16 to 12:39. This clip will show you: What happens when a file (like index.html) is not included in the content array. Why concatenating strings to create class names fails during the build process. The correct pattern for applying dynamic classes by storing the full class name in your logic.
In rare cases where you can't write the full class name, you can use the safelist option in your tailwind.config.js file to prevent specific classes from being purged. You can learn more about this in the "Common Pitfalls and Solutions" section of the Minifying CSS article we referenced earlier.
5. Hands-On Practice: Building Your Site for Production
Now, let's apply this to your personal profile project. We will create a production-ready build.
-
Configure
contentintailwind.config.js:- Open your
tailwind.config.jsfile. - In the
contentarray, make sure you have a pattern that matches all of your HTML files. Since they are in the root directory, a simple pattern is all you need.
content: ["./*.html"], - Open your
-
Create a Production Build Script:
- Open your
package.jsonfile. - In the
scriptsobject, you likely have adevorwatchscript already. Add a new script calledbuild. - This script will use the Tailwind CLI to process your CSS, but with the crucial
--minifyflag. This tells Tailwind to run the JIT engine and minify the output.
// package.json
"scripts": {
  "dev": "npx tailwindcss -i ./src/input.css -o ./dist/output.css --watch",
  "build": "npx tailwindcss -i ./src/input.css -o ./dist/output.css --minify"
},
Make sure the input (
-i) and output (-o) paths match your project setup. - Open your
-
Run the Build:
- Open your terminal in VS Code.
- Run the new build script:
npm run build
-
Inspect the Result:
- After the command finishes, look at the
output.cssfile inside yourdistfolder. - It should now be a single, long, unreadable line of text. This is minified CSS!
- Check its file size. Right-click the file in VS Code's explorer and choose "Reveal in File Explorer" (or similar), then view its properties. It should be just a few kilobytes.
- Finally, open one of your HTML files (e.g.,
index.html) in your web browser to confirm that all the styles are still correctly applied.
- After the command finishes, look at the
You have now successfully created a professional, optimized build of your website!
Conclusion
Excellent work today! You have now mastered the full Tailwind CSS workflow, from development to production. You've learned not just how to build beautiful interfaces quickly, but also how to ensure they are performant and ready for the real world. This is a crucial skill that separates hobbyist developers from professionals.
Key Takeaways:
- Tailwind's development CSS file is intentionally large for a better developer experience.
- For production, Tailwind's JIT engine automatically removes all unused styles, creating a tiny CSS file.
- This optimization is configured by providing file paths to the
contentarray intailwind.config.js. - You must always write full class names in your template files, as the JIT scanner cannot assemble class names from variables or string fragments.
- Running your build with the
--minifyflag (or using a build tool like Vite) triggers this production optimization.
This lesson concludes our module on Tailwind CSS. You've come a long way, from basic styling to creating a custom, themed, and optimized static site.
In our next module, we will make a very exciting leap. We'll move from static websites to dynamic web applications by beginning our journey with Vue.js. We will start by setting up your first Vue project and exploring its core concepts of components and reactivity.