Hello! Welcome back.
In our last lesson, we built a fully functional to-do list application. You did an excellent job implementing the logic to add, complete, and delete tasks. However, as you may have noticed, all of our application's code—the template, the logic, and the styles—lives inside a single file, App.vue. While this works for small projects, it quickly becomes difficult to manage as applications grow.
Today, we will address this by introducing one of the most fundamental and powerful concepts in Vue: components. Our goal is to refactor our single-component to-do app into a more organized, professional structure. We will break it down into a hierarchy of smaller, reusable pieces. This practice is the cornerstone of building modern, maintainable web applications.
By the end of this lesson, you will have refactored the to-do app and learned:
- The importance of breaking a user interface into components.
- How to create a new Vue component.
- How parent and child components communicate.

Part 1: The "Why" of Components
Before we write any code, let's understand the concept. A component is a self-contained, reusable piece of your user interface. It has its own HTML template, JavaScript logic, and CSS styles. Think of them like Lego bricks: you combine simple, well-defined bricks to build a complex model.
The primary benefits of this approach are:
- Organization: Your project becomes a tree of components, making the codebase much easier to navigate and understand.
- Reusability: You can use the same component in multiple places without duplicating code. For example, a
UserProfileCardcomponent could be used on a friends list, in a chat window, and on a profile page. - Maintainability: When a bug occurs, you can often isolate it to a specific component, making it much faster to find and fix.
Parent-Child Communication
When you break an app into components, they need a way to communicate. Vue provides a clear and simple pattern for this: props down, events up.
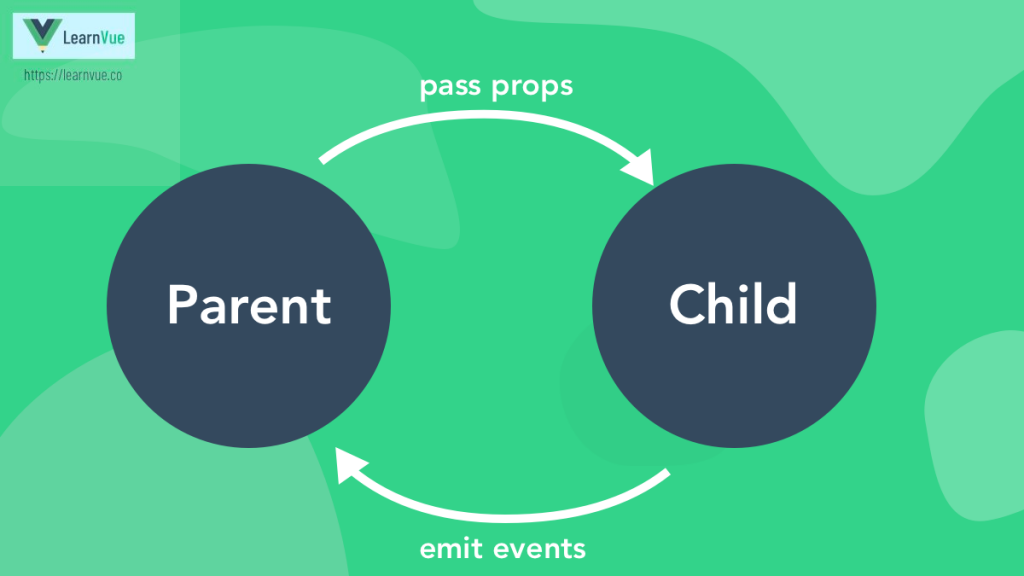
- Props (Properties): A parent component passes data down to a child component using props. These are custom attributes you can register on a component. The child receives this data and can use it in its template and logic.
- Events: A child component communicates up to its parent by emitting an event. The parent can listen for these events and run a function in response.
We will use this exact pattern to refactor our to-do app.
Part 2: Creating the TodoItem Component
Let's start by creating a component to represent a single to-do item. This is the most granular and reusable part of our list.
-
Create the Component File:
Inside your project'ssrcfolder, you should see acomponentsdirectory. Create a new file inside it namedTodoItem.vue. -
Move the Template:
OpenApp.vue. Find the<li>element and all of its contents inside thev-forloop. Cut this entire block of HTML.<!-- Cut this from App.vue --> <li v-for="todo in todos" :key="todo.id" :class="{ 'completed': todo.done }"> <input type="checkbox" v-model="todo.done" /> <span>{{ todo.text }}</span> <button class="delete-btn" @click="deleteTodo(todo.id)">Delete</button> </li>Now, open your new
TodoItem.vuefile and create a<template>block. Paste the<li>element inside it.<!-- src/components/TodoItem.vue --> <template> <li :class="{ 'completed': todo.done }"> <input type="checkbox" v-model="todo.done" /> <span>{{ todo.text }}</span> <button class="delete-btn" @click="deleteTodo(todo.id)">Delete</button> </li> </template>You can remove the
v-forand:keyattributes for now, as they belong in the parent component that does the looping.
Your editor will likely show errors because todo and deleteTodo are not defined here. Let's fix that.
-
Receiving Data with
props
TheTodoItemcomponent needs thetodoobject from its parent. We will usepropsto receive it. Add a<script setup>block toTodoItem.vueand define the props it expects.<!-- src/components/TodoItem.vue --> <script setup> // This component expects a 'todo' object to be passed to it as a prop. const props = defineProps({ todo: { type: Object, required: true } }); </script> <template> <li :class="{ 'completed': props.todo.done }"> <input type="checkbox" v-model="props.todo.done" /> <span>{{ props.todo.text }}</span> <button class="delete-btn" @click="deleteTodo(props.todo.id)">Delete</button> </li> </template>We've done two things:
definePropstells Vue that this component requires a prop namedtodo, which must be anObject.- We updated the template to use
props.todoto access the data.
-
Sending Messages with
emits
ThedeleteTodofunction lives inApp.vuebecause it needs to modify the maintodosarray. TheTodoItemcomponent cannot delete the item itself; it can only request that the parent do it. We'll use an event for this.Update your
<script setup>block to define the events this component can emit.<!-- src/components/TodoItem.vue --> <script setup> const props = defineProps({ todo: { type: Object, required: true } }); // This component can emit a 'delete-todo' event. const emit = defineEmits(['delete-todo']); </script>Now, change the delete button's
@clickhandler. Instead of trying to call a function, it willemitan event.<!-- src/components/TodoItem.vue --> <template> <li :class="{ 'completed': props.todo.done }"> <input type="checkbox" v-model="props.todo.done" /> <span>{{ props.todo.text }}</span> <button class="delete-btn" @click="emit('delete-todo', props.todo.id)">Delete</button> </li> </template>This line now says: "When this button is clicked, emit a 'delete-todo' event and include the ID of this todo as the payload."
A Quick Note on
v-model: You might wonder whyv-model="props.todo.done"works without needing an event. This is because JavaScript objects and arrays are passed by reference. Thetodoprop in the child component is a reference to the same object in the parent'stodosarray. When the checkbox changesprops.todo.done, it directly modifies the object in the parent's state, and Vue's reactivity updates the UI. While this is convenient, for more complex scenarios you would also use events to handle this, which we will explore later.
Part 3: Using the TodoItem Component in App.vue
Now that our TodoItem component is ready, let's use it in our main app.
-
Import the Component:
Go back toApp.vueand import your new component at the top of the<script setup>block.// src/App.vue import { ref } from 'vue' import TodoItem from './components/TodoItem.vue' // <-- Add this line -
Update the Template:
Find the<ul>element where your list is rendered. We're going to replace the original<li>with our new<TodoItem>component.<!-- src/App.vue --> <template> <!-- ... form ... --> <ul> <TodoItem v-for="todo in todos" :key="todo.id" :todo="todo" @delete-todo="deleteTodo" /> </ul> <!-- ... rest of template ... --> </template>
Let's break down what's happening here:
v-for="todo in todos"and:key="todo.id": The loop now creates oneTodoItemcomponent for each object in thetodosarray.:todo="todo": This is how we pass the prop. The colon:is shorthand forv-bind. This line passes the currenttodoobject from the loop down into theTodoItemcomponent'stodoprop.@delete-todo="deleteTodo": This is how we listen for the event. The at symbol@is shorthand forv-on. This line listens for thedelete-todoevent coming up fromTodoItem. When it's received, it calls thedeleteTodofunction that is still defined inApp.vue. The ID that was emitted from the child is automatically passed as an argument to this function.
Your application should now look and behave exactly as it did before! The difference is that your code is now more organized and follows professional Vue standards. App.vue is responsible for managing the list, while TodoItem.vue is responsible for displaying one item.
To learn more about breaking down a list like this, the following article provides another great example.
Hands-on: Building a TODO App with Vue 3 Composition API
The article 'Hands-on: Building a TODO App with Vue 3' provides a detailed walkthrough of this refactoring process. While it uses a slightly different syntax (TypeScript and the setup() function instead of <script setup>), the core concepts are identical.
Focus on the sections 'Creating the TodoItem Component' and 'Modifying the TODO List to Use the TodoItem Component'. Pay attention to how props and emits are defined and used to create the parent-child communication channel. This will reinforce the pattern we just implemented.
Conclusion
Fantastic work! You've successfully taken your first step into building with components. This is a massive leap forward in writing scalable and maintainable Vue applications.
Key Takeaways:
- Single Responsibility: Each component now has a single, clear purpose.
App.vuemanages the data, andTodoItem.vuedisplays it. - Component Hierarchy: You've created a simple parent-child hierarchy (
App->TodoItem). - Data Flow: You implemented the "props down, events up" pattern to allow these components to communicate effectively.
In our next lesson, we will continue to explore component communication by looking at how to pass data from a parent to a child using props, and how to communicate back up from a child to a parent by emitting custom events, building on what we've learned today.