Hello! Welcome back to your web development course.
In our first lesson, you successfully set up your professional code editor, VS Code, and equipped it with essential extensions like Prettier and Live Server. Your development environment is starting to take shape.
Today, we'll continue building out your workspace by focusing on a tool you'll use every single day as a developer: the terminal. While graphical interfaces are convenient, the command line is the bedrock of modern development, essential for version control with Git, running build tools, and managing server environments. Mastering it is a significant step toward professional fluency.
This lesson is designed to address the next learning outcome: Use the Fedora terminal to navigate directories, create files, and manage basic file operations.
By the end of this session, you will be comfortable using the terminal to create and organize the files and folders for your projects.
1. Understanding the Terminal
Before we dive into commands, it's important to understand what the terminal is and why it's so fundamental to development. It's a text-based interface to your computer, allowing you to run programs and manage your file system with commands instead of clicks.
The following reading from the Mozilla Developer Network (MDN) provides an excellent overview.
Command line crash course - Learn web development | MDN
This article, 'Command line crash course', provides a great introduction to what the terminal is and why it's a critical tool for web developers.
Please read the section titled 'Welcome to the terminal'. It covers the history, appearance, and importance of the command line in development.
As you'll start to see, using the terminal is often much faster and more powerful than using a graphical file explorer, especially when you need to perform complex or repetitive tasks.
2. Core Navigation and Inspection Commands
Let's begin with the three most fundamental commands for finding your way around the file system. The video below provides a clear, visual introduction to these concepts.
Watch this segment from 'Basic Linux Navigation' to understand the terminal prompt and your first set of commands for navigating the file system.
Please watch the following parts: The Prompt and Home Directory (0:08 - 1:37): Understand the components of the terminal prompt, the concept of the 'current working directory', and the home directory (~). Listing Contents (1:37 - 1:52): Learn the ls command. Changing Directories (2:30 - 3:00): Learn the cd command. Navigating Up and Home (6:32 - 7:28): Learn how to use cd .. to go to the parent directory and the cd shortcut to return home.
To summarize and expand on the video:
pwd(Print Working Directory): This command tells you exactly where you are in the file system hierarchy. It's like checking the "You are here" map.ls(List): This lists the files and directories in your current location. It's your way of looking around.cd(Change Directory): This is how you move. You cancdinto a subdirectory (e.g.,cd Desktop), move up to the parent directory (cd ..), or jump straight to your home directory from anywhere by just typingcd.
Getting More Information with ls
The basic ls command is useful, but we can make it far more powerful by adding flags (also called options). A flag is a modifier, usually prefixed with a dash (-), that changes a command's behavior. For web development, two flags for ls are essential:
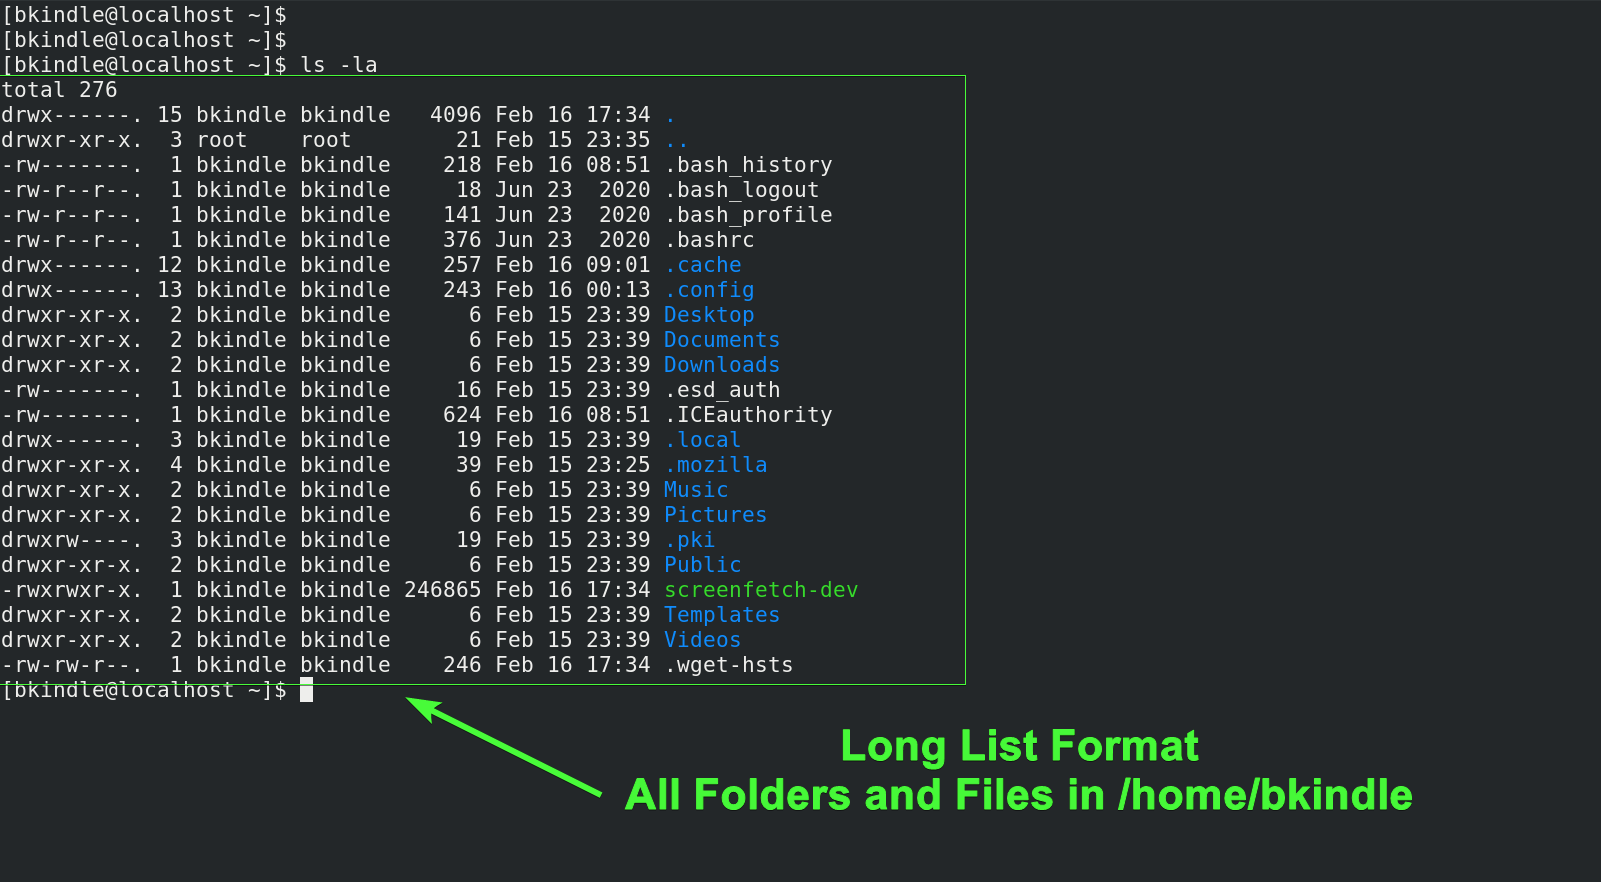
-l: Displays a long list format with detailed information (permissions, owner, size, modification date).-a: Shows all files, including hidden ones (which start with a dot, like.gitor.config).
You can combine flags, and ls -la is one of the most common commands you'll use.
The image below shows the output of ls -la. Notice the detailed columns and the hidden files (like .bash_history) that are now visible.
3. Managing Files and Directories
Now that you can navigate, let's learn how to create, move, copy, and delete files and directories. This is how you'll organize your project structures.
We'll continue with the "Basic Linux Navigation" video, which demonstrates these actions clearly.
This next segment demonstrates how to manage files and folders directly from the terminal.
Please watch these clips to learn the file management commands: Make Directory (1:52 - 2:30): Learn mkdir to create new folders. Create Files (3:41 - 4:55): See how to use a text editor like nano to create a file. We'll also cover another common command, touch, below. Remove Files (5:50 - 6:12): Learn rm to delete files. Copy Files (6:12 - 6:32): Learn cp to copy files. Copy Directories (7:28 - 8:13): Understand the -r (recursive) flag for copying directories with cp -r. Move & Rename (8:46 - 10:48): Learn mv to move and rename files. Remove Directories (11:10 - 11:54): Learn rm -r to delete directories and their contents.
Here's a quick summary of those key commands:
| Command | Description | Example |
|---|---|---|
mkdir |
Make directory | mkdir my-project |
touch |
Creates a new, empty file. | touch index.html |
cp |
Copy a file or directory. Use cp -r for directories. |
cp source.txt dest.txt |
mv |
Move or rename a file or directory. | mv old-name.txt new-name.txt |
rm |
Remove (delete) a file. | rm style.css |
rmdir |
Remove an empty directory. | rmdir old-folder |
rm -r |
Remove a directory and all its contents recursively. | rm -r my-project |
A Crucial Word of Warning:
The rm command deletes files permanently; they do not go to a recycle bin. Be especially careful with rm -r. A typo could accidentally delete your entire project or other important files. Some developers even use the -i (interactive) flag, like rm -ri my-folder, which prompts for confirmation before deleting each item.
Always double-check your pwd and the path in your rm command before hitting Enter.
4. Hands-On Practice: Creating a Project Structure
Theory is good, but practice is better. Let's use these new commands to set up the folder structure for the personal profile website you'll be building in the next module.
Open your Fedora terminal and follow these steps.
-
First, make sure you are in your home directory.
cd -
Create a
projectsdirectory if you don't already have one. This is a good practice for organizing all your work.mkdir projects -
Move into your new
projectsdirectory.cd projects -
Create the main folder for your personal profile website.
mkdir personal-profile-site -
Now,
cdinto that folder.cd personal-profile-site -
Inside, create the standard subdirectories for CSS, JavaScript, and images. You can create them all with one command.
mkdir css js images -
Create the initial HTML, CSS, and JavaScript files using the
touchcommand. Notice how you can use paths to create files inside the correct subdirectories.touch index.html css/styles.css js/app.js -
Finally, verify your entire structure. The
-R(Recursive) flag forlsis perfect for this, as it lists the contents of the directory and all its subdirectories.ls -R
Your output should look something like this:
.:
css  images  index.html  js

./css:
styles.css

./images:

./js:
app.js
You have just created a clean, professional project structure entirely from the command line!
Conclusion
Excellent work! In this lesson, you've taken a significant step in mastering your development environment. You now have the foundational command-line skills to work efficiently.
Here are the key takeaways:
- The terminal is a powerful text-based interface for managing your computer.
- You can navigate your file system using
pwd,ls, andcd. - Flags like
-land-amodify commands to provide more detail. - You can manage project structures with
mkdir,touch,cp,mv, andrm. - Caution is critical, especially with the
rmcommand, as deletions are permanent.
These commands are not just abstract exercises; they are the very tools you will use in our upcoming lessons to initialize Git repositories, manage project branches, and run development servers.
In the next lesson, we will continue setting up your environment by covering another critical piece of the web development toolchain: installing Node.js and npm.