Hello! Welcome to the next phase of your web development journey.
In the last module, you did an excellent job mastering Tailwind CSS, culminating in rebuilding your personal profile site. You now have a strong foundation in modern styling and building responsive, static web pages.
Now, we're going to take a major leap forward from static pages to dynamic, interactive web applications. This module introduces Vue.js, a powerful and popular JavaScript framework designed to build modern user interfaces. You'll learn how to make your websites "think" and react to user actions.
In this first lesson, we'll lay the essential groundwork. You'll learn how to set up a brand new Vue 3 project using create-vue, the official command-line tool, which leverages the speed of Vite. We'll then take a guided tour of the project it creates, so you understand the purpose of each file and folder from the very beginning.
1. Creating Your First Vue Project
In modern web development, we rarely start from a blank HTML file. Instead, we use scaffolding tools to generate a pre-configured project with a sensible structure and a powerful build system. For Vue, the official tool is create-vue.
create-vue uses another tool called Vite (pronounced "veet") under the hood. Vite provides an extremely fast development server and an optimized build process, making your development experience smooth and efficient.
Let's start by looking at the official documentation, which is always the best source of truth.
The official Vue.js 'Quick Start' guide details the standard command for creating a new Vue application. It's the perfect starting point.
Read the section 'Creating a Vue Application' and review the command line examples. Focus on the npm create vue@latest command and take a look at the list of optional features you'll be prompted about. We'll be using npm, so you can ignore the pnpm and yarn examples for now.
Now that you've seen the command, let's walk through the process together. The following video provides a clear, step-by-step demonstration.
Your Task:
- Open your terminal on your Fedora system.
- Navigate to the directory where you store your projects.
- Create a new directory for this module's work, for example
mkdir vue-foundations, andcdinto it. - Follow the steps in the video to initialize your first Vue project.
Learn Vue.js – Tutorial for Beginners
This video from freeCodeCamp.org provides an excellent walkthrough of scaffolding a new project with create-vue.
Watch from 15:42 to 20:25. Follow along in your own terminal. When you get to the prompts for adding features (like TypeScript, Vue Router, Pinia, etc.), select 'No' for all of them by pressing Enter. We will cover many of these tools in later lessons, but we'll start with the core of Vue first. After the project is created, run npm install and npm run dev as shown.
If everything went well, your terminal should show you a local URL (like http://localhost:5173/). Open this in your browser, and you will see the default Vue welcome page!
2. The Anatomy of a Vue Project
Now that you have a running application, let's explore the files and folders that create-vue generated. Understanding this structure is crucial for knowing where to write your code and how the different parts of the application connect.
This diagram provides a great visual map of a typical Vue project.
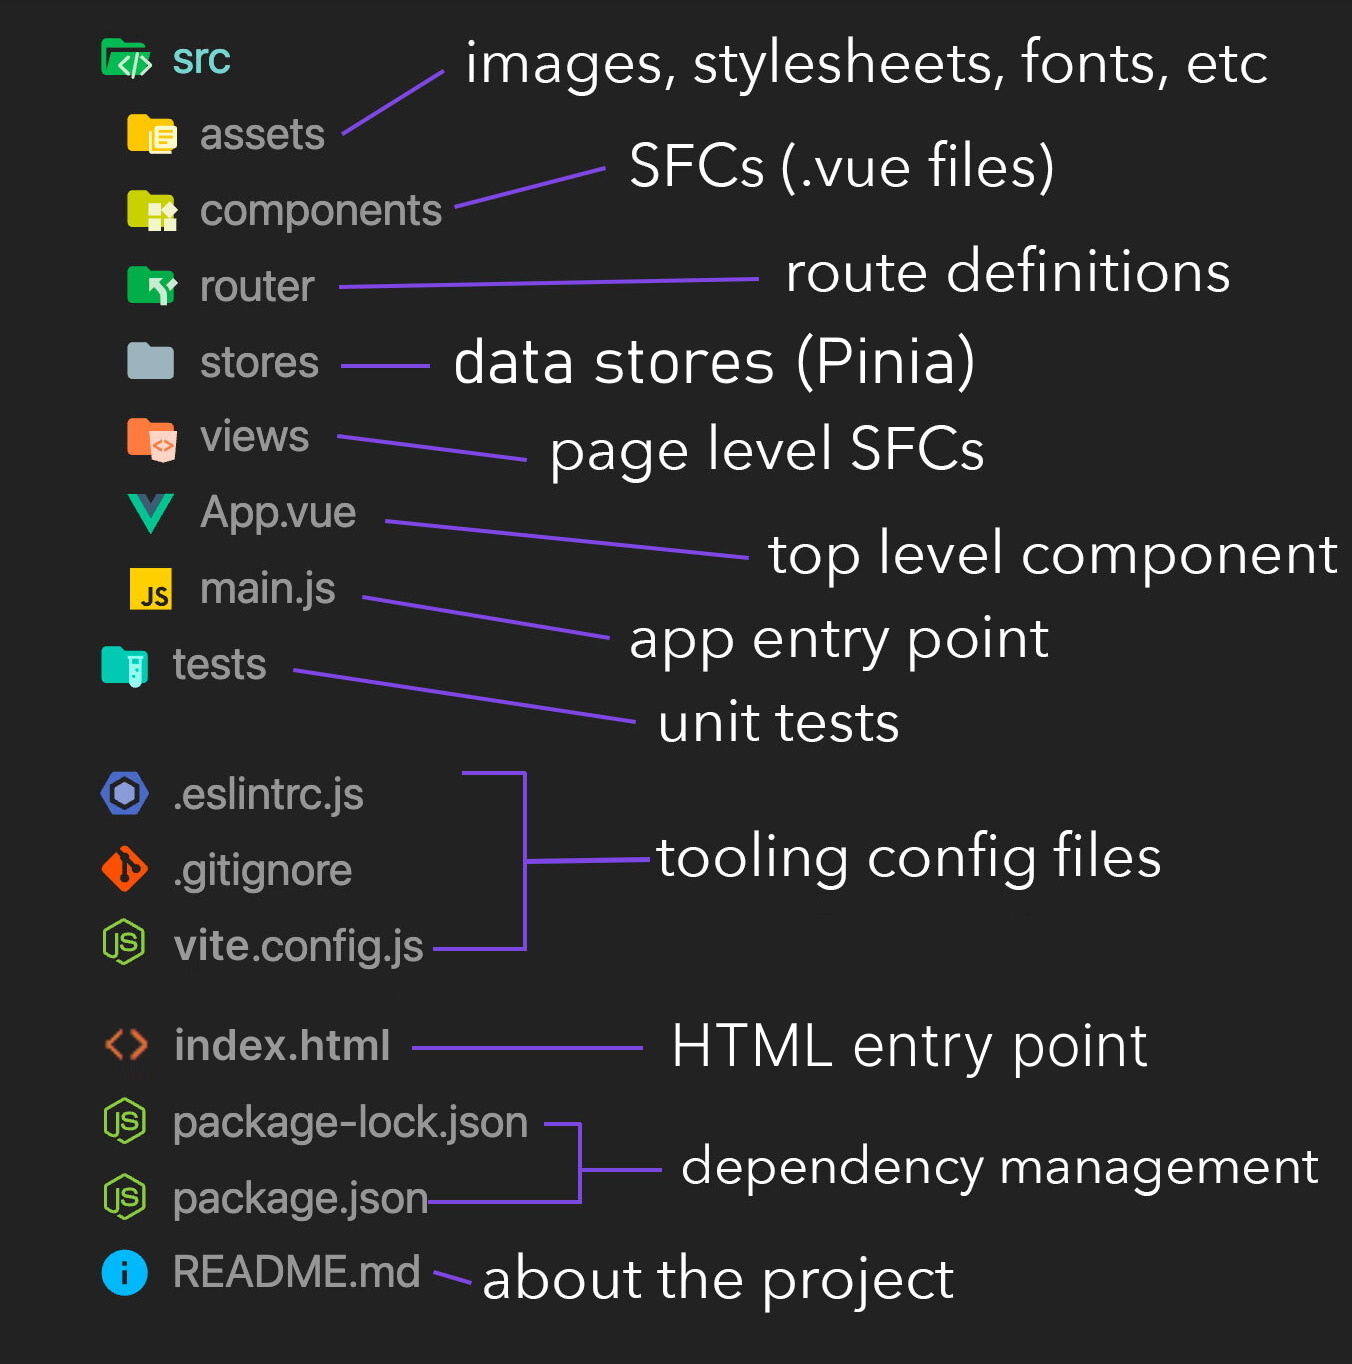
Now, let's get a guided tour of this structure.
Learn Vue.js – Tutorial for Beginners
The same freeCodeCamp.org video provides a concise tour of the project anatomy, explaining the purpose of each important file and folder.
Watch from 22:33 to 24:33. The video will walk you through the src folder, index.html, the public folder, and the main configuration files.
To solidify that information, here’s a summary of the most important pieces you'll be working with:
package.json: This file lists your project's dependencies (like thevuelibrary itself) and defines scripts likenpm run dev(to start the development server) andnpm run build(to create a production-ready version of your app).vite.config.js: The configuration file for Vite. For now, you won't need to touch this, but it's where you would add plugins or customize the build process.index.html: This is the only HTML file in your entire project. It's the main entry point that gets sent to the browser. Notice the<div id="app"></div>. Your entire Vue application will be loaded, or "mounted," inside this div.src/: This is the "source" directory where you'll spend almost all of your time.main.js: The JavaScript entry point. This file imports the root Vue component (App.vue), creates the Vue application instance, and mounts it to the<div id="app">inindex.html.App.vue: The main, top-level component of your application.components/: A folder to organize your reusable UI pieces. For example, you might create aButton.vueorNavbar.vuecomponent here.assets/: A folder for project assets like CSS files or images that will be processed by Vite during the build process.
3. Practice: Preparing a Blank Slate
The default project is great for a demo, but we're about to build our own application. A common first step is to clean out the boilerplate code to create a blank canvas. This is also great practice for navigating your new project structure.
Let's clean up the project you just created.
- Stop the development server by pressing
Ctrl + Cin the terminal. - In your VS Code file explorer:
- Navigate to
src/components/and delete all the files inside it. - Navigate to
src/assets/and delete thebase.cssfile. - Open
src/assets/main.cssand delete all of its content.
- Navigate to
- Now, open
src/App.vue. This is a Single-File Component (SFC). Notice the three parts:<template>,<script>, and<style>. Delete everything inside these three blocks, leaving just the empty tags, like this:<script setup> </script> <template> </template> <style scoped> </style> - Finally, open
src/main.js. At the top, there's a line that saysimport './assets/main.css'. This is correct, but if you see any other CSS imports (like forbase.css), delete them.
Now, restart your development server by running npm run dev in the terminal. If you look at your browser, you should see a completely blank white page.
Congratulations! You have successfully set up a Vue project and prepared a clean slate, ready for development.
Conclusion
In this lesson, you've taken the first critical step into the world of Vue.js. You now have the foundational knowledge to start any new Vue project with confidence.
Key Takeaways:
- You can create a new Vue 3 project from scratch using the official command-line tool:
npm create vue@latest. - You understand the role of Vite as a fast, modern build tool for Vue development.
- You can navigate the file structure of a Vue project and understand the purpose of key files and directories, including
index.html,src/main.js, andsrc/App.vue. - You have practiced modifying the project structure by cleaning out the default boilerplate.
In our next lesson, we'll start building. You will learn how to create your first Vue component from scratch using the Composition API and <script setup> syntax. We will also dive into reactivity, the magic that allows Vue to automatically update your user interface when your data changes.