Hello! In our last lesson, you successfully set up a new Vue project and cleared it out, leaving us with a blank canvas. That was the essential prep work. Now, the real fun begins.
Today, we'll bring that blank page to life by building your very first interactive Vue component. We'll focus on the modern, recommended way to write Vue components: the Composition API with the <script setup> syntax. You'll learn how to manage a component's data (its "state"), display it, and change it in response to user actions. This is the core foundation of building any dynamic web application in Vue.
By the end of this lesson, you will be able to:
- Explain the purpose of the
<script setup>block. - Create reactive state using
ref(). - Display and update that state in your component's template.
- Define methods to handle user interactions like button clicks.
1. The "Why": Options API vs. Composition API
Before we write any code, it's important to understand why we're using <script setup>. In your previous experience and in older tutorials, you might have seen Vue code organized into "options" like data, methods, and computed. This is called the Options API.
The modern approach is the Composition API. It allows us to group our code by logical feature, rather than by option type. This makes components, especially large ones, much easier to read, manage, and reuse. The <script setup> syntax is a clean and concise way to use the Composition API.
This image neatly illustrates the structural difference:
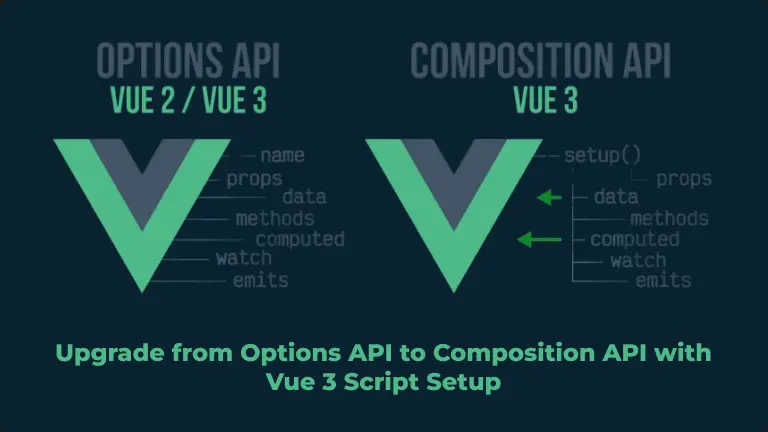
The key takeaway is that <script setup> gives us a more natural and scalable way to write our component's logic.
To get a clearer sense of the benefits, let's read a short introduction.
Vue Script Setup: Simple Guide for Vue 3 SFCs
This article from Cloudinary provides a concise explanation of what <script setup> is and why it's the preferred syntax in modern Vue development.
Read the first two sections: 'What Is Vue Script Setup and Why Use It?' and 'Vue Script Setup Syntax Basics'. Focus on the key benefits mentioned: less boilerplate code, better performance, and improved IDE support.
2. Building Our First Component: A Simple Counter
The best way to learn is by doing. Let's build a simple counter. We'll start with the project you created in the last lesson. Make sure the development server is running (npm run dev) and you have src/App.vue open in VS Code. It should be empty, like this:
<script setup>
</script>

<template>
</template>

<style scoped>
</style>
Step 1: Creating Reactive State with ref()
First, we need a place to store the number for our counter. This number is our component's state. We want the user interface to automatically update whenever this number changes. This is called reactivity, and it's at the heart of Vue.
To create a reactive variable, we use the ref() function, which we must import from vue.
Your Task:
Modify the <script setup> block in App.vue to look like this:
<script setup>
import { ref } from 'vue'

const count = ref(0)
</script>
Here's what this does:
import { ref } from 'vue': We import thereffunction from the Vue library.const count = ref(0): We declare a constant namedcountand initialize it with a reactive reference containing the value0. Any variable wrapped inref()becomes reactive.
Step 2: Displaying State in the Template
Now that we have a reactive count variable, let's display it on the page. We do this in the <template> block using a syntax called "interpolation" or "mustache syntax" ({{ }}).
Your Task:
Add an <h1> tag inside your <template> block to display the counter's value.
<template>
  <h1>The count is: {{ count }}</h1>
</template>
Save the file. Your browser should now display: "The count is: 0".
Notice we just used count, not count.value. When you use a ref inside the template, Vue automatically "unwraps" it for you, so you can access the value directly. This keeps the template clean.
Step 3: Defining a Method to Change State
Next, we need a way for the user to change the count. We'll add a button and a function (a "method") to increment the counter.
Inside <script setup>, a method is simply a regular JavaScript function.
Your Task:
- Define a function called
incrementinside your<script setup>block. - Add a
<button>to your template and use the@clickdirective to call theincrementfunction when the button is clicked.
Your App.vue file should now look like this:
<script setup>
import { ref } from 'vue'

const count = ref(0)

function increment() {
  count.value++
}
</script>

<template>
  <h1>The count is: {{ count }}</h1>
  <button @click="increment">Increment</button>
</template>
Crucial Point: Inside the <script> block, to access or change the value of a ref, you must use the .value property (e.g., count.value).
Save the file and test it in your browser. Clicking the button should now increase the count, and the <h1> should update automatically. This is reactivity in action!
3. Seeing it in Action: Old vs. New
The process we just followed is the modern way. To fully appreciate its simplicity, let's watch a video that directly compares the old way (using a setup() function with an explicit return) to the new <script setup> syntax we just used. This will solidify why <script setup> is such a big improvement.
Vue 3 Script Setup Tutorial - This Changes Everything!
This video from the 'Make Apps with Danny' channel does an excellent job of demonstrating how much cleaner and more intuitive the <script setup> syntax is.
Watch from 04:15 to 10:48. The video first shows how to create a simple component with the older setup() function, highlighting the need to return everything. Then, it refactors the exact same component to use <script setup>, clearly showing how the boilerplate disappears. Pay close attention to how ref and functions are declared and used in both styles.
As the video shows, <script setup> eliminates the need to manually return every variable and function you want to use in your template, which was a common source of minor bugs and mental overhead.
Conclusion
Excellent work! You've just created your first fully interactive Vue component using the most current, industry-standard syntax.
Key Takeaways:
- Single-File Components (SFCs) organize your component's HTML (
<template>), JavaScript (<script>), and CSS (<style>) in one file. <script setup>is the modern, concise syntax for writing your component's logic using the Composition API.- Reactivity is the system that automatically updates your UI when your data changes.
- The
ref()function creates a reactive variable. You must use.valueto access its value in the script, but not in the template. - Methods are just regular JavaScript functions declared inside
<script setup>. - The
@clickdirective is used to listen for click events and trigger methods.
To help you remember these core concepts, here is a handy cheat sheet. It covers what we did today and gives a small preview of other concepts we'll explore soon.

In the next lesson, we will expand on what you've learned. We'll explore another way to create reactive state with reactive(), learn how to handle more complex data like objects and arrays, and introduce powerful Vue directives like v-if for conditional rendering and v-for for rendering lists.