Hello! In our last lesson, you did a great job implementing a mobile-first responsive design for your personal profile site using media queries. This ensures your site looks sharp on any device, a crucial skill for any web developer. You've also been using Git branches to keep your work organized, which is excellent practice.
Today, we'll tackle a topic that can seem intimidating at first but is a normal and necessary part of using Git in any real-world project: resolving merge conflicts. A conflict is simply Git's way of saying, "I see two different changes to the same line of code, and I need a human to decide which one is correct."
Our goal for this lesson is to resolve a basic merge conflict that may arise when updating project styles. By the end, you'll understand why conflicts happen, how to spot them, and how to confidently resolve them using the powerful tools built into VS Code.
1. What is a Merge Conflict?
Imagine you and a colleague are both editing the same sentence in a shared document. You change the sentence to say "The sky is blue," and your colleague changes it to "The sky is azure." When you try to combine your work, which version should be saved? It's ambiguous.
This is exactly what happens during a Git merge. When you merge one branch into another, Git compares three things in a process called a "3-way merge":
- The tip of your current branch (your changes).
- The tip of the branch you're merging in (the incoming changes).
- Their most recent common ancestor commit (what the code looked like before either of you made changes).
If both you and the other branch have changed the same lines of code relative to that common ancestor, Git doesn't know how to automatically combine them. It flags a merge conflict and pauses the merge, waiting for you to resolve it.
To get a clear mental model of this "common ancestor" or "base," let's watch a short clip.
The EXTREMELY helpful guide to merge conflicts
The video 'The EXTREMELY helpful guide to merge conflicts' from the official Visual Studio Code channel does a fantastic job explaining the concept of the 'base' commit.
Watch from 00:31 to 02:11. Focus on understanding why the 'base' commit is the key to how Git identifies a conflict.
This diagram illustrates the scenario well. Two branches diverge from a common point, and a conflict arises when they are brought back together.

2. Hands-On: Let's Create a Conflict
The best way to learn how to solve a problem is to create it yourself in a controlled way. We'll simulate a common scenario in your personal profile project where two branches modify the same CSS rule.
Make sure you are in your project directory in the terminal and on the main branch.
Step 1: Create a feature branch and make a change.
Create a new branch to work on a hypothetical style change.
# Make sure you are on the main branch and it's up to date
git checkout main


# Create and switch to a new branch
git checkout -b update-header-color
Now, open styles.css and change the background color of your header. For example:
/* In styles.css */
header {
  background-color: #4A5568; /* A dark gray-blue */
  color: white;
  padding: 1rem 0;
  text-align: center;
}
Commit this change on the update-header-color branch:
git add styles.css
git commit -m "feat: change header background to gray-blue"
Step 2: Make a conflicting change on the main branch.
This simulates another developer's work being merged while you were busy on your feature branch.
git checkout main
Now, open styles.css again. Notice the background color is back to what it was before. Change the same property to a different value.
/* In styles.css, on the main branch */
header {
  background-color: #2D3748; /* A darker gray */
  color: white;
  padding: 1rem 0;
  text-align: center;
}
Commit this "conflicting" change on the main branch:
git add styles.css
git commit -m "fix: update header to a darker background"
Step 3: Attempt the merge and trigger the conflict.
You are now on the main branch, and you want to merge the work from your feature branch.
git merge update-header-color
Your terminal will output something like this:
Auto-merging styles.css
CONFLICT (content): Merge conflict in styles.css
Automatic merge failed; fix conflicts and then commit the result.
Congratulations, you've successfully created a merge conflict!
3. Resolving the Conflict with VS Code
Now for the main event. Don't worry, VS Code makes this process very visual and straightforward.
When you open styles.css or look at the Source Control panel in VS Code, you'll see the conflict clearly marked.
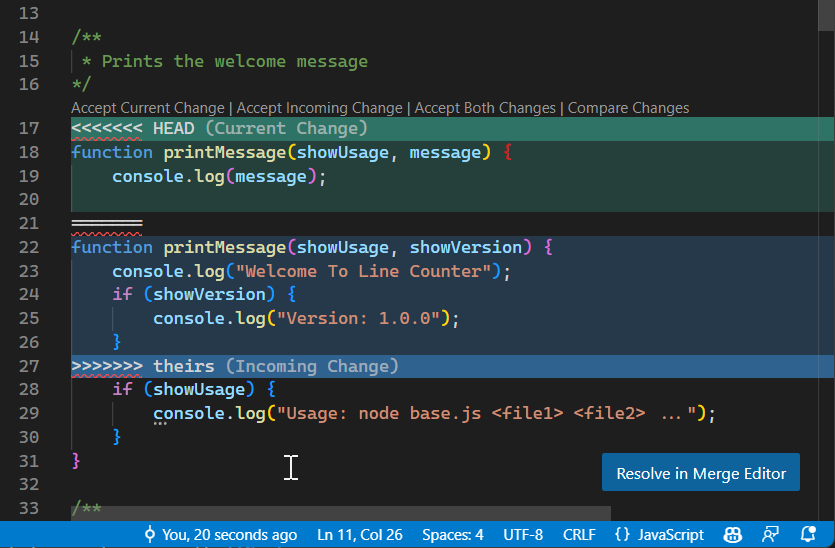
Git has inserted special markers into the file to show you the conflicting sections:
<<<<<<< HEAD: Everything below this line until the=======is the code from your current branch (main).=======: This separates the two conflicting blocks of code.>>>>>>> update-header-color: Everything between the separator and this line is the code from the incoming branch.
VS Code provides helpful "CodeLens" buttons above the conflict block:
- Accept Current Change: Keeps only the code from the
mainbranch. - Accept Incoming Change: Keeps only the code from the
update-header-colorbranch. - Accept Both Changes: Keeps both blocks of code, one after the other. (This is rarely what you want for CSS properties).
- Compare Changes: Shows a side-by-side diff view.
To resolve our conflict, simply decide which color you want. Let's say we prefer the darker gray from the main branch.
- Click Accept Current Change.
- VS Code will automatically update the file, removing the incoming change and all the conflict markers (
<<<,===,>>>). - Save the
styles.cssfile.
Now, you need to finalize the merge by telling Git you're done.
- Stage the resolved file: In the terminal, run
git add styles.css. You can also do this from the VS Code Source Control panel by clicking the+icon next to the file. - Commit the merge: Run
git commit. VS Code will open a new tab for the commit message. Git provides a default message likeMerge branch 'update-header-color'. This is usually sufficient. Just save and close that tab to complete the commit.
That's it! You've resolved the conflict. Your main branch now includes the changes from both branches, with your manual resolution applied.
For a full video walkthrough of this entire process, check out the following resource.
Resolve Git MERGE CONFLICTS: The Definitive Guide
The video 'Resolve Git MERGE CONFLICTS: The Definitive Guide' provides a clear, step-by-step demonstration of finding, understanding, and resolving a conflict, including using the VS Code interface.
Watch from 03:20 to 07:12. This covers: Using git status to identify conflicted files. Understanding the conflict markers in a file. Resolving the conflict manually and with VS Code's UI. Staging and committing the final merge.
4. Advanced Tools and Further Reading
For simple conflicts like our example, the inline editor is perfect. For more complex situations where changes are interleaved, VS Code offers a powerful 3-way merge editor. This gives you a dedicated interface with three panes: Incoming, Current, and the final Result, giving you more control.
The EXTREMELY helpful guide to merge conflicts
To see this advanced editor in action, watch this section from the VS Code channel video.
Watch from 03:25 to 07:44. You don't need to master this tool right now, but it's important to know it exists for when you face a more challenging conflict in the future.
Finally, for a comprehensive text-based guide that you can bookmark for future reference, the official VS Code documentation is an excellent resource.
Resolve merge conflicts in VS Code
The 'Resolve merge conflicts in VS Code' article from the official documentation covers everything we've discussed and more. It's a great page to have handy.
Read through the following sections to solidify your understanding: 'Recognize conflicts in VS Code' 'Resolve conflicts with inline actions' 'Use the 3-way merge editor' 'Complete the merge operation' 'Configure VS Code as default merge tool' (This is a great pro-tip to integrate VS Code with Git on the command line).
Conclusion
Excellent work! You've successfully navigated what is often a frustrating experience for developers. By understanding that conflicts are a normal part of collaboration and by knowing how to use your tools to resolve them, you've added a crucial skill to your developer toolkit.
Key Takeaways:
- A merge conflict occurs when Git can't automatically combine changes made to the same part of a file on different branches.
- Git marks conflicts with
<<<<<<< HEAD,=======, and>>>>>>> branch-namemarkers. - VS Code provides a user-friendly interface with buttons like "Accept Current Change" and "Accept Incoming Change" to resolve conflicts quickly.
- The resolution process is: resolve the conflict in the file, save it, stage it (
git add), and commit the merge. - If you ever feel overwhelmed, you can cancel the merge with
git merge --abort.
In the next lesson, you'll begin the Mini Project for this module. You'll get to apply everything you've learned about the CSS box model, Flexbox, Grid, and responsive design to fully style your personal profile site. Now, if you use branches for different parts of the project and a conflict arises, you'll be ready to handle it with confidence.