Hello! In our last lesson, we explored the concept of a data pipeline, an automated "factory line" for preparing our data for machine learning. We saw how it takes raw, messy data and transforms it into a clean, ready-to-use format.
Now, imagine this factory line. Before any machine can start working on a product, it needs to have the correct permissions. It needs a key to access the raw materials, and it needs authorization to operate. In the world of AWS, before our data pipeline can read from a data store or start a processing job, it needs permission. This lesson is about the service that acts as the master locksmith and security guard for your entire AWS account: AWS Identity and Access Management (IAM).
We will explore how IAM works, its key components, and why it's the absolute foundation for building secure machine learning workflows on AWS.
The Keys to the Castle
At its heart, AWS IAM answers one fundamental question: Who can do what?
Think of your AWS account as a kingdom full of valuable resources—data, applications, servers, and more. IAM provides the "keys to the castle," ensuring that only the right people (or applications) get access to the right rooms, and can only perform the actions they are supposed to.

To do this, IAM handles two distinct but related concepts: authentication and authorization.
AWS Identity and Access Management (IAM) – Explained With an ...
This article from freeCodeCamp provides a wonderful analogy to help distinguish between these two core ideas.
Read the introduction and the section on Authentication and Authorisation. The airport analogy of showing your passport (authentication) versus your boarding pass (authorization) is a perfect way to understand this.
To summarize the key distinction:
- Authentication is about proving you are who you say you are. (e.g., "I am User 'Alice'").
- Authorization is about what you are allowed to do once you've been identified. (e.g., "User 'Alice' is allowed to read files from this specific folder").
The Building Blocks of IAM
IAM uses four main building blocks to manage permissions: Users, Groups, Roles, and Policies. Let's break them down.
1. Users and Groups
These two are the most straightforward.
- An IAM User represents a single person (like a developer on your team) or an application that needs long-term access to AWS. Each user has its own permanent credentials, like a username and password for logging into the AWS console, or access keys for programmatic access.
- An IAM Group is simply a collection of users. Instead of giving permissions to each user one by one, you can put them in a group and give permissions to the group. This is much easier to manage. For example, you could have a
DataScientistsgroup and aDevelopersgroup, each with different levels of access.
AWS Identity and Access Management (IAM) – Explained With an ...
Let's continue with the freeCodeCamp article to see how it defines Users and Groups.
Read the sections titled What are IAM Users? and What are IAM Groups?.
2. Roles
Roles are a bit different and are incredibly important for building automated systems like data pipelines.
An IAM Role is a set of permissions that doesn't belong to a specific user. Instead, it's an "identity" that trusted users, applications, or even other AWS services can temporarily assume to perform tasks. Think of it like putting on a hat for a specific job. While you're wearing the "Data Analyst" hat, you can access the analytics database, but when you take it off, you no longer have that access.
This is the preferred way to grant permissions to applications and AWS services. For example, our data pipeline running on AWS Glue doesn't get its own permanent password. Instead, it temporarily assumes a role that gives it the permissions it needs to run, and those permissions disappear when the job is done. This is much more secure.
UPDATED - AWS Identity and Access Management (IAM) Basics | AWS Tutorials For Beginners
The video "AWS Identity and Access Management (IAM) Basics" from Tiny Technical Tutorials offers a great "wearing hats" analogy to explain roles.
Watch the segment from the hat analogy to the explanation of how users can switch roles. This gives a very intuitive feel for what it means to "assume a role."
3. Policies
So, where are the actual permissions defined? That's the job of an IAM Policy.
A Policy is a document (written in JSON format) that explicitly lists permissions. It's the "boarding pass" that says exactly what is allowed or denied. A policy is made up of statements that define the:
- Effect:
AlloworDeny. - Action: What operation is allowed (e.g.,
s3:GetObjectto read a file from S3). - Resource: Which specific thing the action applies to (e.g., a particular S3 bucket).
You attach these policies to users, groups, or roles to grant them permissions.
Mastering AWS IAM Policies: A Beginner-Friendly Guide | by Elaf Aziz
This article from Medium breaks down the structure of an IAM policy very clearly.
Read the sections What Are IAM Policies, Breaking Down an IAM Policy, and Best Practices for Beginners. Don't worry about the JSON code in detail; focus on understanding the key parts: Effect, Action, and Resource.
This brings us to the most important rule in IAM: the Principle of Least Privilege. This means you should only grant the minimum permissions necessary for a user or service to perform its task, and no more. If a user only needs to read data, don't give them permission to delete it.
Tying It All Together
The following diagram shows how these components work together. Users (like Alice the developer) can be put into Groups. A group can be assigned a Role to access specific resources. AWS services themselves (like the App Server) also use Roles to securely access other resources, like project data in S3 or a user table in a database.
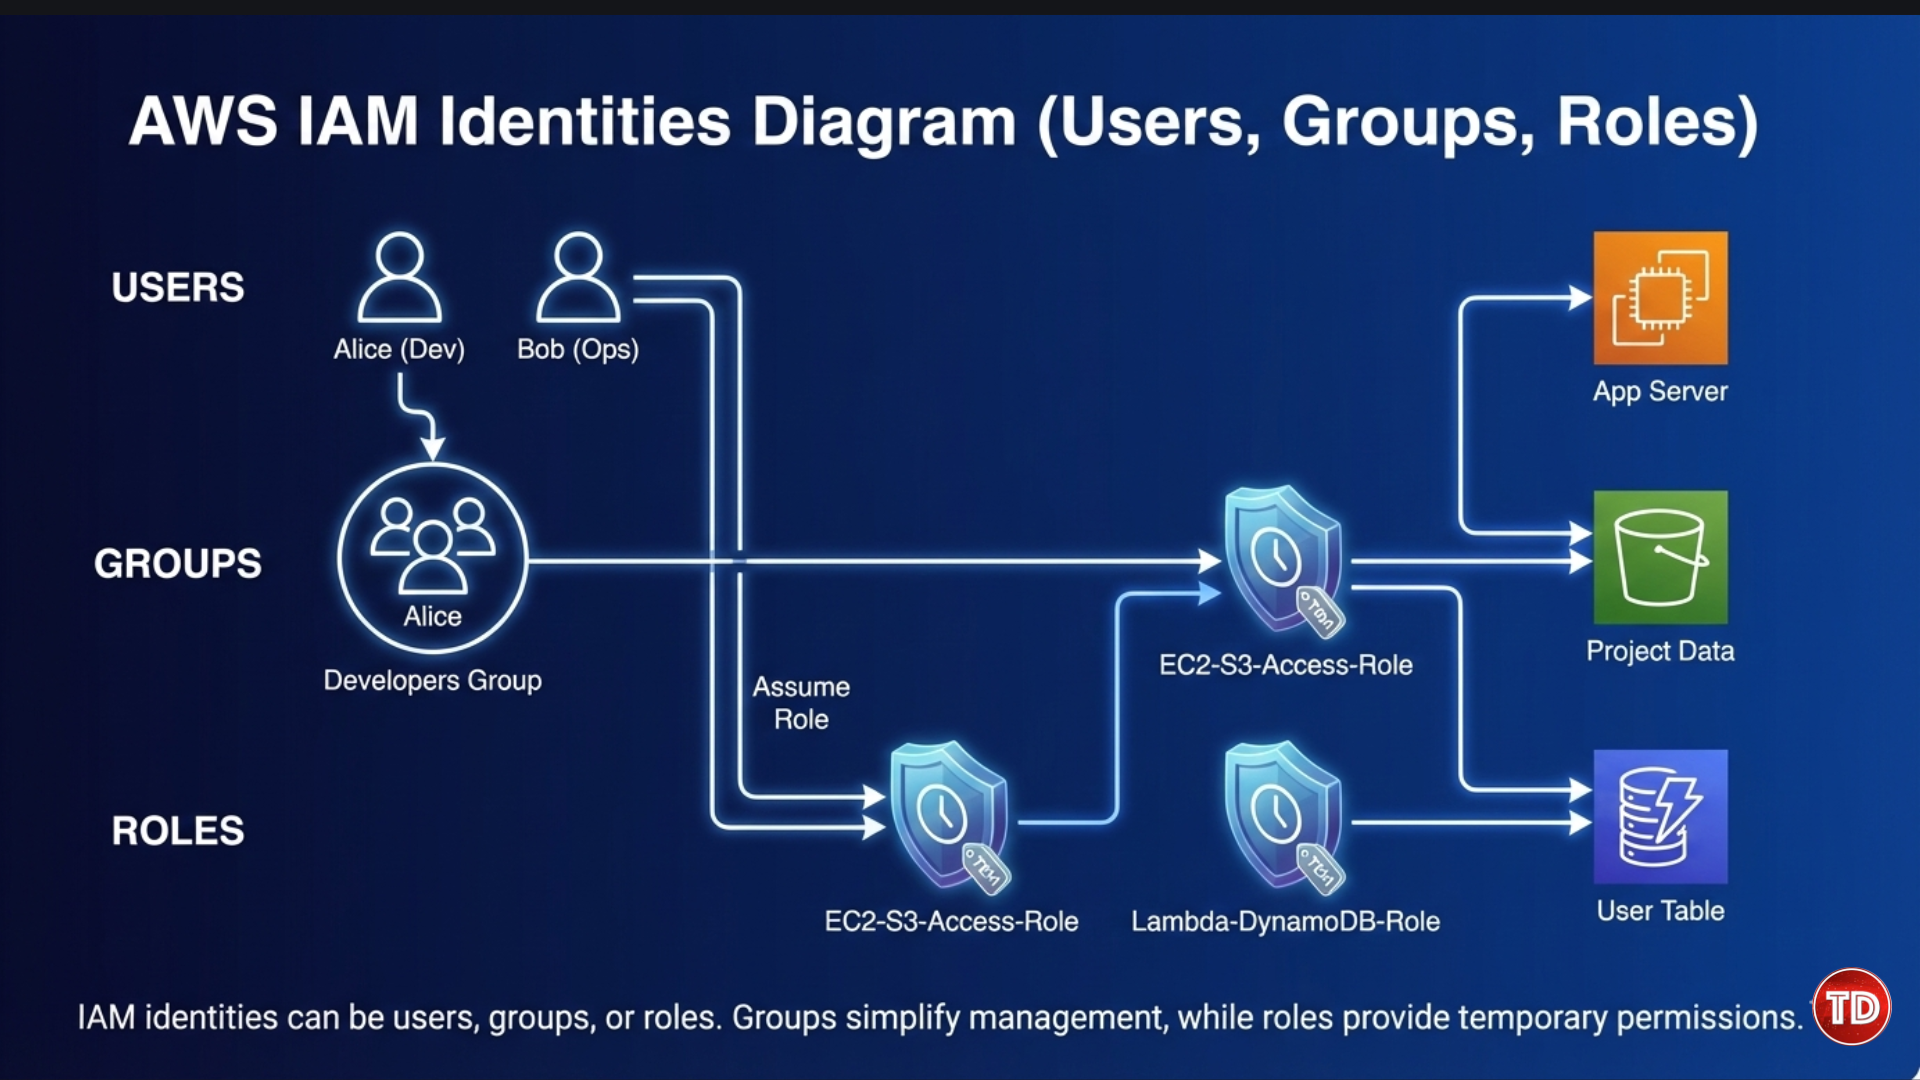
IAM in an ML Workflow: A Concrete Example
Let's apply this to the data pipeline we discussed. Imagine a pipeline that needs to read raw customer data from one S3 bucket and write cleaned, prepared data to another.
Here's how we'd use IAM securely:
- Create a Policy: We would write a policy that grants only the necessary permissions:
Allowthes3:GetObjectaction (read) on thes3-raw-databucket.Allowthes3:PutObjectaction (write) on thes3-clean-databucket.
- Create a Role: We would create a role named something like
DataPipelineRole. - Attach the Policy: We would attach our new policy to this role.
- Assign the Role: When we configure our AWS Glue job (the service running our pipeline), we tell it to assume the
DataPipelineRole.
Now, when the Glue job runs, it temporarily "wears the hat" of the DataPipelineRole and gets a short-lived set of credentials that allow it to perform only those two specific actions on those two specific buckets. It can't access any other resource or perform any other action. This is the Principle of Least Privilege in action and is the cornerstone of building secure, automated systems on AWS.
AWS Identity and Access Management (IAM) – Explained With an ...
The freeCodeCamp article concludes with a perfect real-world example of this process.
Read the final section, Example Use Case, which demonstrates exactly how to give an AWS service (in this case, an EC2 instance) permission to access an S3 bucket using a role. This is the exact pattern we use in ML pipelines.
Conclusion
You now have a foundational understanding of AWS IAM, the security backbone of your entire cloud environment. It might seem complex at first, but the core ideas are designed to be powerful and flexible.
Let's summarize the key takeaways:
- IAM controls who (identity) can do what (action) on which resource.
- It separates authentication (proving who you are) from authorization (what you're allowed to do).
- The main building blocks are Users, Groups, Roles, and Policies.
- Roles are essential for securely granting permissions to AWS services and applications, like those in our data pipelines.
- Always follow the Principle of Least Privilege: grant only the minimum permissions necessary.
Now that we understand how to securely manage access to our resources, we're ready to explore the primary storage service for machine learning data on AWS. In the next lesson, we will dive into Amazon S3, the "data lake" where all our raw and prepared datasets will live.