Hello! Welcome to your next lesson.
In our previous lessons, we explored how to manage state in web applications using server-side sessions and client-side cookies. We saw how a session provides a secure way to track a user's activity after they've been identified. But how does that initial identification happen? It starts with registration.
Today, we'll build the first crucial piece of any user-based application. Our learning outcome is to build a user registration system with secure password handling. This is a foundational skill for your goal of building complete web applications and directly ties into your interest in web security.
We will cover the entire process, from creating the database table and the HTML form to the vital back-end logic that validates user input and, most importantly, secures their password before storing it.
1. The Foundation: Database and Registration Form
Every registration system needs two things to start: a place to store user data and a form for users to submit it.
Creating the users Table
First, we need a table in our MySQL database. A basic users table will store a unique ID for each user, their chosen username, their email, the securely stored password, and a timestamp for when the account was created.
PHP MySQL Login System - Creating the Database Table
This article from Tutorial Republic provides a clear and standard SQL command to create the necessary users table. We'll use this as the blueprint for our system.
Please read the short section titled 'Step 1: Creating the Database Table'. You can execute this SQL query in your phpMyAdmin to create the users table.
The SQL command you just saw is:
CREATE TABLE users (
    id INT NOT NULL PRIMARY KEY AUTO_INCREMENT,
    username VARCHAR(50) NOT NULL UNIQUE,
    password VARCHAR(255) NOT NULL,
    created_at DATETIME DEFAULT CURRENT_TIMESTAMP
);
Notice that the password column is a VARCHAR(255). This size is important because the hashed passwords we will store are much longer than the original plaintext passwords.
The HTML Registration Form
Next, we need a standard HTML form. It will collect the user's desired username, email address, password, and a password confirmation. The form will use the POST method to send the data to our PHP script for processing.
The following resource provides a complete register.php file that contains both the PHP logic and the HTML form. For now, just focus on the HTML part.
Unlock the Web: Building Your First PHP & MySQL Login System
The article 'Unlock the Web' on dev.to has a great example of a self-contained registration page. Let's look at the HTML structure.
Scroll down to the subsection titled 'The HTML Form' within 'Building the Registration Page (register.php)'. Review the HTML code to understand the form fields (username, email, password, confirm_password) and the form's action and method attributes.
A key part of the form tag is action="<?php echo htmlspecialchars($_SERVER["PHP_SELF"]); ?>". This makes the form submit data back to the same file (register.php), which is a common pattern for simple pages. Using htmlspecialchars here is a security measure to prevent Cross-Site Scripting (XSS) attacks.
2. The Core Security: Validating Input and Hashing Passwords
With the form in place, we move to the most critical part: handling the submitted data securely. Your interest in cybersecurity makes this section particularly relevant. The number one rule of web security is: Never trust user input.
Server-Side Validation
All data coming from a user's browser must be validated on the server. Client-side validation with JavaScript is good for user experience, but it can be easily bypassed.
This video provides an excellent, detailed walkthrough of the essential validation checks.
Registration Form - Secure PHP Authentication System from Scratch Ep. 1
This video from Code Break demonstrates a robust, procedural approach to validating registration form data on the server.
Watch from 04:30 to 08:49. Pay close attention to the checks being performed for each field: Name/Username: Checking length and character validity with preg_match. Email: Using filter_var for format validation and even checking DNS records. Password: Enforcing complexity rules with a regular expression and ensuring the 'confirm password' field matches.
Password Hashing: The Modern Standard
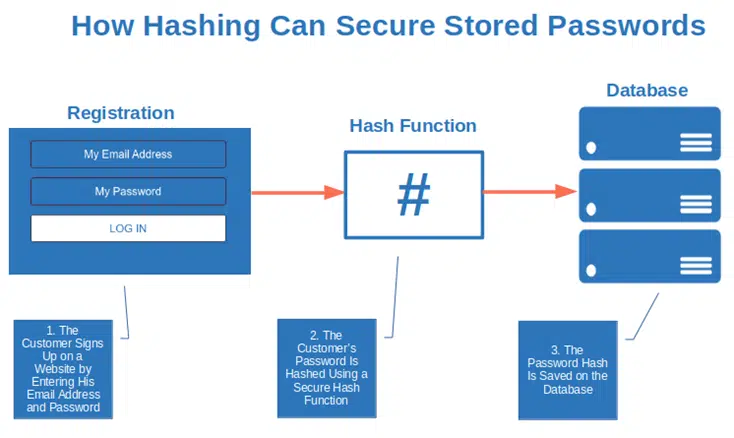
This is the single most important security step in a registration system. You must never store passwords in plaintext. If your database is ever compromised, every user's password would be exposed. Instead, we store a one-way cryptographic hash of the password.
PHP provides a modern, secure, and simple way to do this with the password_hash() function.
password_hash() does two crucial things for you automatically:
- It uses a strong, modern hashing algorithm (currently Bcrypt).
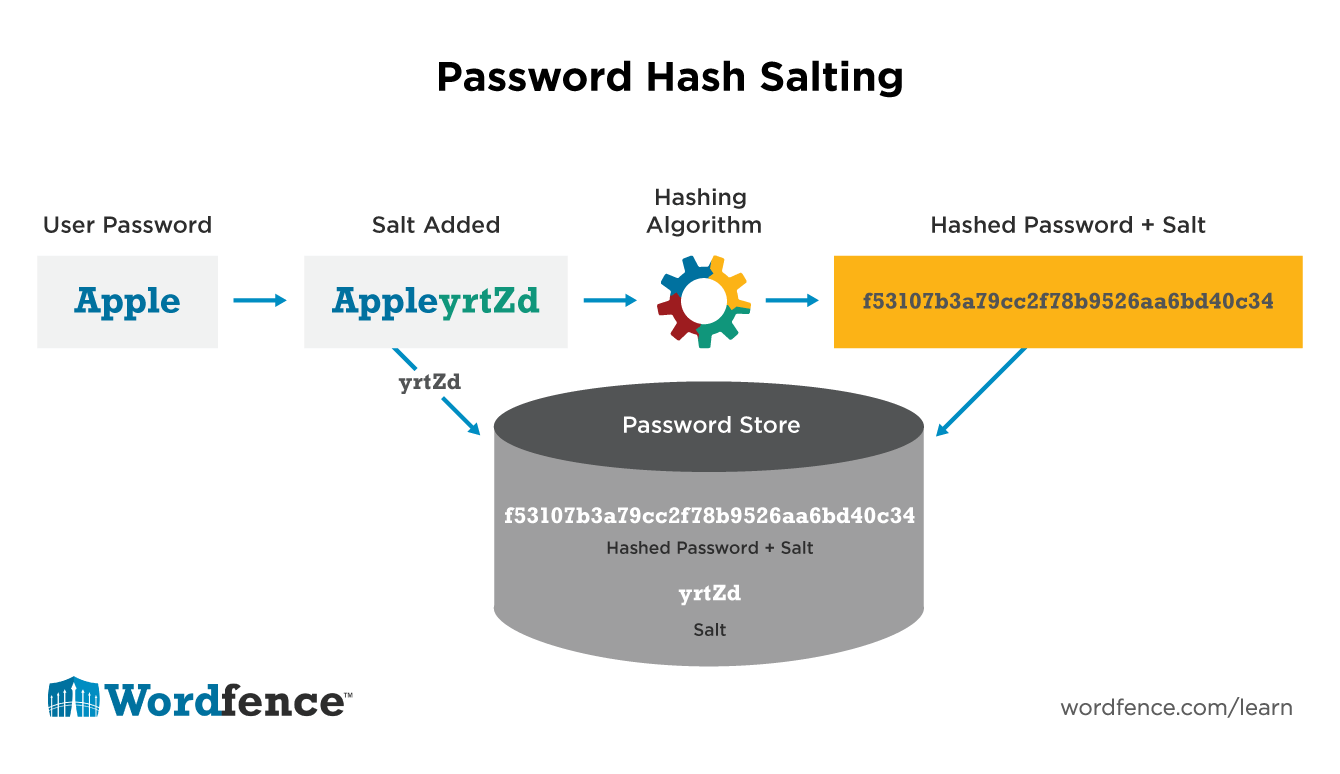
- It generates a unique and random "salt" for each password before hashing it.
Salting means that even if two users have the same password, their stored hashes will be completely different. This defends against "rainbow table" attacks.
This diagram shows the basic flow of hashing a password before storage.
And this image illustrates the vital role of the salt.
The password_hash() function handles all of this behind the scenes. All you need to do is provide the password and a constant:
$passwordFromUser = 'user-password-123';
// The PASSWORD_DEFAULT constant tells PHP to use the best algorithm available.
$hashedPassword = password_hash($passwordFromUser, PASSWORD_DEFAULT);
// $hashedPassword will now contain a long string like '$2y$10$...' which is safe to store.
3. Database Interaction: Checking and Inserting
After validating the inputs and preparing to hash the password, the final step is to interact with the database. This involves two queries:
- A
SELECTquery to check if the username or email already exists. - An
INSERTquery to create the new user account if they don't.
For both operations, we must use prepared statements. This is another non-negotiable security practice that prevents SQL Injection attacks by separating the SQL command from the user data.
Unlock the Web: Building Your First PHP & MySQL Login System
Let's return to the dev.to article. The PHP code block at the top of register.php shows a complete, procedural implementation of the entire registration logic.
Study the PHP code block under the subsection 'The PHP Logic'. Trace the logic flow from the if($_SERVER["REQUEST_METHOD"] == "POST") check. Notice: Validation: How errors are stored in variables like $username_err. Duplicate Check: The SELECT query using mysqli_prepare to check if a username or email is already taken. Insertion: The INSERT query, also using mysqli_prepare. Hashing: The line $param_password = password_hash($password, PASSWORD_DEFAULT); where the magic happens before the data is bound.
4. Putting It All Together: A Complete register.php
Now, let's look at the complete register.php file, which combines the PHP processing logic at the top with the HTML form at the bottom. This structure allows the page to process its own data and display validation errors directly next to the relevant form fields.
Here is a simplified version of the code from the article, bringing all the concepts together:
<?php
// 1. Include your database connection file (e.g., config.php)
require_once "config.php";

// 2. Define variables and initialize with empty values
$username = $email = $password = "";
$username_err = $email_err = $password_err = "";

// 3. Process form data when form is submitted
if ($_SERVER["REQUEST_METHOD"] == "POST") {

    // 4. Validate username and email (check for empty, format, and if they already exist in DB)
    // ... (Validation logic as shown in the dev.to article)
    // ... For example, checking for an existing username:
    // ... $sql = "SELECT id FROM users WHERE username = ?";

    // 5. Validate password (check for empty, length)
    // ... (Validation logic)

    // 6. Check input errors before inserting in database
    if (empty($username_err) && empty($email_err) && empty($password_err)) {

        // 7. Prepare an insert statement
        $sql = "INSERT INTO users (username, email, password) VALUES (?, ?, ?)";

        if ($stmt = mysqli_prepare($link, $sql)) {
            // Bind variables to the prepared statement as parameters
            mysqli_stmt_bind_param($stmt, "sss", $param_username, $param_email, $param_password);

            // Set parameters
            $param_username = $username;
            $param_email = $email;
            // Creates a password hash
            $param_password = password_hash($password, PASSWORD_DEFAULT);

            // Attempt to execute the prepared statement
            if (mysqli_stmt_execute($stmt)) {
                // Redirect to login page upon success
                header("location: login.php");
            } else {
                echo "Something went wrong. Please try again later.";
            }

            // Close statement
            mysqli_stmt_close($stmt);
        }
    }

    // Close connection
    mysqli_close($link);
}
?>

<!DOCTYPE html>
<html>
<head>
    <title>Sign Up</title>
</head>
<body>
    <h2>Sign Up</h2>
    <form action="<?php echo htmlspecialchars($_SERVER["PHP_SELF"]); ?>" method="post">
        <div>
            <label>Username</label>
            <input type="text" name="username" value="<?php echo $username; ?>">
            <span><?php echo $username_err; ?></span>
        </div>
        <div>
            <label>Email</label>
            <input type="email" name="email" value="<?php echo $email; ?>">
            <span><?php echo $email_err; ?></span>
        </div>
        <div>
            <label>Password</label>
            <input type="password" name="password">
            <span><?php echo $password_err; ?></span>
        </div>
        <div>
            <input type="submit" value="Submit">
        </div>
        <p>Already have an account? <a href="login.php">Login here</a>.</p>
    </form>
</body>
</html>
Conclusion
Congratulations! You have just walked through the complete process of building a secure user registration system. This is a significant step toward your goal of mastering PHP for professional web development.
Key Takeaways:
- Never trust user input: Always perform validation on the server side.
- Use
password_hash(): This is the modern, secure standard for storing passwords in PHP. It handles strong algorithms and salting for you. - Prevent SQL Injection: Always use prepared statements (
mysqli_prepareor PDO) for all database queries involving user data. - Structure is key: A typical registration script validates input, checks for duplicates, hashes the password, and then inserts the new record into the database.
Preview of the Next Lesson:
With a system to securely register users, the logical next step is to let them log in. In the next lesson, we will implement a user login system. We'll learn how to take a submitted password, compare it against the stored hash using password_verify(), and start a session for the user upon successful authentication.