Hello! Welcome back to our course on PHP mastery.
In our last lesson, we explored the theory behind the Model-View-Controller (MVC) architectural pattern. You learned that it separates an application into three distinct parts: the Model (for data and business logic), the View (for presentation), and the Controller (for handling user requests). This separation is the key to building organized, scalable, and maintainable web applications.
Today, we move from theory to practice. Our goal is to implement a front controller as a single entry point for all web requests. This is the foundational piece of the entire MVC structure, acting as the "main gate" through which every user request must pass. By centralizing request handling, we set the stage for building the rest of our application components in a clean, structured way.
1. The Old Way: The Problem with Multiple Entry Points
Before we build a front controller, it's important to understand the problem it solves. In simpler PHP applications, it's common to have a separate PHP file for each page. For example, you might have:
home.phpabout.phpproducts.phpcontact.php
The web server directly maps the URL to the file. While this works for small sites, it quickly becomes a maintenance nightmare as the application grows.
To see why, please watch the beginning of the following video, which contrasts this traditional approach with the front controller pattern.
Build a PHP Framework: The Front Controller
This video by Dave Hollingworth clearly explains the limitations of having multiple PHP files as entry points and introduces the front controller as the solution.
Watch from the beginning to 02:58. Pay attention to the problems he identifies, such as code duplication and maintenance difficulties.
As the video explains, the main drawbacks of the multiple-file approach are:
- Code Duplication: Common code for things like database connections, session management, and HTML headers/footers must be included in every single file.
- Inconsistent Security: It's easy to forget to include a crucial security check in one of the many files, leaving a vulnerability.
- Maintenance Headaches: If you need to change how the database is loaded, you have to edit every file that uses it.
The solution is to funnel every request through one single script: the front controller.
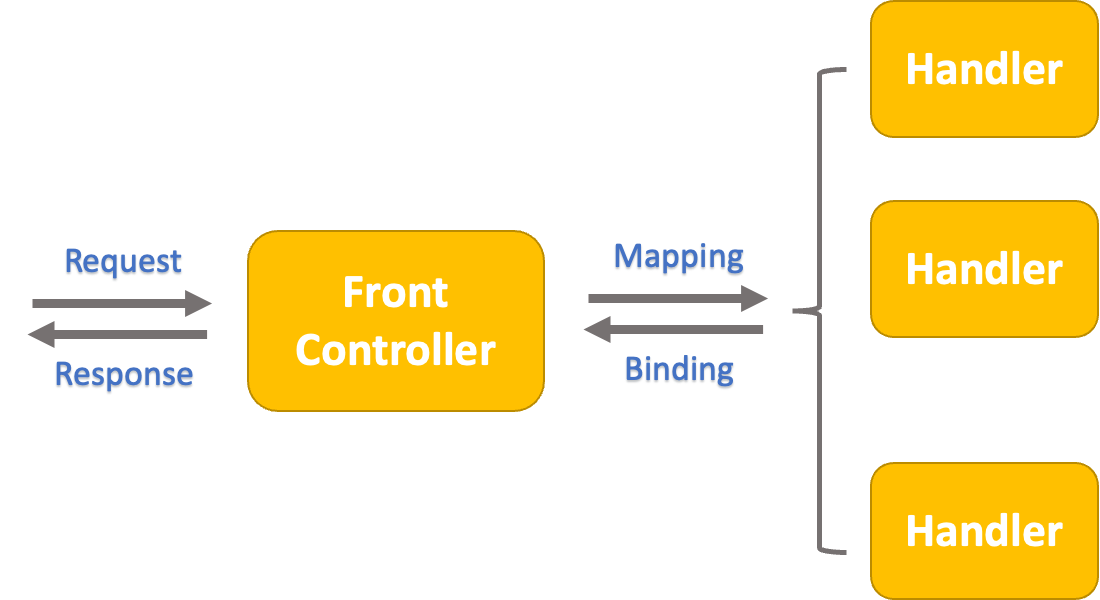
2. Creating the Single Entry Point
To implement a front controller, we need to do two things:
- Configure the web server to redirect all non-file requests to a single PHP file.
- Create that PHP file (
index.php) to receive and handle these requests.
Step 1: Web Server Configuration
We'll use a file called .htaccess to tell the Apache web server how to handle incoming requests. This file will contain rules that redirect traffic to our index.php file.
The next video explains exactly how to set up this redirection.
Routes, Routers and Routing in PHP
In this video, the same instructor will walk you through creating an .htaccess file to route all requests to index.php.
Watch from 01:27 to 02:49. Focus on understanding the purpose of each line in the .htaccess file.
For your reference, here is the code discussed in the video. You would create a file named .htaccess in your project's root directory and add the following content:
RewriteEngine On


# If the request is for an existing file, serve it directly
RewriteCond %{REQUEST_FILENAME} !-f


# If the request is for an existing directory, serve it directly
RewriteCond %{REQUEST_FILENAME} !-d


# Otherwise, redirect the request to index.php
RewriteRule ^ index.php [L]
RewriteEngine On: Enables the URL rewriting module.RewriteCond: These two lines are conditions. They prevent the rule from applying to requests for existing files (like CSS or image files) or directories. This is important so your assets can load normally.RewriteRule ^ index.php [L]: This is the main rule. It takes any request (^) and internally forwards it toindex.php. The[L]flag means this is the last rule to be processed.
With this in place, a request to /about or /products/view/123 will now be handled by index.php instead of looking for about.php or products/view/123.php.
Step 2: The index.php Front Controller
Now that all requests are funneled to one place, we need to create that file and figure out what the user was originally asking for. A common security practice is to place your index.php file inside a public directory and set that as your web server's document root. This ensures that sensitive files (like configuration or application logic) stored outside the public directory are not directly accessible from a browser.
Let's create public/index.php. Inside this file, we can access the original requested URL path from PHP's $_SERVER superglobal.
The next segment of the video shows how to capture and clean up this URI.
Routes, Routers and Routing in PHP
Now let's see how to access the original URL from within our new front controller script.
Watch from 02:49 to 04:37. Note how the $_SERVER['REQUEST_URI'] variable is used and how parse_url() helps to remove the query string.
So, our public/index.php file will look like this:
<?php

// Get the requested URI
$uri = parse_url($_SERVER['REQUEST_URI'], PHP_URL_PATH);

echo 'Requested URI: ' . htmlspecialchars($uri);

// For example:
// A request to http://your-site.com/about will output: "Requested URI: /about"
// A request to http://your-site.com/products?id=10 will output: "Requested URI: /products"
Now, no matter what URL a user visits, our index.php script is in control. We've successfully implemented a single entry point!
3. A Simple Routing Mechanism
The final step is to do something based on the URI we've captured. This process is called routing. We will build a proper, object-oriented router in the next lesson, but for now, we can use a simple switch statement to demonstrate the concept.
Routes, Routers and Routing in PHP
This final clip shows a basic way to handle different URIs using a switch statement, which acts as a very primitive router.
Watch from 04:37 to 05:14 to see the switch statement in action.
Let's update our public/index.php to include this basic routing logic:
<?php

$uri = parse_url($_SERVER['REQUEST_URI'], PHP_URL_PATH);

switch ($uri) {
    case '/':
        echo 'Welcome to the homepage!';
        break;

    case '/about':
        echo 'This is the about page.';
        break;

    case '/contact':
        echo 'Contact us here.';
        break;

    default:
        http_response_code(404);
        echo '404 - Page Not Found';
        break;
}
Now, when you visit /, /about, or /contact, you'll see different messages. Any other URL will result in a 404 "Not Found" error. This index.php file is our front controller, and the switch statement is its brain, deciding what to do for each request.
While functional, you can probably see how this switch statement would become huge and unmanageable in a real application with hundreds of routes. This limitation is exactly what we will address next.
Conclusion
Congratulations! You've just implemented one of the most important patterns in modern web development. By creating a front controller, you've moved from a scattered, file-based approach to a centralized, organized architecture. This is the first practical step in building an application using the MVC pattern.
Key Takeaways:
- A front controller is a single script (e.g.,
public/index.php) that acts as the entry point for all web requests to your application. - We use web server configuration (like an
.htaccessfile for Apache) to redirect all relevant traffic to this one script. - Inside the front controller, we can inspect the requested URI using
$_SERVER['REQUEST_URI']to determine what the user wants. - This centralized model solves problems of code duplication and makes it easier to manage security, configuration, and other global tasks.
Preview of the Next Lesson:
Our simple switch statement router works, but it's not a scalable solution. In the next lesson, "Create a basic router to parse request URIs and dispatch to controller methods," we will replace this switch statement with a flexible, object-oriented Router class. This will allow us to cleanly map URIs to specific Controller classes and methods, bringing us much closer to a complete MVC framework.