Hello! Welcome to the third module of the course.
In the last module, we completed a comprehensive look at corner kicks. You learned how to analyse attacking and defensive strategies on video and, in our most recent lesson, how to use performance data like Key Performance Indicators (KPIs) and Expected Goals (xG) to evaluate their effectiveness.
Now, we shift our focus to the second major set-piece category: free kicks. Just like with corners, a coach's first job is to understand the situation. The location of a foul completely changes the tactical landscape—the threats, the opportunities, and the likely strategies from both teams.
This lesson is the foundation for everything that follows in this module. We'll be focusing on the learning outcome: Classify free kick situations by pitch location and angle to determine threat level. By the end of this hour, you'll be able to look at where a free kick is given anywhere in the attacking half and immediately categorise it, assess its danger, and anticipate the most probable attacking action.
1. A Framework for Free Kick Classification
As a starting point, we need a simple, practical system to categorise free kicks. While every situation is unique, most fall into a few key types based on their location. An experienced coach instantly recognises these zones and the primary tactics associated with them.
Let's explore a common classification system that divides free kicks into six types.
Set pieces: The 6 Types of Free Kicks in Football
The article 'Set pieces: The 6 Types of Free Kicks in Football' from MBP School provides a clear and practical framework. It breaks down free kicks based on their position on the pitch, which is exactly how a coach thinks.
Please read the descriptions for all six types of free kicks: The Central Free Kick The Wide Free Kick Medium Wide Free Kick Indirect Free Kicks (Note: this is a special rule, but often occurs in dangerous locations) Far Wide Free Kick Far Free Kick \nAs you read, focus on how the location of the free kick dictates the most likely action (e.g., direct shot vs. cross).
This article gives us a solid vocabulary. We can summarise the key attacking zones as:
- Central: Close to the goal, prime territory for a direct shot.
- Wide: In the channels near the penalty box, ideal for crossing.
- Medium Wide: Further out in the channels, offering more variety (cross, short pass, etc.).
- Far: Near the halfway line (central or wide), where the choice is often between launching the ball into the box or playing a short pass to retain possession.
Here are some visuals to help cement these locations.
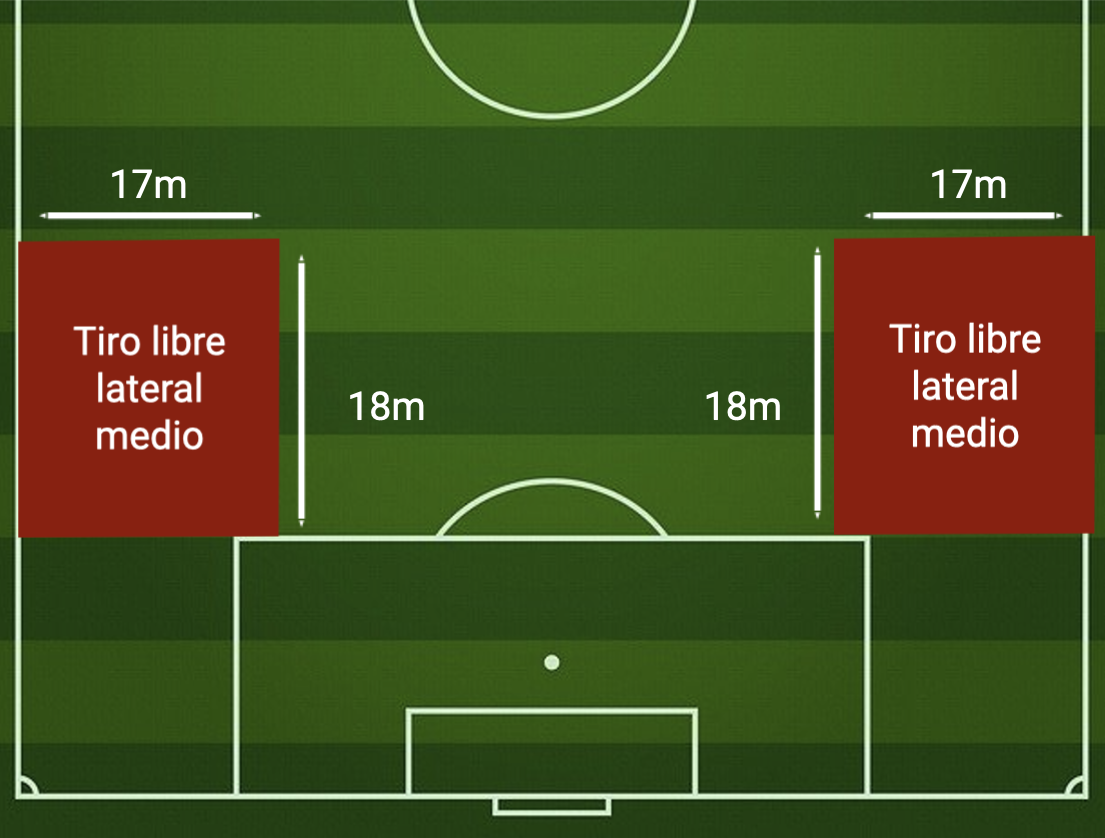

2. From Classification to Threat Assessment
Categorising a free kick is the first step. The second is evaluating its threat level. This is where we re-introduce the data-driven thinking from our last lesson. A free kick's threat is a function of its location and angle to the goal, which directly correlates to the potential xG of any resulting shot.
A scientific study on shooting opportunities provides a fantastic model for this. While the study looked at all shots, not just free kicks, its method for zoning the pitch based on threat level is perfectly applicable.
Highlighting Shooting Opportunities in Football - PMC - NIH
The research paper 'Highlighting Shooting Opportunities in Football' uses positional data to map out the most dangerous areas on the pitch. We'll focus on how they defined these zones to build our understanding of threat levels.
Please read two parts of this paper: Start with Section 2.4. Distribution of the Shooting Zones and the Level of Threat. This is the most important part. Pay close attention to how they divide the final 30 metres of the pitch into zones and why they label some as more threatening than others (based on angle and distance). Then, read the first three paragraphs of Section 4.1. Heatmaps and the Threatening Zones in the Discussion. This section explains the tactical implications: why defenders prioritise protecting certain zones, which in turn creates space elsewhere. \nDon't worry about the statistical methods; focus on the concept of the zones and their relative danger.
The key insight from this research is that not all locations are created equal. We can create a "Threat Hierarchy" based on their model:
- Maximum Threat Zones (Zones 4, 5, 6 in the paper): These are the areas inside the penalty box, particularly the central corridor in front of the goal. Any shot from here has a high probability of success (high xG). The primary goal of a free kick from a wide area is to deliver the ball into one of these zones.
- Medium Threat Zones (Zones 2 & 3): These are the wide areas near the penalty box. A direct shot is very difficult (low angle), but they are prime locations for dangerous crosses. The threat is indirect—it comes from the quality of the delivery.
- Lower (but significant) Threat Zone (Zone 1): This is the central area outside the penalty box. The research notes that while this zone is further from goal, defenders often prioritise protecting the box, leaving more space here. This creates opportunities for direct shots (as seen in the "Central Free Kick") and makes it a critical area for analysis. A free kick here is dangerous precisely because it can directly test the goalkeeper or exploit the space the defence has conceded.
The paper's discussion highlights a crucial tactical dynamic: defences will pack the Maximum Threat Zones, forcing attackers to operate in the other areas. As a set-piece coach, your job is to design plays that can breach this defensive focus.
3. Synthesising a Practical Model
Now, let's combine the practical classifications from the first article with the threat assessment model from the scientific paper. This gives you a complete, two-step process for analysing any free kick.
Here is a table summarising this synthesised approach:
| Free Kick Type (Classification) | Location on Pitch | Threat Zone (Assessment) | Primary Threat & Tactical Approach |
|---|---|---|---|
| Central Free Kick | Central, 18-25m from goal | Zone 1, bordering Maximum Threat zones | High (Direct). High xG potential from a direct shot over or around the wall. |
| Wide Free Kick | Wide channels, near penalty box line | Zones 2 & 3 | Medium (Indirect). Threat comes from delivering the ball into the Maximum Threat zones for a header/shot. High-quality delivery is key. |
| Medium Wide Free Kick | Wide channels, further from penalty box | Zones 2 & 3 (further back) | Medium (Indirect/Hybrid). Similar to a Wide Free Kick, but the extra space allows for more variation (e.g., short pass routines) to manipulate the defence. |
| Far Free Kick (Central/Wide) | Near the halfway line | Outside the defined threat zones | Low (Positional). Threat is not immediate. The choice is between a long, hopeful ball into the box (low % play) or a short pass to recycle possession and build an attack. |
| Indirect Free Kick | Inside the penalty area | Maximum Threat Zones | Very High (Situational). A rare but extremely dangerous situation. The defence must form a wall on the goal line, but the attacking team has a free touch in the most valuable area of the pitch. |
This table is your mental checklist. When a foul is given, you should instantly be able to run through this process:
- Classify: "Okay, this is a Medium Wide Free Kick on the left."
- Assess: "That means we're in a Medium Threat zone. The primary threat isn't a shot from here, it's a delivery into the box. The defence will be worried about an inswinger aimed at the six-yard box."
Conclusion
In this lesson, you have established the foundational skill for analysing free kicks. You have learned not just to name the different types of free kicks but to connect their location and angle directly to their strategic value and threat level.
Key Takeaways:
- Location Dictates Tactics: A free kick's position on the pitch is the single most important factor in determining the attacking and defensive strategy.
- A Hierarchy of Threat: The pitch can be mapped into zones of varying threat, with the central area inside the penalty box being the most valuable real estate. The goal of most indirect free kicks is to move the ball into these high-threat zones.
- Synthesise Classification and Assessment: The practical role of a coach is to instantly combine a classification ("Wide Free Kick") with a threat assessment ("Medium threat, cross expected") to anticipate and plan.
Preview of the Next Lesson:
Now that you can classify situations and understand the inherent threats, it's time to get creative. In our next lesson, we will begin designing routines. You will learn how to design direct and indirect attacking free kick routines, applying your new understanding of pitch geography to create goal-scoring opportunities.