Hello! Welcome back.
In our last lesson, we established a strong theoretical foundation by comparing the three main systems for defending corners: man-marking, zonal marking, and hybrid marking. We analysed their respective strengths, weaknesses, and even looked at performance data to understand why zonal systems have become so popular at the elite level.
Today, we move from theory to practice. Our learning outcome is to assign specific player roles and responsibilities within a chosen defensive corner system. We'll break down the specific jobs that need doing—from protecting the goal line to launching a counter-attack—and discuss what kind of player is best suited for each task. This is the crucial process of turning a tactical blueprint into a clear, actionable plan for your players.
Universal Roles: The Building Blocks of Any System
Before we dive into the specifics of man-marking or zonal setups, let's identify several key roles and responsibilities that a coach must assign regardless of the overarching system. Answering these questions is the first step in organising your defence.
To explore these roles, we'll watch a video that gives excellent general advice on defending corners.
Soccer Coaching - How to Defend Corners - General Advice
This video, 'How to Defend Corners - General Advice' from Jack Norbury - Football Coach, breaks down several individual jobs and considerations that apply to any defensive corner setup.
Watch the video, focusing on the specific responsibilities discussed in these segments: Players on Posts (01:08 - 03:34): What are the pros and cons of placing players on the goal line? Players Left Upfield (03:34 - 06:00): Why leave players up, and how does it affect the opposition? Goalkeeper's Role (06:00 - 07:34): What are the key decisions a goalkeeper must make? Short Corner Defence (09:19 - 10:14): Who is responsible for pressing a short corner? Covering the Edge of the Box (10:14 - 12:15): Who deals with cleared balls (second balls)? Organising the Line (12:15 - 13:54): Who leads the defence in pushing out after a clearance?
Let's summarise those key roles and the decisions you need to make as a coach:
- Goalkeeper: The commander of the six-yard box. Their key decision is whether to catch (high-risk, high-reward) or punch (safer). Their confidence and dominance heavily influence how much space the rest of the defence needs to cover.
- Post-Players: A traditional safety measure. A player on the near post can clear under-hit deliveries, while players on both posts provide goal-line protection. The major trade-off is that each player on a post is one less player available to mark an opponent or a zone. Many top teams now omit them to free up defenders.
- Counter-Attack Outlets: Leaving one or two players upfield forces the opposition to keep defenders back, reducing the number of attackers in your box. Your fastest players are ideal for this role, as they pose a credible threat that the opposition cannot ignore.
- Edge-of-Box/Second Ball Players: Not every corner is cleared cleanly. You must assign players (often midfielders) the job of covering the edge of the penalty area to press opponents who receive a clearance and win the "second ball."
- Short Corner Presser: You must have a designated player (or players) responsible for immediately closing down a short corner. This is often the player in the nearest zonal position or the player marking the opponent who comes short.
- Line Organiser: After a clearance, the defence must push up together to catch attackers offside and reset the defensive shape. This requires a leader (often a centre-back or the goalkeeper) to give the command to "push out."
Assigning Roles in a Man-Marking System
In a man-marking system, the primary responsibility is simple: stick with your assigned opponent. The main coaching decision is how to create the most favourable individual matchups.
Soccer Coaching - Defending Corners: Zonal Marking vs Man Marking
Let's revisit the 'Soccer Coaching - Defending Corners' video, which asks the key questions a coach must consider when assigning man-marking roles.
Watch the clip from 02:39 to 03:45. Pay close attention to the different criteria you can use to pair defenders with attackers.
As the video explains, you have several options for matchups:
- Height for Height: Your tallest players mark their tallest players.
- Strength for Strength: Your best headers of the ball, regardless of height, mark their biggest aerial threats.
- Positional: Your centre-backs mark their centre-backs, your full-backs mark their full-backs, etc.
Now, let's look at a complete list of roles for a man-to-man system.
[PDF] Three strategies for defending corners: Zonal, Man to Man and ...
This PDF, 'Three strategies for defending corners', provides a clear, numbered breakdown of each player's responsibility in a man-to-man setup.
Read the 'Roles and responsibilities' section under 'Man-To-Man Marking'. Notice how it defines a job for all 11 players, from the goalkeeper to the players on the edge of the box.
In summary, a typical man-marking assignment sheet might look like this:
- Goalkeeper: Commands the 6-yard box.
- Player on Near Post: Provides goal-line protection.
- 5-6 Designated Markers: Each assigned a specific opponent based on height, aerial ability, etc. Their job is to prevent their player from getting a free header.
- 1 'Free' Player/Goalkeeper Protector: Marks the space around the keeper or picks up any player trying to block the keeper.
- 2 Edge-of-Box Players: Cover second balls and launch counter-attacks.
- 1 Player Higher Upfield: Provides a primary counter-attacking outlet.
Assigning Roles in a Zonal System
In a zonal system, you are assigning players to spaces, not opponents. The key is to place players with the right attributes in the most critical zones.
First, let's establish a clear framework for the different zones that need defending.
Guide To Zonal Marking From Corners - Set-Piece Analysis
The article 'Guide To Zonal Marking From Corners' provides an excellent visual framework, breaking the key defensive area into nine distinct zones.
Read the section 'First Line Structures' and study the diagram that labels the nine positional zones (e.g., 'Near Post High', 'Central Near', 'Back Post Deep'). This terminology is very useful for a coach.
With this framework in mind, the coach's job is to decide which players are best suited to defend which zones. This decision is based on player attributes.

Different zones demand different qualities:
- Near-Post Zones: Deliveries here are often fast and low. This requires players who are brave, agile, and have good concentration to react quickly and get to the ball first. Height is less important than timing and alertness.
- Central Zones: This is the prime scoring area. You need your best aerial players here—those with a combination of height, jumping reach, strength, and heading ability—to dominate and attack the ball at its highest point.
- Back-Post Zones: The ball travels further and is in the air longer, so players need to read the flight of the ball well. Good positioning and awareness are key.
- Second Line/Blockers: In a more sophisticated zonal system, you can assign players to a "second line" just in front of the main zonal group. Their job isn't to win the header, but to block and impede the runs of attackers, disrupting their momentum so they can't get a clean jump on your primary zonal defenders.
Assigning Roles in a Hybrid System
A hybrid system seeks the best of both worlds. You use some players to defend key zones and others to man-mark the opposition's most dangerous threats.
The core decisions here are:
- Who are our best zonal defenders? Typically, your strongest aerial players are placed in the central zones to control the most dangerous space.
- Who are the opponent's biggest threats? Identify their 2-3 most dangerous players from set-pieces.
- Who are our best man-markers? Assign your most disciplined and athletic defenders (who are not in zonal roles) to man-mark those key threats.
The remaining players will fill the other universal roles: pressing short corners, covering the edge of the box, and staying up for the counter.
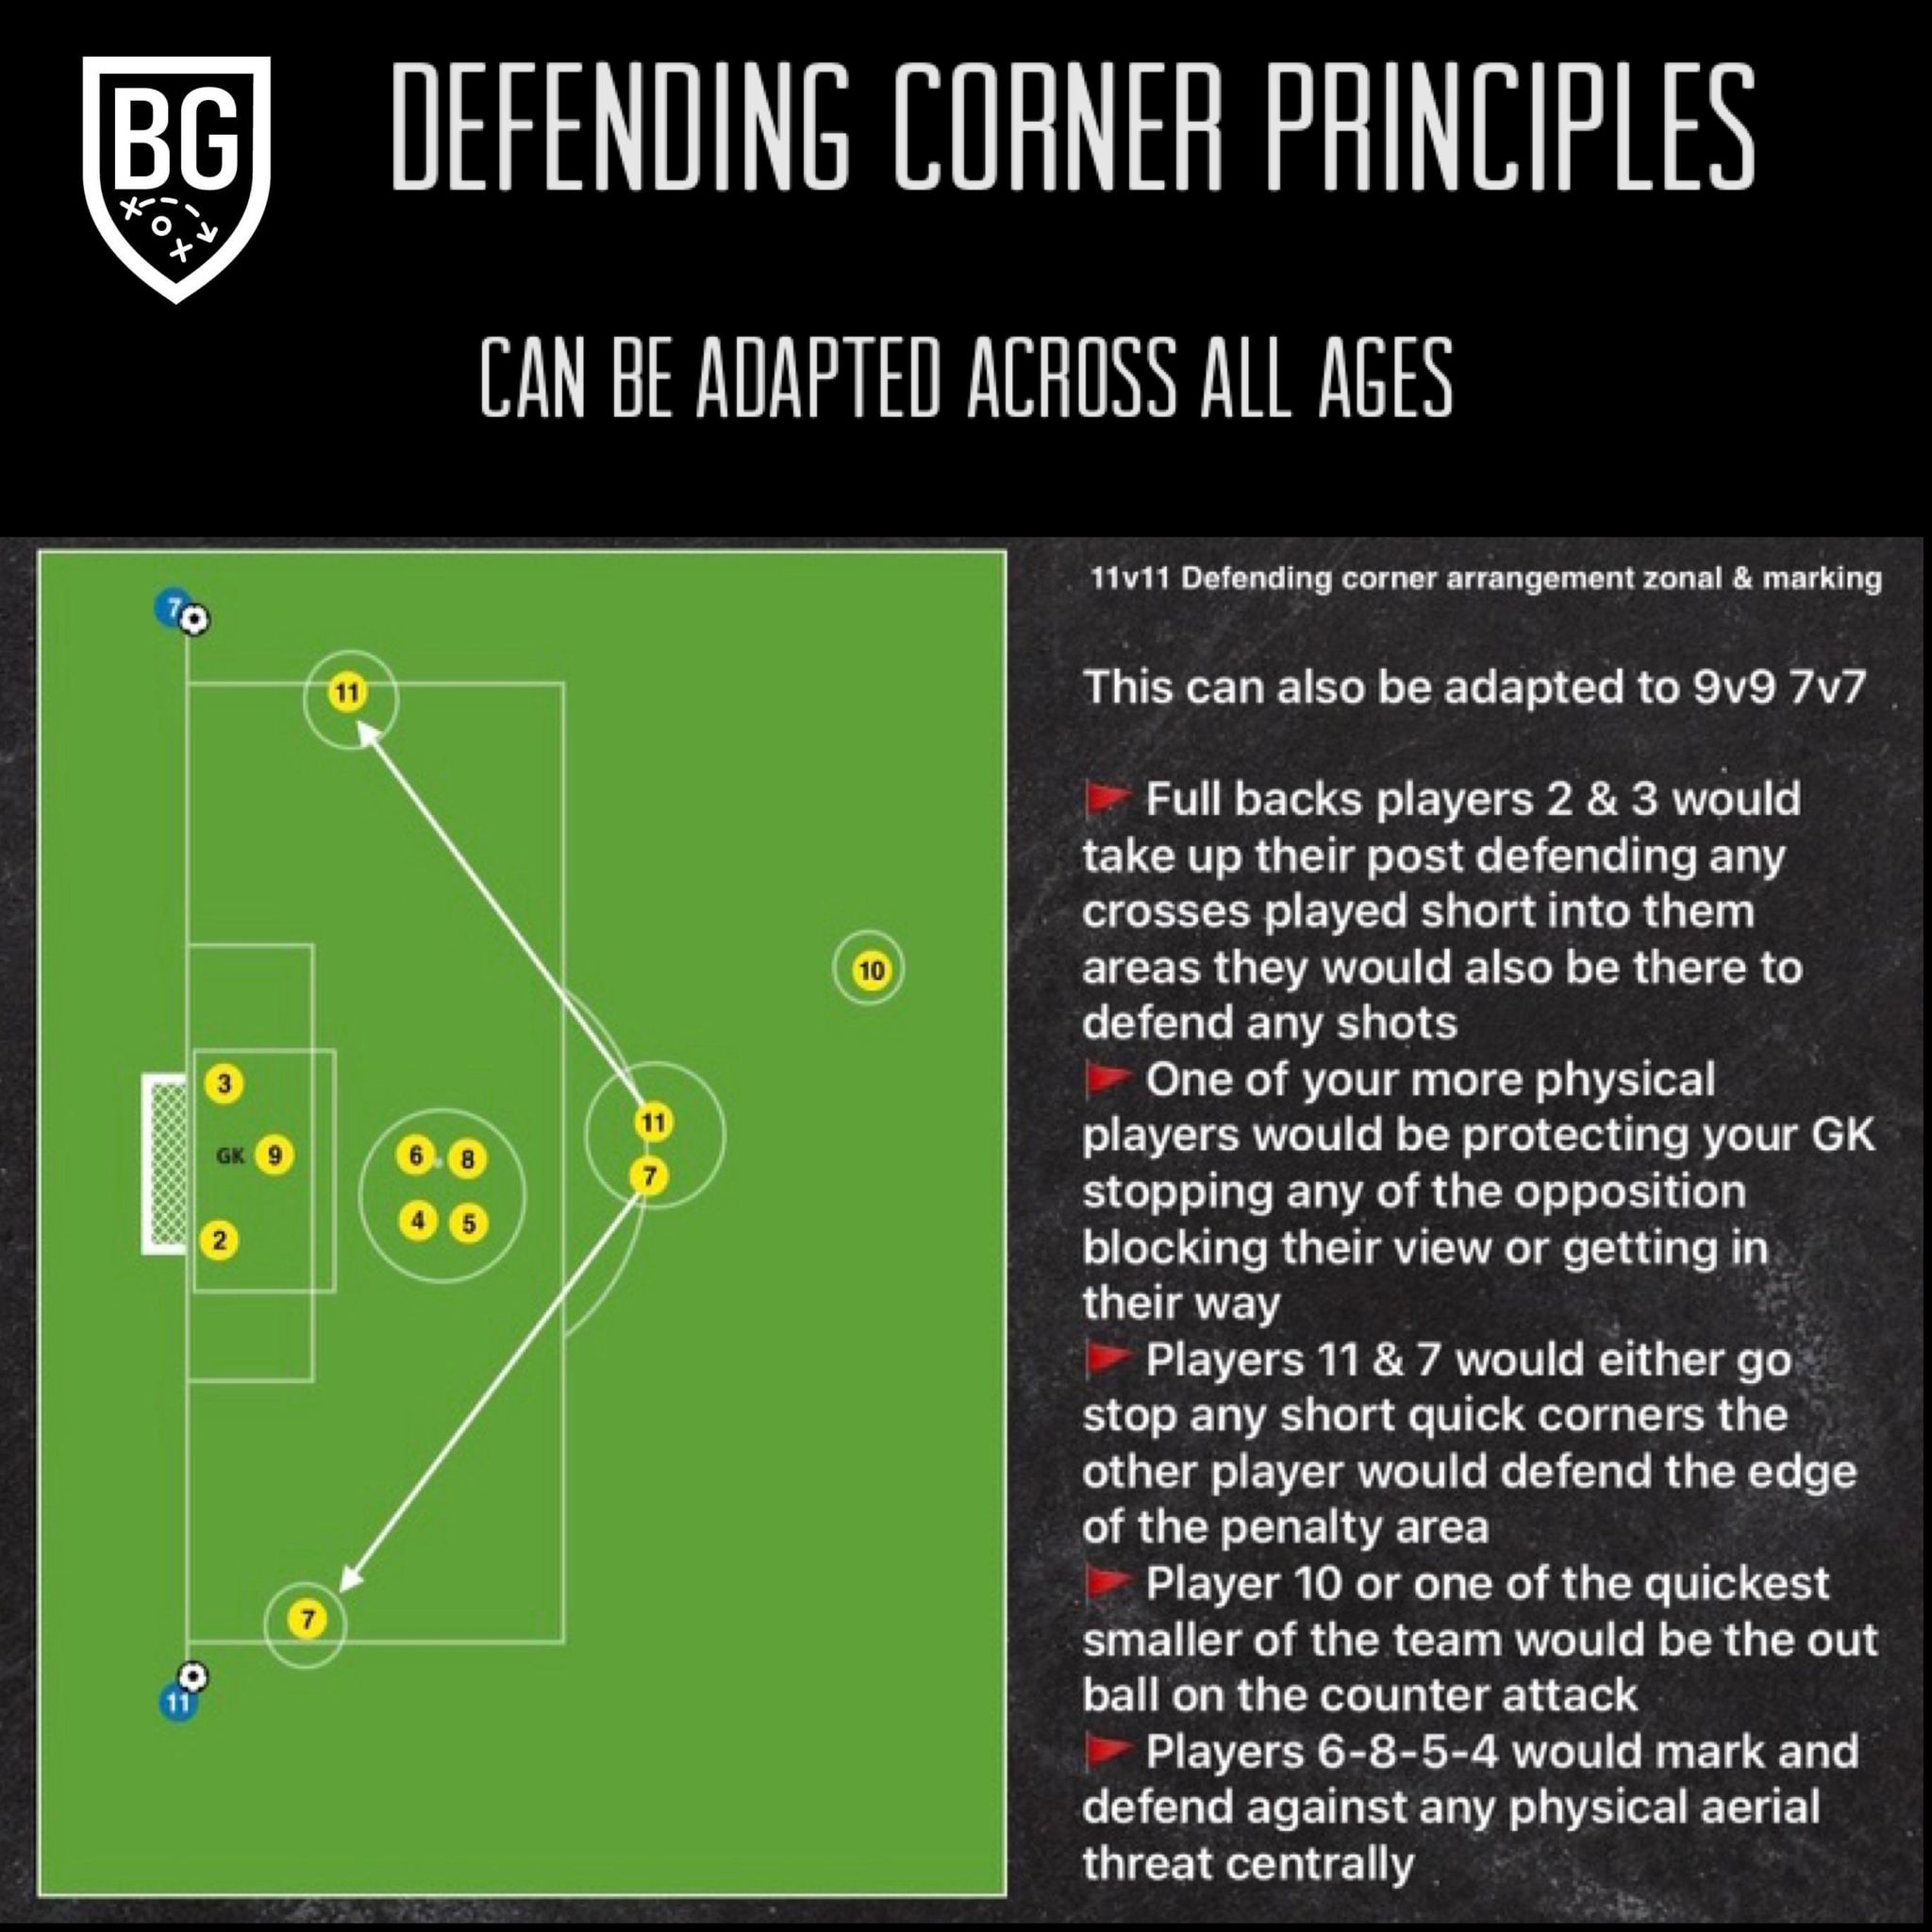
Now, let's look at a detailed list of these combined responsibilities.
[PDF] Three strategies for defending corners: Zonal, Man to Man and ...
The 'Three strategies...' PDF also details the roles in a 'Mixed Zonal and Man to Man' system.
Read the 'Roles and responsibilities' section under 'Mixed Zonal and Man to Man marking'. Compare this to the previous two lists to see how the jobs are distributed between zonal and man-marking tasks.
Conclusion
Today we've moved from abstract systems to concrete jobs. You now have a framework for assigning every player on the pitch a specific role and responsibility when defending a corner, whether you choose a man-marking, zonal, or hybrid approach.
Key Takeaways:
- Universal Roles: Every defensive setup must account for the goalkeeper, potential post-players, counter-attack outlets, second-ball winners, and short-corner pressers.
- Man-Marking Roles: Success depends on creating favourable matchups based on height, strength, or position. Accountability is high.
- Zonal-Marking Roles: Success depends on placing players with the right attributes in the right zones (e.g., agile players at the near post, dominant headers in the centre). Awareness and communication are paramount.
- Hybrid-Marking Roles: This involves a strategic choice: use your best aerial players to control key zones and your most disciplined defenders to nullify specific opposition threats.
Preview of the Next Lesson:
Knowing how to build a defensive system is one thing; knowing how to pick one apart is another. In our next lesson, we will begin our work as opposition analysts. We will learn how to analyse a team's corner routines and defensive setup from video footage to identify patterns, strengths, and, most importantly, weaknesses to exploit.