Hello! Welcome to the final lesson in our module on "Tactical Throw-ins & Transitions."
In our last session, we constructed a robust system for defending against long throw-ins. We looked at hybrid marking systems, the importance of the "instability window" after first contact, and even analysed a high-risk strategy from Chelsea that used attacking players to disrupt the opposition's setup. That Chelsea example, where a defensive organisation immediately created an attacking threat, serves as the perfect starting point for today's topic.
This lesson focuses on what happens in the immediate aftermath of any set piece. We will address the learning outcome: Plan for attacking and defensive transitions immediately following a set piece. We will explore this crucial, often chaotic phase of the game from two perspectives:
- Defensive Transition: How to structure your team to prevent a counter-attack when your own attacking set piece breaks down. This is known as "rest defence."
- Attacking Transition: How to turn a defensive set piece into a launchpad for your own counter-attack.
Mastering these transitions is what separates good set-piece plans from great ones. It's about controlling not just the set play itself, but the moments of instability that follow.
1. The Defensive Transition: Building a "Rest Defence"
When you send players forward for a corner or an attacking free-kick, you are at your most vulnerable. A quick clearance and a fast opponent can lead to a goal against you in seconds. The solution is a well-organised rest defence (from the German Restverteidigung), which is the defensive structure your team holds while executing an attacking set piece.
Its purpose is twofold: to stop a counter-attack at its source and to recycle possession by collecting cleared balls.
Let's begin by reading a short piece that highlights the importance of this transitional phase.
Tactical Theory: Set-Pieces - Spielverlagerung.com
The article 'Tactical Theory: Set-Pieces' from Spielverlagerung.com is an excellent resource for advanced tactical concepts. We'll start with a brief section that frames the importance of the transition phase.
Please read the two paragraphs in the introduction of the article. Focus on the idea that the transition phase is key to maintaining 'stable phases of play' and how occupying the 'rebound zone' is crucial for both attacking and defensive stability.
As the article mentions, stability is key. Your rest defence provides this stability. Here are the core principles of structuring it:
Player Numbers and Profiles:
- You typically leave 3 or 4 players back. The exact number depends on a risk-reward calculation: how many players does the opponent leave forward versus how many you need to be a threat in the box?
- These players are usually your quicker defenders (often full-backs to cover wide areas) and a defensively-astute midfielder to control the centre. The set-piece taker also joins this structure immediately after delivering the ball.
Positioning and Organisation:
The image below shows a classic rest defence setup with five players, which is a more conservative approach. The principles, however, remain the same.
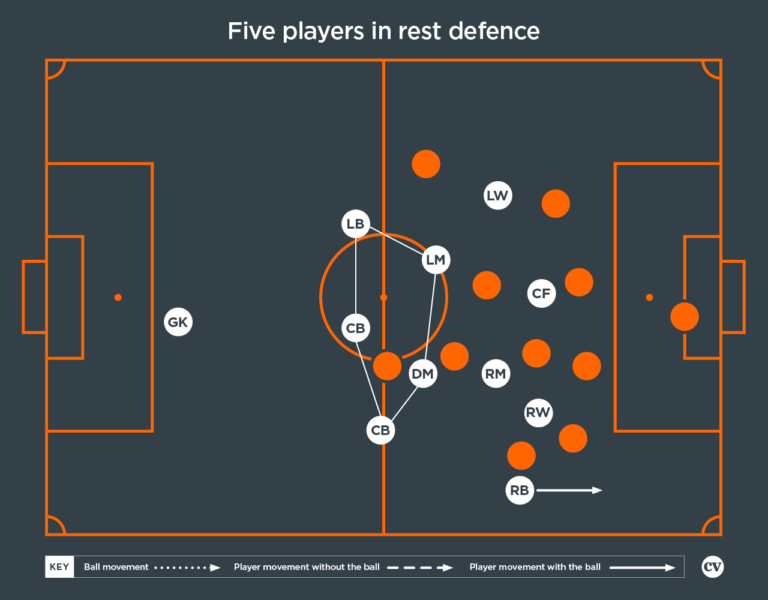
Notice their shape:
- Central Control: The players are positioned to protect the centre of the pitch, forcing any counter-attack wide, which is less dangerous and easier to defend.
- Staggered Depth: They are not in a flat line. This staggering allows one player to press the ball while others provide cover behind them, preventing a single pass from breaking the entire line.
- Distance: They must be close enough to support the attack and win second balls, but deep enough to not be beaten by a simple ball over the top.
The primary job of this unit is to delay and deny. By slowing the opponent's counter, they give the rest of your team time to recover their defensive positions.
2. The Attacking Transition: Turning Defence into Attack
Now let's flip the scenario. The opponent has a set piece, and you are defending. Instead of simply clearing the ball and reorganising, you can use this moment as a trigger to launch a devastating counter-attack. This requires proactive planning, not just reactive defending.
A throw-in provides an excellent, contained example of this principle. By setting a "trap," you can lure the opposition into a false sense of security and win the ball in a advantageous area.
Using defensive throw ins as offensive opportunities
This Spielverlagerung article, 'Using defensive throw ins as offensive opportunities', provides a masterclass in turning a defensive duty into an attacking weapon. The principles here are transferable to defending corners and free-kicks as well.
Please read the sections titled 'Spare player concept' and 'Disguised spare player'. Pay close attention to the Liverpool vs. Genk example: how do they set the trap, and what is their attacking shape the moment they win the ball back? The description of the goal being scored within nine seconds is a perfect illustration of a successful attacking transition.
The Liverpool example is tactical brilliance. They don't just defend the throw-in; they dictate the play, win the ball, and are already in their attacking shape to score. This principle can be generalised:
- Leave Players High: As we saw with the Chelsea example in the last lesson, leaving one or two fast players high up the pitch when defending a corner or deep free-kick serves two purposes. It forces the opposition to keep defenders back, weakening their set-piece attack, and provides an immediate outlet for a counter.
- The Goalkeeper as a Playmaker: A goalkeeper who confidently claims a cross and has a quick, accurate distribution (either a fast throw to a midfielder or a kick to a high forward) is a massive weapon for starting these transitions.
- Coordinated Pressing Triggers: The moment the ball is won is the trigger. The nearest player presses the ball, while others move to cut off the easy passes, forcing a turnover or a hurried, inaccurate long ball. It’s a collective, pre-planned action.
3. Maintaining the Attack: Second and Third Phases
A transition doesn't always mean a full-pitch counter-attack. Sometimes, it's about transitioning from your initial set-piece attack into a second wave of pressure before the defence can reset. This is where you can overwhelm an opponent. The key is coaching a mentality to "stay alive" for the second ball.
This practical coaching session perfectly demonstrates how to drill this mindset.
Ian Baraclough, Northern Ireland head coach • Set-pieces coaching course • CV Academy
To see how this looks on the training pitch, let's watch this clip from a coaching session with Northern Ireland's head coach, Ian Baraclough. He expertly coaches his players to anticipate and attack in multiple phases.
First, watch from 00:26-01:25 where he outlines a three-phase attacking corner. Then, watch from 02:40-04:06 and 05:23-05:56. Listen for his repeated keywords: 'stay alive', 'readjust', 'second phase'. This is the exact language and intensity needed to coach this principle effectively.
As Coach Baraclough demonstrates, the play doesn't end after the first header. A successful set-piece plan accounts for these subsequent phases by:
- Positioning players on the edge of the box: Their role is not just defensive (part of the rest defence), but also offensive. They are your primary attackers for any clearances that fall into the "rebound zone."
- Coaching anticipation: Players must be drilled to react to the clearance, moving towards the ball while the defending team's instinct is to push out. This creates a crucial timing advantage.
- Finishing with quality: As seen in the video, the routine ends with a player arriving to strike a lay-off. This isn't random; it's a planned outcome for the second phase, designed to create a high-quality shooting opportunity.
Conclusion
Today, we've expanded our view of set pieces from isolated plays to dynamic transitional moments. By planning for what happens next, you can create scoring chances and prevent them in equal measure.
Key Takeaways:
- A rest defence is your insurance policy during attacking set pieces. It’s a proactive, organised structure (usually 3-4 players) designed to stop counter-attacks and recycle possession.
- Defensive set pieces can be weaponised. By leaving players high or using coordinated pressing traps, you can turn a defensive situation into a high-value attacking transition.
- The play is not over after the first contact. Coaching players to "stay alive" and planning for second and third attacking phases allows you to maintain pressure and overwhelm a scrambling defence.
Preview of the Next Module:
This lesson concludes our module on "Tactical Throw-ins & Transitions." We have covered the analysis and tactical design of these situations in detail. Now, it's time to take these plans to the training ground. In our next module, "From Plan to Pitch: Coaching Set Pieces," we will begin by learning how to structure a set piece training session with appropriate warm-up, practice, and feedback phases.