Hello! Welcome to your fifth lesson in the "Tactical Throw-ins & Transitions" module.
In our last session, we acted as opposition analysts, breaking down attacking throw-in routines to understand their setup, movements, and intended outcomes. We learned to identify patterns like short combinations, screens, and the two main long-throw models: the near-post flick and the mid-box distribution.
Today, we're flipping the script. Armed with the knowledge of how teams attack with long throws, we'll focus on how to stop them. This lesson directly addresses the learning outcome: Describe how to organise the team to defend against long throw-ins. We will build a robust defensive system from the ground up, grounding our principles in both practical coaching wisdom and modern data analysis.
1. Building a Defensive Shell: The Four Pillars
Defending a long throw-in is not about simply packing the box and hoping for the best. It requires a coordinated system, much like defending a corner. We can think of a strong defensive organization as being built on four key pillars.
Let's begin by reading a concise overview of these defensive layers.
The Long Throw-In in Soccer: Why It's Back & How to Defend it
The article 'The Long Throw-In in Soccer' from the International Soccer Science & Performance Federation (ISSPF) provides an excellent, coach-focused framework for defending long throws. It breaks the process down into four clear, actionable layers.
Please read the section titled 'Coaching the Defence' and its four numbered points. Focus on understanding the core concept of each layer: the defensive shell, the goalkeeper's role, physical contact, and the second phase.
This gives us our foundation. Now, let's add detail and data-driven insights to each of these pillars to build a truly professional-level defensive plan.
2. Deconstructing the Defensive System
A comprehensive research paper from Hudl analysed thousands of long throws to quantify what makes a defensive setup effective. We will use its findings to refine our four pillars.
A Dual-Model Framework For Minimising Defensive Risk
This research paper, 'A Dual-Model Framework For Minimising Defensive Risk', uses advanced statistical models to identify the key factors in successfully defending long throws. Its findings will help us move from general principles to specific, evidence-backed instructions.
This is a detailed document, so we will use it as a reference throughout this section. For now, I want you to read the final summary of tactical recommendations in Section 7.2 ('Summary') and the final numbered list in Section 8.1 ('Practically, the findings translate into clear coaching guidance:'). This will give you a high-level overview of the key data-driven principles before we dive into the details.
Now, let's integrate these data-driven insights with our four pillars.
Pillar 1: The Defensive Shell - Structure Over Numbers
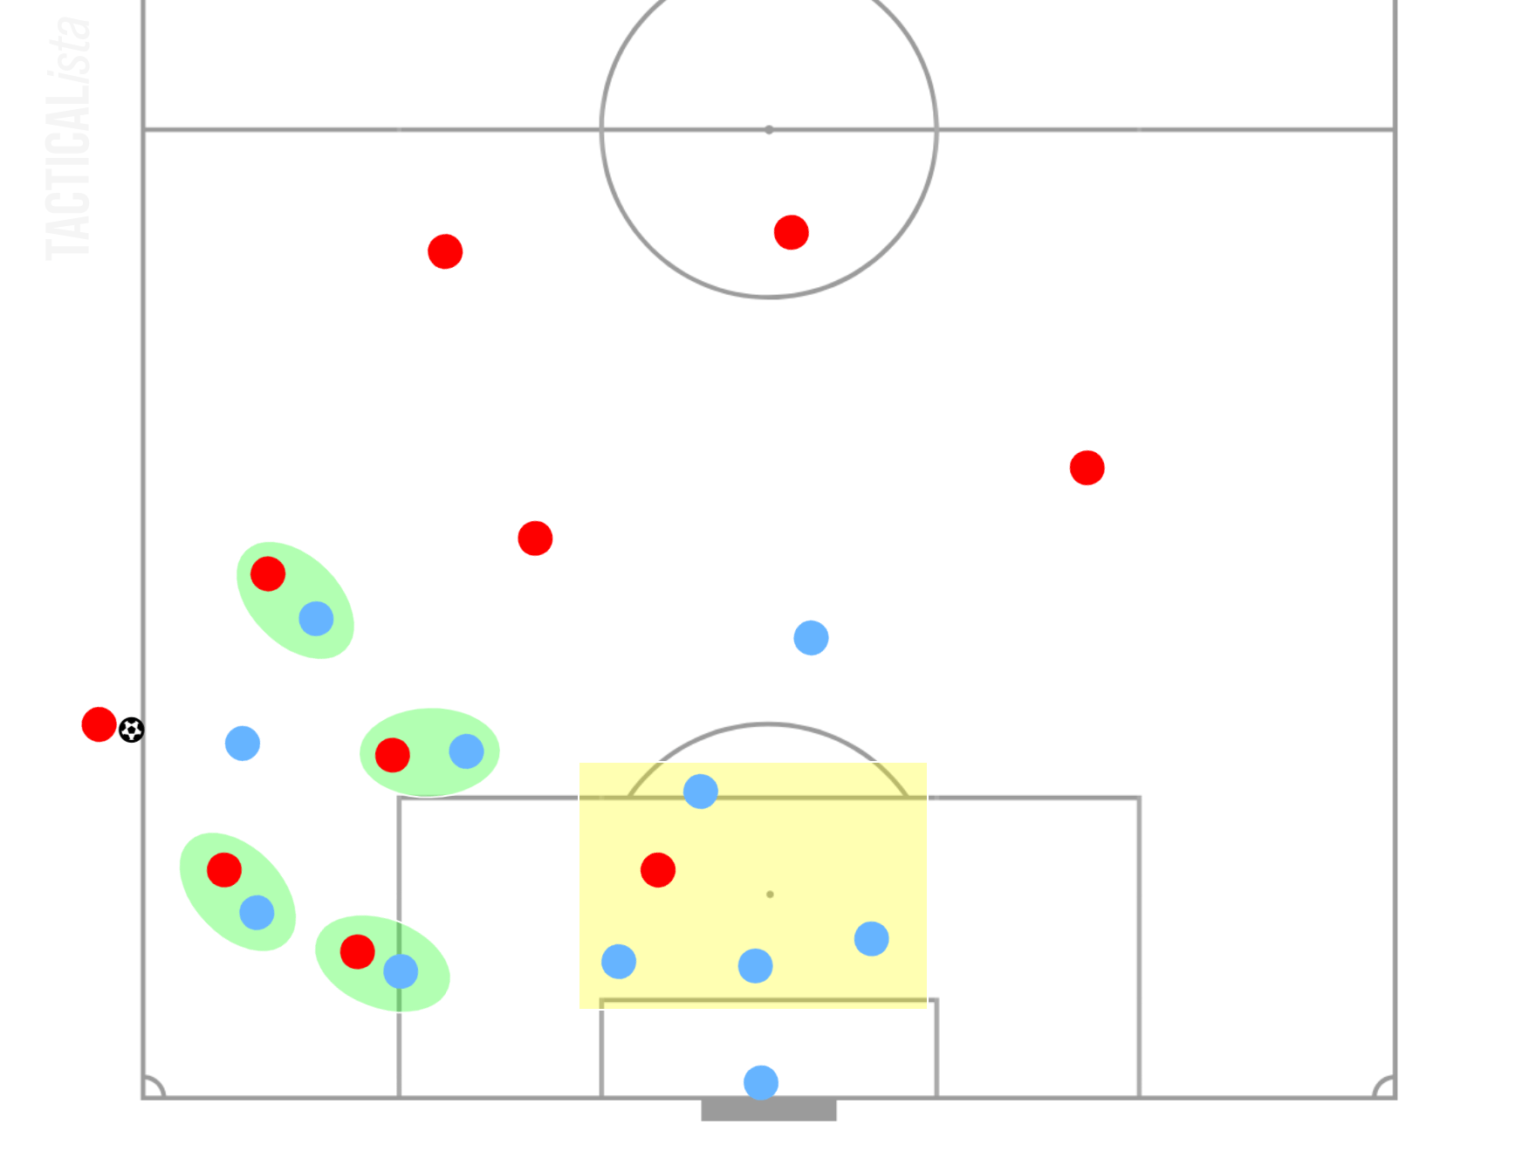
The ISSPF article recommends a hybrid zonal-man system. This is the most common and effective approach. Here’s how it works and why data supports it:
- Zonal Core: Three or four defenders create a zonal "spine" to protect the most dangerous area. The Hudl research confirms this, identifying the 6-10 metre corridor around the penalty spot as the primary danger zone. Your most aerially dominant players should occupy this central space.
- Man-Marking: Key aerial threats from the opposition are assigned specific man-markers who stay tight and disrupt them.
- Optimal Numbers: A common mistake is to bring every player back. The Hudl data shows that beyond five or six defenders in the box, the benefit disappears. Overcrowding obscures the goalkeeper's view and leads to chaotic ricochets. Spacing and structure are more important than sheer numbers.
This diagram illustrates a well-organised hybrid system.
Pillar 2: The Second Phase - Winning the "Instability Window"
As the ISSPF article notes, "most of the danger lives after first contact." The initial header is often just the setup for the real attack.
- The Instability Window: The Hudl paper identifies a critical 2-6 second window immediately after the first header. This is when defensive shapes tend to break down and rebounds are scored. Coaching your team to maintain their compact structure during this brief period is vital.
- Designated "Sweeper": Do not have every player attack the first ball. One player's specific job should be to ignore the initial duel and instead anticipate and attack the second ball. This player is often positioned on the edge of the box, ready to "sweep" up flick-ons or clearances.
- Directional Clearances: A poor clearance that goes straight up or back into the middle of the box is a massive risk. Train your defenders to clear directionally—wide towards the touchline, away from the central danger zones. A good clearance ends the threat; a bad one recycles it.

Pillar 3: The Goalkeeper - Patient and Prepared
The goalkeeper's role is a delicate balance. The ISSPF article mentions a "decision tree" for punching vs. catching. The data adds another layer:
- Patience is a Virtue: While it's tempting for a keeper to be aggressive and "command the box," the data suggests this is often counterproductive for long throws. An overly aggressive starting position can leave the keeper stranded if they misjudge the flight or if the ball is flicked on.
- Deeper Starting Position: The Hudl research recommends a starting position 0.5-1 metre deeper than for a typical cross. This slightly deeper base gives the keeper more time to react to the ball's actual path (especially after a flick-on) rather than gambling on its initial flight. This maximizes their chance to deal with the second ball, which is often the most dangerous.
Pillar 4: Legal Physicality
This pillar is about coaching detail. In the tense environment of the penalty box, the line between strong defending and a foul is thin. You must train your players to use their bodies intelligently—using their chest and arms to shield space and unbalance an opponent before the ball arrives, without grabbing shirts or pushing, which are easily spotted by referees.
3. An Alternative: Defending by Attacking
While the structured shell we've just designed is the standard, risk-averse approach, some managers opt for a high-risk, high-reward alternative. Let's look at a recent example.
The Solution To Defending Against Long Throw-Ins?
This video from Tartan Geo analyses an innovative tactic used by Chelsea's manager Enzo Maresca to defend long throws. It challenges the conventional wisdom of bringing all players back and instead uses the opponent's set piece as a potential attacking trigger.
Watch the video from 04:08 to 07:13. Pay close attention to: How many players Chelsea leave forward and where they are positioned. The effect this has on the opposition and the space in the penalty box. The type of player profile (especially the goalkeeper) needed to make this tactic work.
As you saw, Chelsea's approach involves leaving three fast attackers high up the pitch. This has several effects:
- Forces the Opposition Back: The attacking team must keep defenders back to mark the counter-attacking threat, meaning they can't load the box with as many players.
- Creates Space for the Goalkeeper: With fewer bodies in the box, a dominant goalkeeper has a clearer path to come and claim the ball. This tactic is heavily reliant on having a keeper who excels at catching crosses.
- Immediate Counter-Attack: If the goalkeeper successfully claims the ball, they can immediately launch a 3v3 or 4v4 counter-attack.
This is a strategic gamble. You are sacrificing defensive numbers in the box for the chance to deter the long throw entirely or create a high-value transition moment. It's a fantastic example of how a set-piece coach must weigh risk and reward based on their team's specific strengths and weaknesses.
Conclusion
Today we have built a comprehensive plan for organising a team to defend against long throw-ins. We have seen that a successful defence is not about luck, but about precise organisation, clear roles, and data-informed principles.
Key Takeaways:
- A robust defensive "shell" is built on a hybrid zonal-man system, prioritising structure over numbers.
- The most dangerous phase is often the second ball. Winning the "instability window" (2-6 seconds post-contact) with a designated sweeper and directional clearances is critical.
- Goalkeepers should adopt a patient, slightly deeper starting position to react to the play rather than gambling on the initial throw.
- High-risk, high-reward strategies, like leaving players forward, exist as tactical alternatives but depend heavily on specific player profiles (e.g., a dominant goalkeeper and fast attackers).
Preview of the Next Lesson:
The Chelsea case study provides a perfect link to our next lesson. It shows how a defensive set piece can instantly become an attacking transition. In our final lesson of this module, we will explore this in more detail and learn how to plan for attacking and defensive transitions immediately following a set piece.