Hello! Welcome back.
In our last lesson, we established the overall structure of a professional set-piece training session, breaking it down into the warm-up, practice, and feedback phases. We looked at how to create a logical flow and make the session engaging and competitive.
Today, we're zooming in on the heart of the session: the "practice" block. This lesson is designed to meet the learning outcome: Design unopposed and opposed drills for rehearsing attacking set piece routines. We will move from the 'why' to the 'how', providing you with a systematic approach to creating effective drills that teach your players the precise mechanics of your attacking set plays. By the end, you'll understand how to build a routine from the ground up and test it in increasingly realistic scenarios.
1. Unopposed vs. Opposed: The Two Pillars of Drill Design
Before we design our first drill, we need to understand the two fundamental types of practice and, crucially, the relationship between them. Nearly all skill development in football, from passing to complex set pieces, is taught using a progression from unopposed to opposed scenarios.
To get a clear definition and understand the unique benefits of each, please read the following article.
Opposed vs Unopposed Training Drills - Coach Notes
This article from Coach Notes, titled 'Opposed vs Unopposed Training Drills', perfectly explains the purpose of these two training methods. It will form the theoretical backbone of our drill design process.
Please read the sections '✍️ Defining the Two Approaches', '✅ The Benefits of Unopposed Drills', and '✅ The Benefits of Opposed Drills'. Focus on the distinct 'Purpose' of each approach.
As the article makes clear, these two methods are not in competition; they are partners in the learning process. Here's the key distinction for a set-piece coach:
- Unopposed Drills: These are for installing the software. You use them to teach players their roles, movements, and the timing of the routine in a controlled environment. The goal is clarity and flawless execution without the chaos of defenders. It's about learning the "what" and the "how".
- Opposed Drills: These are for testing the software under pressure. You introduce defenders to create game-like problems. This is where players learn to adapt, make decisions, and execute their roles despite the opposition's actions. It's about learning the "when" and the "why".
A successful coach masters the art of progressing from one to the other.
2. Designing the Unopposed Drill: Building the Blueprint
The first step in teaching any new set-piece routine is the unopposed drill. This is where you lay the foundation. A poorly executed unopposed drill leads to confusion and a lack of confidence when defenders are introduced.
Let's use a practical guide to see what components make up a good routine.
Cunning corners - Advanced Football & Soccer Training Drills & Skills
The article 'Cunning corners' from Soccer Coach Weekly provides excellent, clear-cut examples of different corner kick routines. We'll use its descriptions as a template for our own design process.
Read the sections 'What you get your players to do' and 'Development'. Note how each routine (Near post, Far post, Short corner) clearly defines player positions, movements, and the delivery target.
Drawing from these examples, we can establish a 4-step process for designing an unopposed routine:
- Define the Core Objective: What is the primary goal of this routine? Is it a near-post flick-on? A deep cross to the far post for your best header? A short corner to create a 2v1 and change the angle of attack? Be specific.
- Assign Roles & Starting Positions: Every player involved must have a clear role. For a corner, you might have:
- The Taker: Responsible for the signal and delivery.
- The Primary Attacker(s): The player(s) intended to make first contact.
- Decoy Runner(s): Players whose movement is designed to pull defenders away and create space.
- Zonal Occupier(s): Players who block defenders or occupy key spaces (e.g., in front of the keeper).
- Edge-of-Box Player(s): Positioned for cut-backs or to win second balls.
- Map the Movements and Triggers: This is the choreography of the play. When does each player run? What is their path? What event triggers the corner taker to deliver the ball? For example, in the short corner routine from the article, the striker's run towards the taker is the trigger.
- Define Success Criteria: In an unopposed drill, what does a successful repetition look like? It might not be a goal. It could be "the primary attacker makes clean contact in the target zone." This gives players a clear, achievable goal for each rep.
Let's look at what this looks like on a tactics board. This diagram shows a short corner routine, the kind of plan you would create in step 3.

3. Progressing to the Opposed Drill: Adding Pressure
Once your players can execute the routine's mechanics flawlessly in an unopposed setting, it's time to add pressure. This progression must be gradual to ensure players build confidence and don't become overwhelmed.
Let's return to the article on training drills to understand this progression.
Opposed vs Unopposed Training Drills - Coach Notes
We'll now look at the section of the Coach Notes article that explains how to bridge the gap between unopposed and opposed practice.
Please read the section '⚖️ Finding the Balance: A Practical Coaching Approach'. Pay close attention to the idea of starting with 'passive defenders' before moving to 'live game scenarios'.
This leads us to a clear, three-stage progression for making a drill opposed:
Stage 1: Passive Opposition
- What it is: Place mannequins or passive defenders in the positions you expect the opposition to occupy. These defenders can shadow runs but cannot tackle or try to win the ball.
- Why you do it: This forces your attackers to navigate around bodies, adjust the timing and arc of their runs, and be aware of traffic without the fear of failure. It transitions them from running in empty space to running in congested space.
Stage 2: Active, Conditioned Opposition
- What it is: The defenders are now "live," but you place conditions on them to give the attack an advantage.
- Examples:
- Numerical Overload: 6 attackers vs. 4 defenders + GK.
- Zonal Restrictions: Defenders are locked into certain zones (e.g., they cannot leave the 6-yard box).
- Delayed Reaction: Defenders can only move once the ball is kicked.
- Why you do it: This stage teaches your attackers to execute the routine against a defence that is actively trying to stop them, but in a controlled way that still encourages success.
Stage 3: Full Opposition / Game Situation
- What it is: An even or realistic number of attackers and defenders (e.g., 7v7 in the box). The defenders have no restrictions. The only goal is to score.
- Why you do it: This is the ultimate test of your routine. It provides the most honest feedback on whether the design is effective and whether the players can execute it under match-realistic pressure.
This image shows what a fully opposed drill (Stage 3) looks like in practice.
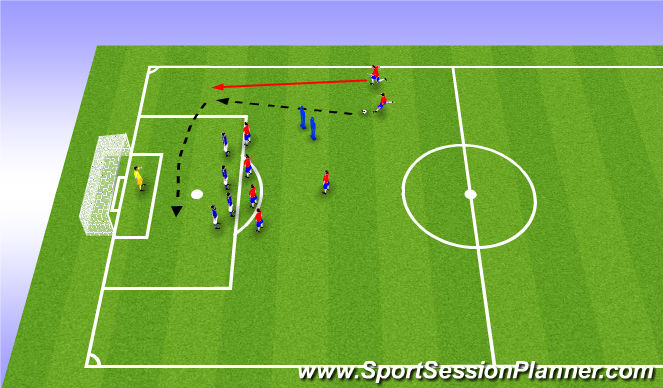
Finally, let's watch how a professional coach, Ian Baraclough, runs a practice that combines these elements. He starts with a focus on the unopposed mechanics but adds a competitive, opposed element as it progresses.
Ian Baraclough, Northern Ireland head coach • Set-pieces coaching course • CV Academy
In this session with the Northern Ireland national team, pay attention to how the drill is structured. It starts by focusing on the attacking pattern but is inherently competitive.
Watch from the beginning to 04:24. Notice how he first lays out the three-phase attacking pattern (unopposed concept). Then, as the players execute it, he introduces competition and praises reactions to second balls, which only happen in opposed scenarios. This is a great example of a 'Stage 2' or 'Stage 3' drill.
Conclusion
You are now equipped with a systematic process for taking an idea for a set piece and turning it into a series of drills that effectively teach it to your players. This progression is fundamental to high-level coaching.
Key Takeaways:
- Follow the Progression: Effective teaching moves from simple to complex. Start with unopposed drills to install the routine's mechanics and timing.
- Design with Clarity: An unopposed drill must have a clear objective, defined player roles, and precise movements. This is your blueprint.
- Introduce Pressure Gradually: Move from unopposed to passive, then conditioned, and finally fully opposed drills. This scaffolds learning and builds player confidence.
- Opposed Drills Test Reality: This is where you see if your routine can withstand defensive pressure and where players learn to make decisions in chaotic, game-like moments.
Preview of the Next Lesson:
We have spent this lesson focused entirely on the attacking side of the ball. In our next session, we will flip our perspective. You will learn how to design drills to improve defensive organisation and reaction to attacking variations, preparing your team to nullify the very routines we've learned to create today.