Hello! Welcome to our next hands-on lesson.
In the previous lesson, we surveyed the common design patterns for multi-agent systems, from simple sequential pipelines to complex collaborative swarms. We identified the Supervisor (or Coordinator) pattern as a powerful and practical approach for managing complex tasks by delegating work to specialized agents.
Today, we'll move from theory to practice. Your goal is to implement a simple two-agent collaboration pattern (a manager-worker duo) using LangGraph. We will build a system where a "manager" agent receives a user request and intelligently routes it to the appropriate "worker" agent—either a researcher or a coder—to get the job done. This is a foundational skill for building sophisticated, modular agentic systems.
1. The Supervisor Pattern: A Quick Refresher
The supervisor pattern is analogous to a project manager directing a team. A central agent receives a task, analyzes it, and delegates it to the team member with the right skills. Once the team member completes their sub-task, they report back to the manager, who then decides the next step.
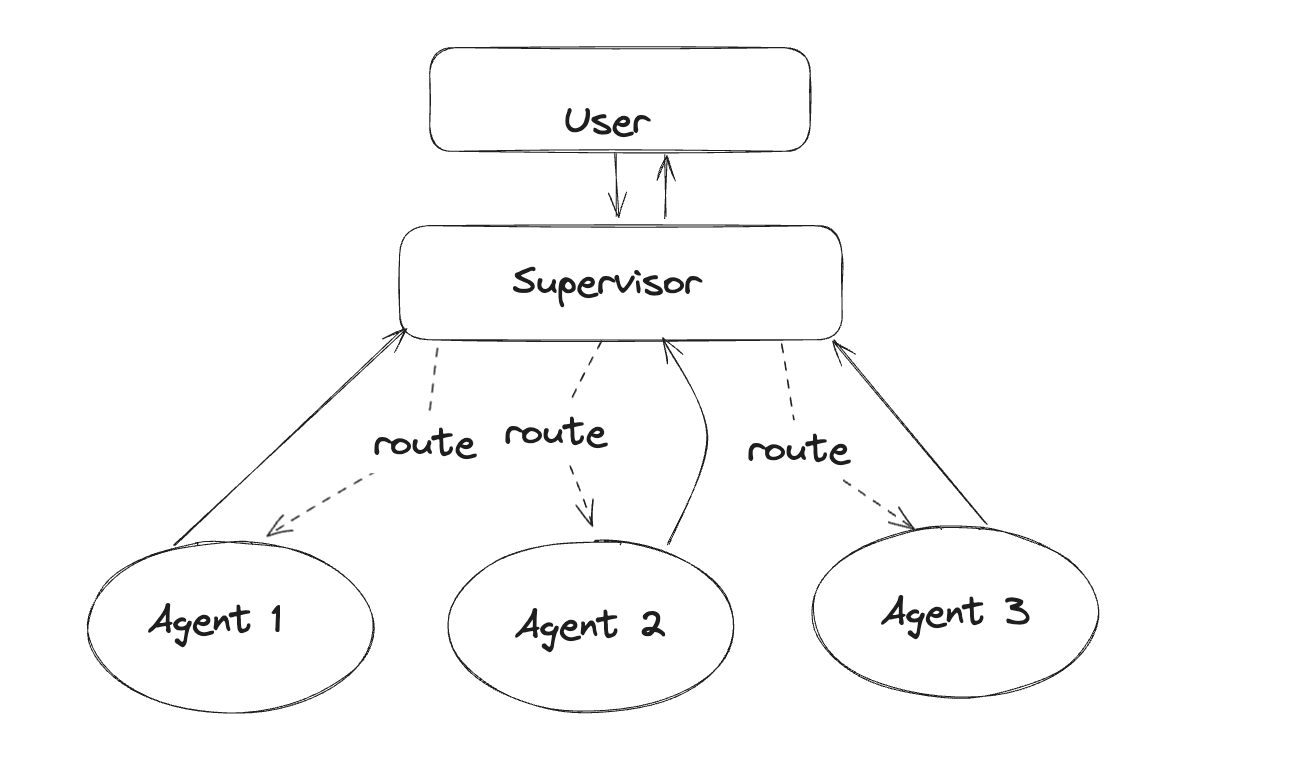
To implement this in LangGraph, we need to understand its core building blocks.
2. The Anatomy of a LangGraph Application
LangGraph builds workflows using a few key concepts that should feel familiar from your software engineering background. Think of it as defining a state machine or a microservices orchestration flow.
- State: A shared data structure (typically a Python
TypedDict) that is passed between all agents. It acts as the single source of truth, holding the conversation history, intermediate results, and any other data needed for the workflow. - Nodes: These are the workers in our system. Each node is a Python function or a LangChain Runnable that performs a specific task. In our case, each agent (the supervisor, the researcher, the coder) will be a node.
- Edges: These are the connections that define the workflow. An edge dictates which node should run after another. LangGraph has:
- Normal Edges: A fixed path (e.g., always go from node A to node B).
- Conditional Edges: A dynamic path, where a routing function inspects the current state to decide which node to go to next. This is the key to implementing the supervisor's logic.
For a solid conceptual foundation, let's turn to a great resource on this topic.
LangGraph Multi-Agent Systems: Production-Grade Orchestration
The article 'LangGraph Multi-Agent Systems' provides a clear overview of LangGraph's core concepts and the Supervisor Pattern. Understanding this will make the code we write next much more intuitive.
Please read the sections 'Core Concepts of LangGraph' and 'Multi-Agent Architecture Patterns', focusing on the 'Supervisor Pattern'. Pay attention to how the graph, state, nodes, and edges work together.
3. Implementing a Manager-Worker System
Now, let's build our two-agent system. We'll create a Supervisor agent that can route tasks to either a Researcher agent or a Coder agent.
The full implementation involves four main steps:
- Defining the shared state.
- Creating the agent nodes (the workers and the supervisor).
- Assembling the graph and defining the edges.
- Compiling and running the application.
Let's watch a video that walks through a very similar implementation. This will give you a dynamic view of how the pieces fit together before we examine the static code.
Hierarchical multi-agent systems with LangGraph
The video 'Hierarchical multi-agent systems with LangGraph' by LangChain provides a concise demonstration of building a supervisor-agent system. It clearly shows the code structure and the execution flow.
Watch from 04:41 to 09:21. The first part (up to 06:25) shows the code for setting up the agents and the supervisor. The second part (from 06:25) walks through an execution trace in LangSmith, which is invaluable for visualizing the handoffs between the supervisor and the workers.
Inspired by that video and the article, here is a complete, runnable example of a two-agent system. Let's break it down piece by piece.
Step 1: Setup and State Definition
First, we import the necessary libraries and define our AgentState. The state will hold the list of messages and a crucial next field, which the supervisor will use to specify the next agent to run.
import os
from typing import TypedDict, Annotated, List
from langchain_openai import ChatOpenAI
from langchain_core.messages import BaseMessage, HumanMessage, SystemMessage
from langgraph.graph import StateGraph, END

# Set your OpenAI API key
# os.environ["OPENAI_API_KEY"] = "YOUR_API_KEY"

# Define the shared state structure
class AgentState(TypedDict):
    messages: Annotated[List[BaseMessage], lambda x, y: x + y]
    next: str
Annotated[List[BaseMessage], lambda x, y: x + y]: This is a LangGraph convenience. It tells the graph that when a node returns amessageslist, it should be appended to the existing list in the state, rather than overwriting it.
Step 2: Define the Agent Nodes
Next, we create our "worker" agents and the "supervisor" agent. Each is a function that takes the current state and returns a dictionary with the updates it wants to make.
# Initialize the LLM that will power our agents
llm = ChatOpenAI(model="gpt-4-turbo-preview")

# Define the Coder agent node
def coder_agent(state: AgentState) -> dict:
    """A specialist agent for writing and reviewing Python code."""
    print("---
AGENT: Coder
---")
    system_msg = SystemMessage(content="You are a coding specialist. Write clean, efficient, and correct Python code to address the user's request. Only return the code block.")
    response = llm.invoke([system_msg] + state["messages"])
    return {"messages": [response], "next": "supervisor"}

# Define the Researcher agent node
def research_agent(state: AgentState) -> dict:
    """A specialist agent for web research."""
    print("---
AGENT: Researcher
---")
    system_msg = SystemMessage(content="You are a research specialist. Provide accurate, concise information based on the user's request.")
    response = llm.invoke([system_msg] + state["messages"])
    return {"messages": [response], "next": "supervisor"}

# Define the Supervisor agent node (the router)
def supervisor(state: AgentState) -> dict:
    """The manager agent that routes tasks to specialists or finishes the job."""
    print("---
SUPERVISOR
---")
    last_message = state["messages"][-1]

    # If the last message was from an agent, the supervisor can decide to finish
    if not isinstance(last_message, HumanMessage):
        # A simple rule: if agents have run twice, finish.
        if len(state['messages']) > 3:
             print("---
SUPERVISOR: Finishing task.
---")
             return {"next": "end"}

    routing_prompt = f"""Given the conversation so far, determine which specialist should handle this request, or if the task is complete.
Conversation:
{state['messages']}

Respond with one of the following agent names, or 'FINISH':
- coder
- researcher
- FINISH
"""
    response = llm.invoke([SystemMessage(content=routing_prompt)])
    next_agent = response.content.strip().lower()
    print(f"---
SUPERVISOR: Routing to {next_agent}
---")
    return {"next": next_agent}
Notice how each worker agent, after doing its job, sets next: "supervisor". This ensures control always returns to the manager. The supervisor itself uses an LLM call to determine the next step.
Step 3: Build the Graph
Now we wire everything together. We add our functions as nodes and define the edges that control the flow. The key is the add_conditional_edges method, which implements the supervisor's routing logic.

# Create a new StateGraph with our AgentState definition
workflow = StateGraph(AgentState)

# Add the nodes to the graph
workflow.add_node("supervisor", supervisor)
workflow.add_node("coder", coder_agent)
workflow.add_node("researcher", research_agent)

# Define the routing logic using conditional edges
workflow.add_conditional_edges(
    "supervisor",
    lambda x: x["next"], # The 'next' field in the state determines the route
    {
        "coder": "coder",
        "researcher": "researcher",
        "FINISH": END
    }
)

# All worker agents return to the supervisor
workflow.add_edge("coder", "supervisor")
workflow.add_edge("researcher", "supervisor")

# Set the entry point of the graph
workflow.set_entry_point("supervisor")

# Compile the graph into a runnable application
app = workflow.compile()
Step 4: Run the System
Finally, we can invoke our multi-agent system with an initial request.
# Let's run it with a request that requires research
initial_request = "What is the current market cap of NVIDIA?"
initial_state = {"messages": [HumanMessage(content=initial_request)]}
final_state = app.invoke(initial_state)

print("\n\n
FINAL RESPONSE:
\n")
print(final_state['messages'][-1].content)

print("\n
---
\n")

# Let's run it with a request that requires coding
initial_request = "Write a Python function to find the nth prime number."
initial_state = {"messages": [HumanMessage(content=initial_request)]}
final_state = app.invoke(initial_state)

print("\n\n
FINAL RESPONSE:
\n")
print(final_state['messages'][-1].content)
When you run this code, you'll see the supervisor first routing to the correct agent, the agent executing its task, control returning to the supervisor, and the supervisor then deciding to finish.
Test your understanding!
Imagine you want to add a DocumentWriter agent to this system. Its job is to take the output from the Researcher or Coder and format it into a clean report before finishing. How would you modify the graph to accommodate this new agent? Describe the changes needed for:
- The nodes.
- The supervisor's logic.
- The graph's edges.
Show answer
Here are the necessary changes:
-
Nodes:
- You would create a new function
document_writer_agent(state: AgentState) -> dict. This function would take thestate, format the content of the previous messages into a report, and return an update to themessageslist. Itsnextvalue would be"supervisor". - You would then add this node to the graph:
workflow.add_node("writer", document_writer_agent).
- You would create a new function
-
Supervisor's Logic:
- The supervisor's prompt would need to be updated to include
"writer"as a possible routing option. - The logic within the supervisor function would need to be enhanced. For example, it might decide: "If the last message came from the
ResearcherorCoder, the next step should bewriter."
- The supervisor's prompt would need to be updated to include
-
Graph Edges:
- The conditional edge from the supervisor would be updated to include the new route:
{"coder": "coder", "researcher": "researcher", "writer": "writer", "FINISH": END}. - A new normal edge would be added to return control from the writer to the supervisor:
workflow.add_edge("writer", "supervisor").
- The conditional edge from the supervisor would be updated to include the new route:
Conclusion
Congratulations! You have successfully implemented a foundational multi-agent pattern. By building a supervisor agent that delegates tasks to specialized workers, you've created a system that is more modular, scalable, and easier to debug than a single monolithic agent.
Key Takeaways:
- The Supervisor Pattern uses a central agent to orchestrate a workflow by routing tasks to specialist agents.
- In LangGraph, this is achieved using a
StateGraph, with agents asnodesand routing logic implemented viaconditional_edges. - The shared state object is critical for communication, holding the conversation history and directing the flow via a
nextfield. - The flow is typically: User -> Supervisor -> Worker -> Supervisor -> ... -> END.
In our next lesson, we will dive deeper into managing shared state and message passing between agents. We'll explore how to handle more complex information exchanges and ensure that agents have exactly the context they need to perform their tasks effectively.