Welcome to your first lesson on building an MCP Server with FastAPI!
Given your background in building conversational bots with Rasa, you're already familiar with the core concepts of tools, state management (slots), and routing logic. Our goal is to apply that thinking to a new context: enabling large language models like Claude to use your APIs safely and efficiently.
This course is designed to be fast-paced, focusing on practical implementation. We'll quickly move from setup to the more advanced topics you're interested in, such as pre-tool and post-tool hooks for validation and state management.
In this first lesson, we'll lay the essential groundwork. We will set up a complete Python project from scratch using uv, a modern and fast package manager. By the end of this session, you'll have a running, albeit basic, FastAPI application ready for us to build upon.
The "Why": What is the Model Context Protocol (MCP)?
Before we write any code, let's clarify the problem MCP solves. When you want an LLM to interact with your internal systems (databases, APIs, etc.), you could build a unique integration for each one. However, this becomes complex and difficult to maintain.
MCP provides a standardized solution. It acts as a unified layer, or a "lingua franca," that allows any compliant AI model to discover and understand the tools your application offers.
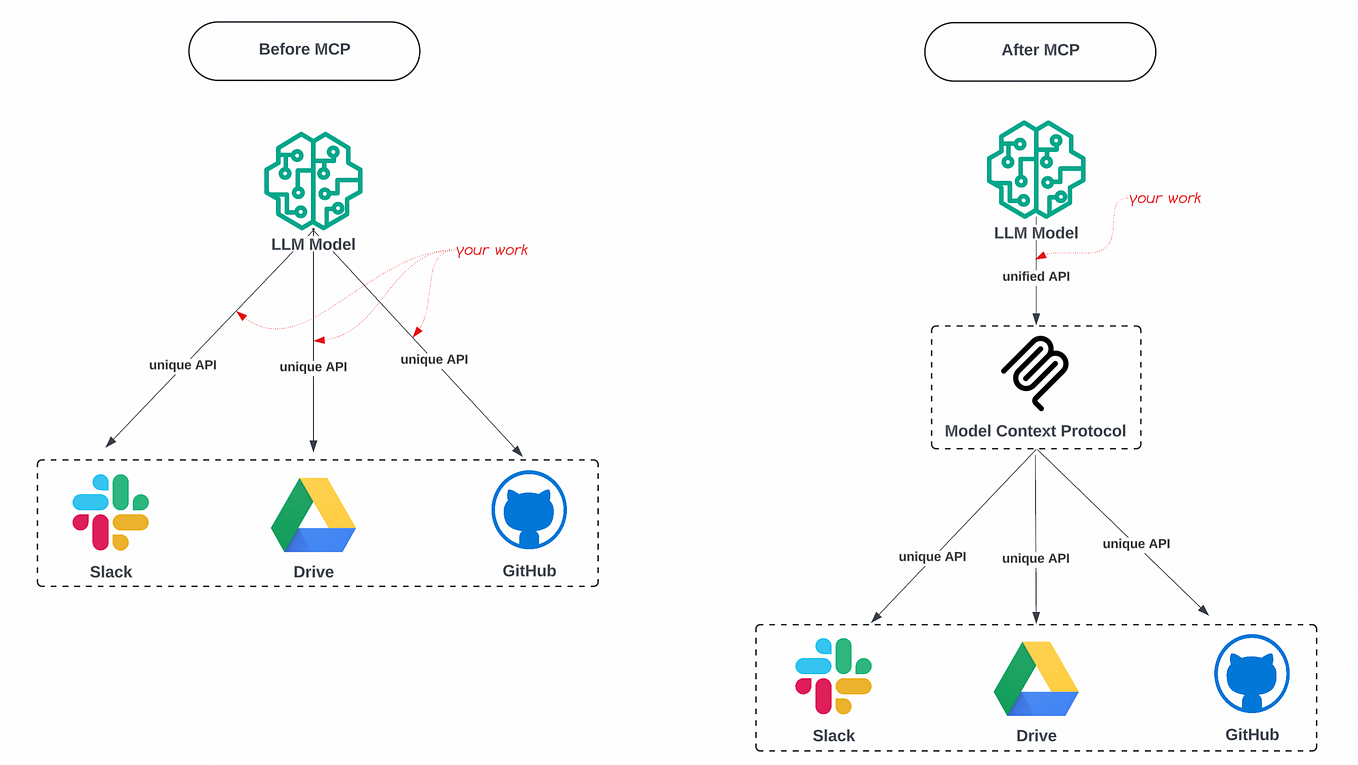
Think of it as an OpenAPI or Swagger specification, but designed specifically for AI consumption. This standardization simplifies development and makes your tools accessible to a wider range of AI agents.
The "How": Using fastapi-mcp
To integrate MCP into our FastAPI application, we'll use a library called fastapi-mcp.
This library is ideal for our goal because it's designed to be mounted directly onto an existing FastAPI app. This means we can reuse all our existing code, logic, and infrastructure, which is far more efficient than building a separate, standalone service.
Now, let's get our hands dirty and set up the project.
Step 1: Set Up Your Project Environment
We'll use uv, a high-performance Python package and project manager from Astral. It simplifies creating virtual environments and managing dependencies.
First, let's ensure uv is installed and then initialize our project. For a detailed guide on uv, you can refer to the article "UV in Python: The Fastest Package & Project Manager".
UV in Python: The Fastest Package & Project Manager
The following guide provides the necessary commands for installing uv on your system. Please read the 'Installing uv' section.
In the article, find the section titled 'Installing uv'. Use the appropriate command for your operating system (macOS/Linux or Windows) to install it. You can verify the installation by running uv --version in your terminal.
Once uv is installed, follow these steps in your terminal to create the project directory and a virtual environment. These commands come from the main tutorial article we'll be following.
How To Build a MCP Server with FastAPI (FastAPI-MCP)
The article 'How To Build a MCP Server with FastAPI (FastAPI-MCP)' will be our primary guide. Let's start by following its instructions for project setup.
Please read 'Step 1: Set Up Your Project'. Execute the commands to create a project directory and initialize a virtual environment using uv.
To summarize the steps from the article:
- Create and enter a new directory for your project:
mkdir my-mcp-server && cd my-mcp-server - Create a virtual environment:
Your terminal prompt should now indicate that you are inside the virtual environment.uv venv
Step 2: Install Project Dependencies
With the environment active, we'll add our core dependencies. Since you're on an accelerated track, we'll install everything needed for the first few lessons at once.
Use uv to add the required packages. The first command adds the runtime dependencies, and the second adds uvicorn as a development-only dependency.
# Add runtime dependencies
uv add fastapi fastapi-mcp python-dotenv


# Add the development server
uv add --dev uvicorn
Here’s a quick breakdown of these packages:
fastapi: The web framework we're building on.fastapi-mcp: The library for adding the MCP layer.python-dotenv: A utility to load environment variables from a.envfile, which is crucial for managing secrets.uvicorn: An ASGI server to run our FastAPI application during development.
Step 3: Create the Core FastAPI Application
Now, let's create the entry point for our application. Create a new file named main.py in your project root.
Since you have experience with FastAPI, the following code will look familiar. It sets up a minimal application with a single root endpoint to confirm the server is running.
# main.py
from fastapi import FastAPI

app = FastAPI(
    title="My Awesome MCP Server",
    description="An API providing tools for an AI assistant.",
)

@app.get("/")
async def root():
    """A simple endpoint to confirm the server is running."""
    return {"message": "Server is running"}
To run this application, use the following command in your terminal:
uv run uvicorn main:app --reload
uv runexecutes a command within the project's virtual environment.uvicorn main:apptells Uvicorn to run theappobject from themain.pyfile.--reloadenables hot-reloading, so the server will automatically restart whenever you save changes to the code.
Open your web browser and navigate to http://127.0.0.1:8000. You should see the JSON response: {"message":"Server is running"}.
Conclusion
Excellent! You have successfully set up the entire foundation for our project. We have:
- Initialized a Python project with a dedicated virtual environment using
uv. - Installed FastAPI and the
fastapi-mcplibrary. - Created and launched a basic, working FastAPI server.
This foundation is the launchpad for the more exciting parts of our journey. In the next lesson, we will build on this by defining our first API endpoint and exposing it as a "tool" through the MCP server. This will be our first concrete step toward giving an AI model a new capability.